background image

Page 10

OPERATION

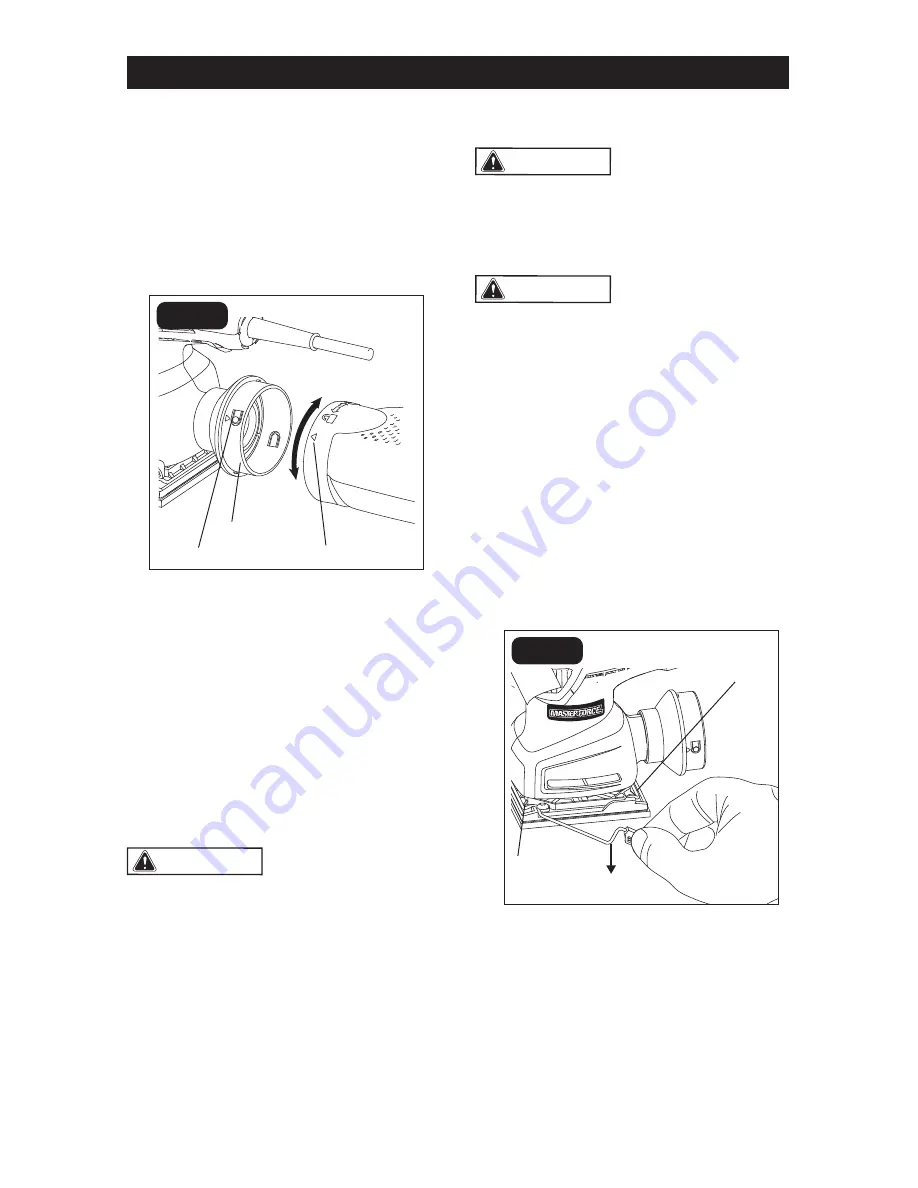
To install:

1.  Disconnect the sander from the power 

source.

2. Align the indicators on the vacuum 

adaptor and the dust box.

3.  Slide the dust box forward and push 

it onto the adaptor. Rotate the box 
clockwise to lock it in place (FIG. 3).

NOTICE: From time to time, clean the 
vacuum adaptor with a dry brush. See the 
maintenance section for instructions for 
cleaning the dust box.

To remove:

1.  Disconnect the sander from the power 

source.

2. Grip the dust box firmly, rotate it 

counterclockwise and pull it out from the 
tool (FIG. 3).

    WARNING:                     

  Collected sanding dust 

from sanding surface coatings such as 
polyurethanes, linseed oil, etc., can self-
ignite in the sander dust box or elsewhere 
and cause fire. To reduce the risk of fire, 
always empty the dust box frequently while 
sanding and never store or leave a sander 
without totally emptying its dust box. Also 
follow the recommendations of the coat-
ings manufacturers.

ATTACHING THE SANDPAPER

    WARNING:                     

 Always inspect the 

sandpaper before attaching. Do not use 
the paper if it is torn or defective. 

1.  Disconnect the sander from the power 

source.

    WARNING:                     

 Failure to unplug the 

sander could result in accidental starting, 
causing possible serious personal injury.

2.  Remove any dust or debris from the 

platen.

3.  The paper clamp levers are located on 

each side of the sander and are locked 
into the slots on the upper surface of the 
platen.


Lift the two levers and disengage them 
from the slots in the platen. This will 
release the tension on the paper clamps 
that hold the paper in position on the 
underside of the platen (FIG. 4).

4.  Insert the front end of the sandpaper 

approximately 1/2 in. under the front 

paper clamp.

5.  Lift up on the lever that controls the front 

paper clamp and lock it back into the slot 
on the platen. This will securely clamp 
the paper to the front of the platen.

6.  Smooth out the sandpaper by pressing 

it tightly against the bottom of the pad 
(front to back).

FIG. 3

lndicator

Adaptor

Indicator

Unlock

Lock

FIG. 4

Front paper 

clamp

Paper clamp 

lever

Back  paper 

clamp

Summary of Contents for 241-0795

Page 1: ...ts technical assistance or repair parts Please Call Toll Free 1 866 917 4374 M F 8 30am 5 00pm Est OPERATOR S MANUAL CAUTION To Reduce The Risk Of Injury User Must Read And Understand Operator s Manua...

Page 2: ...TABLE OF CONTENTS Safety Symbols Page 2 Safety Instructions Page 3 Overview Specifications Page 7 8 Assembly Page 8 Operation Page 9 Maintenance Page 12 Troubleshooting Page 13 Warranty Page 14...

Page 3: ...ent Type or characteristic of current no No load speed Rotational speed at no load lbs Pounds Weight Class II construction Double insulated construction min Per minute Revolutions strokes surface spee...

Page 4: ...to follow all instructions listed below may result in electric shock fire and or serious personal injury SYMBOL MEANING SAFETY ALERT SYMBOL Indicates DANGER WARNING OR CAUTION May be used in conjunct...

Page 5: ...use the cord for carrying pulling or unplugging the power tool Keep the cord away from heat oil sharp edges or moving parts Damaged or entangled cords increase the risk of electric shock 5 When operat...

Page 6: ...may affect the power tool s operation If damaged have the power tool repaired before use Many accidents are caused by poorly maintained power tools 6 Keep cutting tools sharp and clean Properly mainta...

Page 7: ...chemicals known to the state of California to cause cancer birth defects or other re productive harm Some examples of these chemicals are Lead from lead based paints Crystalline silica from bricks an...

Page 8: ...Page 7 OVERVIEW Platen Pad On Off Rocker Switch Vacuum Adaptor Dust collecting Box 1 4 Sandpaper Sheets Paper Punch Paper Clamp Lever Paper Clamp Air Vent...

Page 9: ...ndition leading to possible serious injury WARNING Your tool should never be connected to the power source when you are assembling parts making adjust ments installing or removing sandpapers cleaning...

Page 10: ...stall 1 Disconnect the sander from the power source 2 Align the raised rib of the dust exhaust port with the groove of the vacuum adaptor FIG 2 3 Slide the vacuum adaptor forward and push it onto the...

Page 11: ...rers ATTACHING THE SANDPAPER WARNING Always inspect the sandpaper before attaching Do not use the paper if it is torn or defective 1 Disconnect the sander from the power source WARNING Failure to unpl...

Page 12: ...e that the holes are punched all the way through the paper 3 Clear the holes in the sander s pad NOTICE Punching holes properly is a necessary step for the dust collecting system to operate properly S...

Page 13: ...tion call the toll free helpline at 1 866 917 4374 NOTICE Applying additional pressure only slows the motor rapidly wears sandpaper and greatly reduces sander speed Excessive pressure will overload t...

Page 14: ...ox and the cover to empty 5 Use a soft brush to clean the filter NOTICE The filter cannot be rinsed with water 6 Reattach the lower cover to the box and firmly reinstall the box on the adaptor of sand...

Page 15: ...Merchandise This warranty 1 excludes expendable parts including but not limited to blades brushes belts bits light bulbs and or batteries 2 shall be void if this tool is used for commercial and or re...

Page 16: ...12 2014 2014 Menard Inc Eau Claire WI 54703...

Reviews: