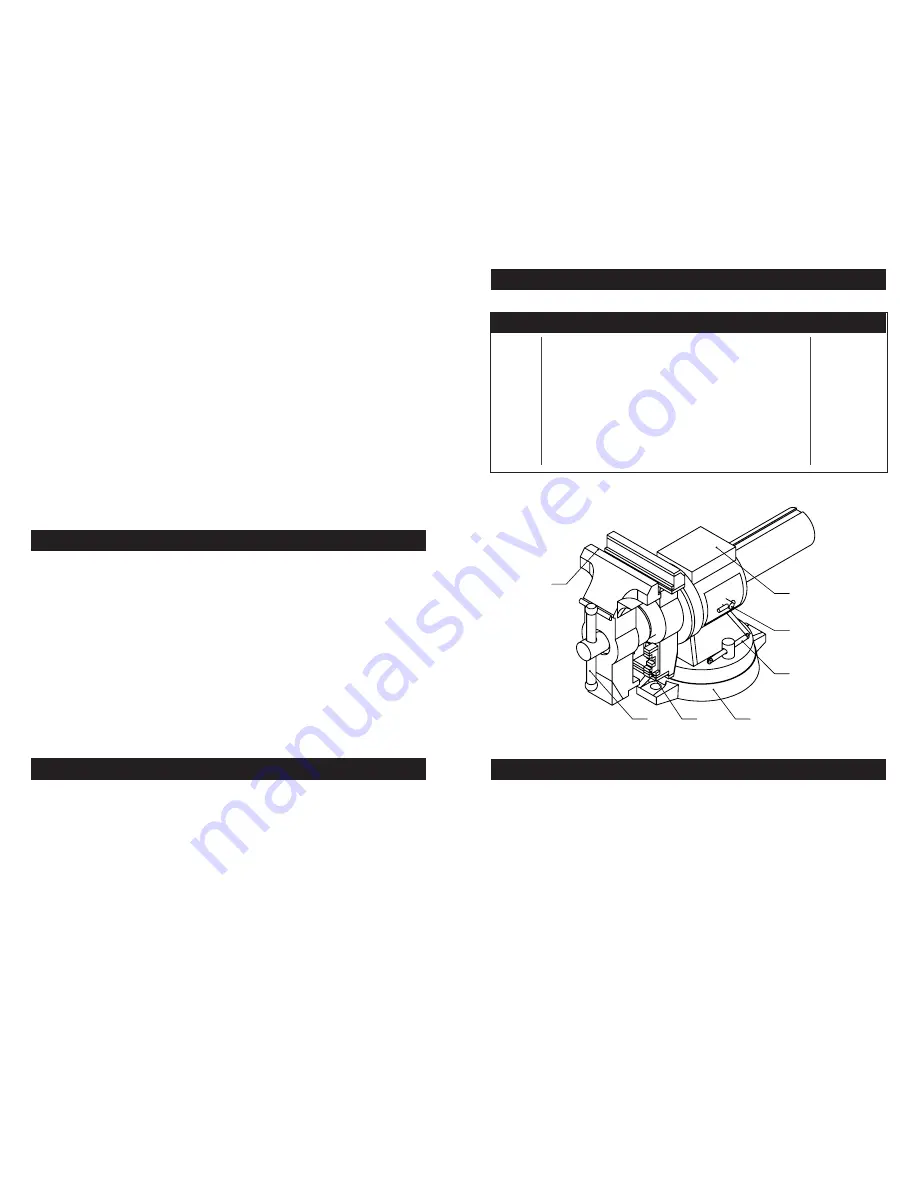
Adjustable Screw
Base Plate
Adjustable base screw
Anvil
Clamp Jaws
Pipe Jaws
Rotational Locking Screw
1 pcs
1 pcs
2 pcs
1 pcs
1 pcs
1 pcs
1 pcs
DESCRIPTION
QTY
PART #
1
2
3
4
5
6
7
1. Adjusting the vise base plate loosen the adjustable base screw, (part / adj base screw)
until loose. Rotate the vise to the desired position and tighten the before mentioned
adjustable base screws.
2. Clamping Turn the adjustable screw (part / adj screw) to the desire clamping force. At no
point should you use an extended pole and or tube to increase the amount of force applied
to the adjustable screw as it will damage the vise
3. Anvil (if your vise includes one) when using the anvil (part / anvil) be sure to exercise caution.
Never hit with a hardened striking tool as it may cause shipping of the tool and or anvil and
or personal injury.
4. Adjusting the head loosen the rotational locking screw (part / rotational locking screw) and
rotate head freely to the desired angle. There are a total of 3 jaws to choose from, (straight
jaws, pipe jaws, and V jaws). After the desired angle and jaws have been chosen tighten the
rotational locking screw to keep the head from moving.
13. Do not overreach. Keep proper footing and balance at all times.
14. Stay alert. Watch what you are doing at all times. Use common sense. Do not operate this
product when you are tired or distracted from the job at hand.
15. Damage could occur to your vise and/or work piece if you overtighten the Handle.
16. Check for damaged parts. Before using this product, carefully check that
It will operate properly and perform its intended function. Check for damaged parts and
any other conditions that may affect its operation. Replace or repair damaged or worn
parts immediately.
17. Replacement parts and accessories. When servicing, use only identical replacement parts.
18. Maintain product with care. Keep this product clean and dry, and all moving parts lightly
lubricated for better performance. Keep the handle dry, clean and free from oil, grease,
and solvents.
19. Use the right product for the right job. Do not attempt to force a small tool or attachment to
do the work of a larger industrial tool. There are certain applications for which this tool was
designed. It will do the job better and more safely at the rate
For which it was intended. Do not modify this tool and do not use this tool for any purpose
other than which it was intended.
Page 3
PARTS LIST
OPERATION
STEPS TO MOUNT A VISE
1. Avoid using solvents when cleaning.
2. Most items are susceptible to damage from various types of commercial solvents.
3. Use clean cloths to remove dirt, dust, oil, grease, etc.
4. Lubricate regularly.
MAINTENANCE
Page 2
1. Place the Vise on the surface you intend to mount it to.
2. With a marker trace the inside of the bolt mounting holes.
3. Remove the vise and pre drill holes for mounting hardware.
4. Place the vise back in place and align bolt pattern of base with pre drilled mounting holes.
5. Place screws (not included) through vise base and into pre drilled mounting surface.
6. Install screws being sure not to over tighten.
1
2
3
4
5
6
7


