www.masterweld.co.uk
6.0 Operation
Switch on the machine using the mains on/off switch, this lights the
front panel.
You can MIG weld in 2 modes Manual and Synergic the manual
mode takes more skill to setup.
Synergic MIG
•
Select the Synergic MIG mode using button
6.1 Operation Selecting the JOB
Press and hold JOB button for 5 seconds (7) until the left display
says JOB rotate the right hand knob until the correct JOB number is
displayed. Refer to the inside of the wire feeder door for lob list.
Note Job list is shorter with Rapid panel and you should select
material and wire size on the front panel using buttons 10 and 11.
Adjusting the Function. Press and hold the F button (3) for 5 seconds
and the left display will show the F number which can be adjusted
by rotating the left knob 4 and the value will be displayed in the right
display and can be adjusted with the right hand knob.
Press the F button (3) briefly to display wire speed, material
thickness or Amperage depending on your preference and then
rotate the left knob (4) until you reach the required value. You are
ready to weld, If you prefer to alter the welding voltage you can trim
it up or down by rotating the right knob (8) and the V+/- light will
illuminate.
Switch off the synergic light or with Rapid panel toggle off the using
F function.
Manually adjust the Wire speed and welding voltage using the rotary
knobs 4 and 8. Note in manual mode you must adjust the voltage
to increase or reduce penetration and the wire speed to balance
the heat input. (Synergic mode is preferred for operation in all
operations)
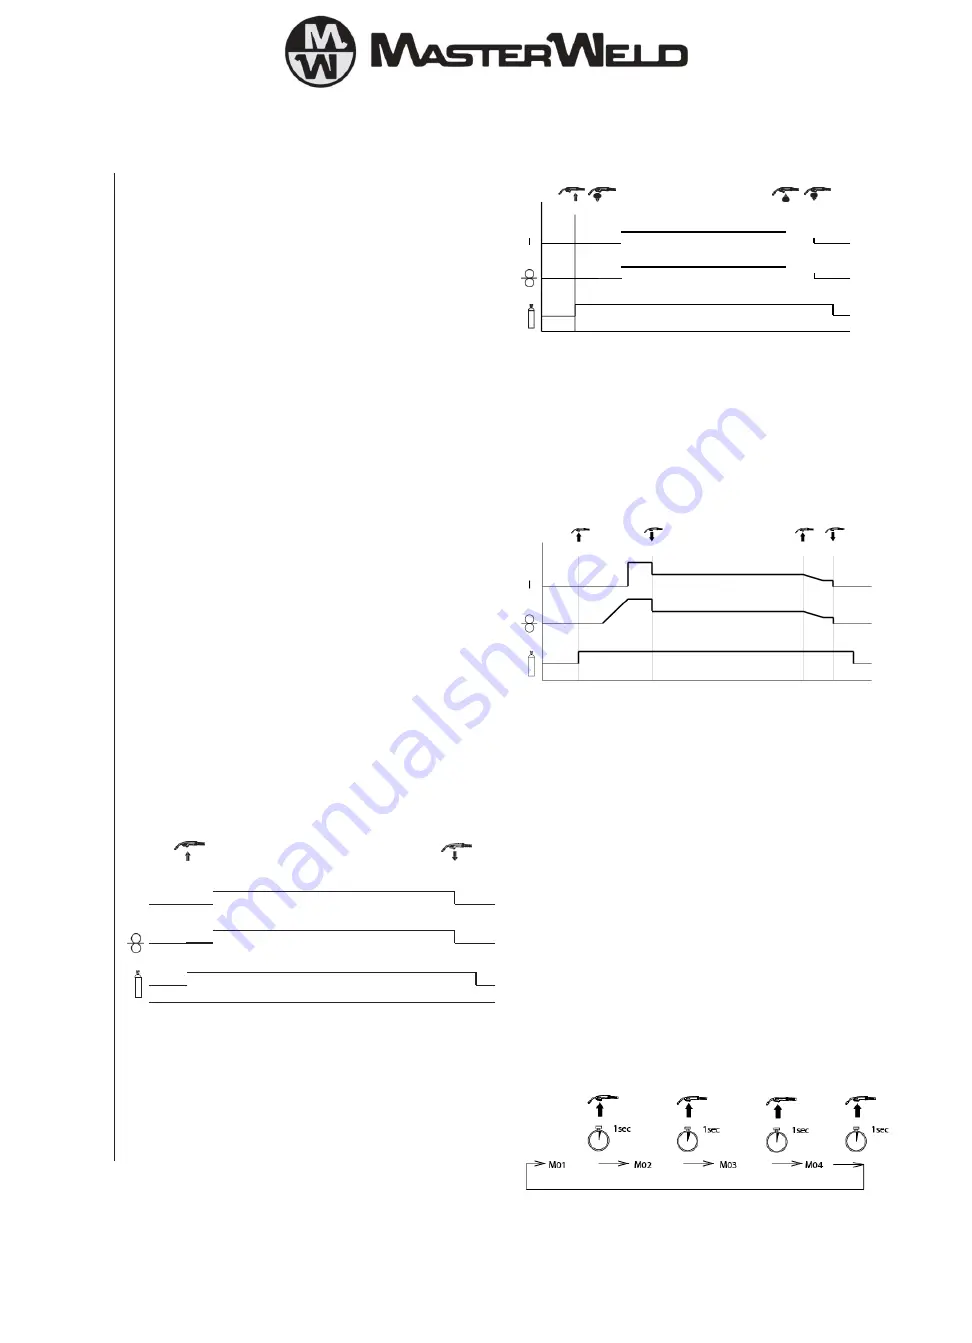
6.2 Operation (2T)
Select 2T operation on the front panel.
•
Depress the trigger and hold on.
•
Pre-gas will start (adjust with F30)
•
Then arc will start
•
At the end of the weld release the trigger and the arc stops.
•
The wire stick out can be adjusted by changing burn back time
(F41)
•
The post gas flow can be adjusted as required (F43)
12
6.3 Operation (4T)
Select 4T operation on the front panel
•
Depress the trigger and hold
•
Pre-gas will start and stay on
•
Release the trigger the arc will start and continue
•
At the end of the weld depress and hold the trigger, the final
current will start (F39) and will stay on until the trigger is
released which starts post gas (F43)
6.4 Operation (S4T)
Select 4T operation on the front panel
•
Depress the trigger and hold
•
Pre-gas will start and stay on (F30)
•
Hot start current will start (F32)
•
Release the trigger the arc will change to the normal power level
and continues
•
At the end of the weld depress and hold the trigger, the final
current will start (F39) and will stay on until the trigger is released
which starts post gas (F43)
6.5 Operation Smart Trigger
Smart trigger allows the user to change memory programs quickly
from the torch without having to return to the machine. Store the
required programs starting at memory location 01, 02 etc.
Using F47 set the number of memories you wish to use for smart
trigger. If you wish to use 4 different settings in memory 01, 02, 03
and 04 then set F47 value to 04 and smart trigger will only cycle
through memory 01 to 04.
Ensure the front panel of the machine is set to 4T or S4T operation.
Set the value of F46 to 01 to switch on smart trigger.
Now if you give the trigger a short press (less than 1 second) it will
select the next memory program within the limit set by F47. Another
short press moves to the next memory location etc.
I


