6 - ENG
200-2835
Copyright © 2011 MAT Industries, LLC
ASSEMBLY INSTRUCTIONS
• SAVE ALL INSTRUCTIONS
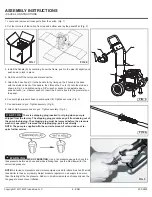
1. Locate and remove all loose parts from the carton. (Fig. 1)
2. Cut four corners of the carton from top and bottom and lay the panels fl at. (Fig. 2)
3. Install the handle (A) by centering it over the frame, push in the pins (B) slightly and
push down to lock in place.
4. Roll the unit off the carton and discard carton.
5. Attach the hose hook (C) to the handle (A) by lining up the 2 holes in the base
with the studs on back of the handle, then thread the 2 nuts (D) onto the studs as
shown in Fig. 3 and tighten using a 3/8” wrench or socket, or adjustable open-
ended wrench (i.e. crescent wrench). Insert the 5 nozzle tips into the grommets on
the
panel.
6. Connect high-pressure hose to pump outlet (E). Tighten securely. (Fig. 3)
7. Connect wand to gun. Tighten securely. (Fig. 4)
8. Attach high-pressure hose to gun. Tighten securely. (Fig. 5)
C A U T I O N
There is a shipping plug inserted in oil plug when pump is
shipped from the factory. The shipping plug prevents any oil from leaking out of
the pump in shipping. The shipping plug must be removed before the pressure
washer is operated. To remove the shipping plug, pull it out directly.
NOTE: The pump is supplied with the correct amount of oil and does not re-
quire further service.
W A R N I N G
RISK OF BURSTING.
Use a tire pressure gauge to check the
tires pressure before each use and while infl ating tires; see the tire sidewall for the
correct tire pressure.
NOTE:
Air tanks, compressors and similar equipment used to infl ate tires can fi ll small
tires similar to these very rapidly. Adjust pressure regulator on air supply to no more
than the rating of the tire pressure. Add air in small increments and frequently use the
tire gauge to prevent over infl ation.
FIG. 5
FIG. 2
FIG. 1
B
A
C
D
E
FIG. 3
FIG. 4


