a
b
c
d
d
100mm
e
100mm
d
100mm
STAGE 10
SILICON
SILICON
INSIDE
VIEW
DOOR
GLASS
SILICON
SILICON
SILICON
SILICON
SILICON
SILICON
SILICON
SILICON
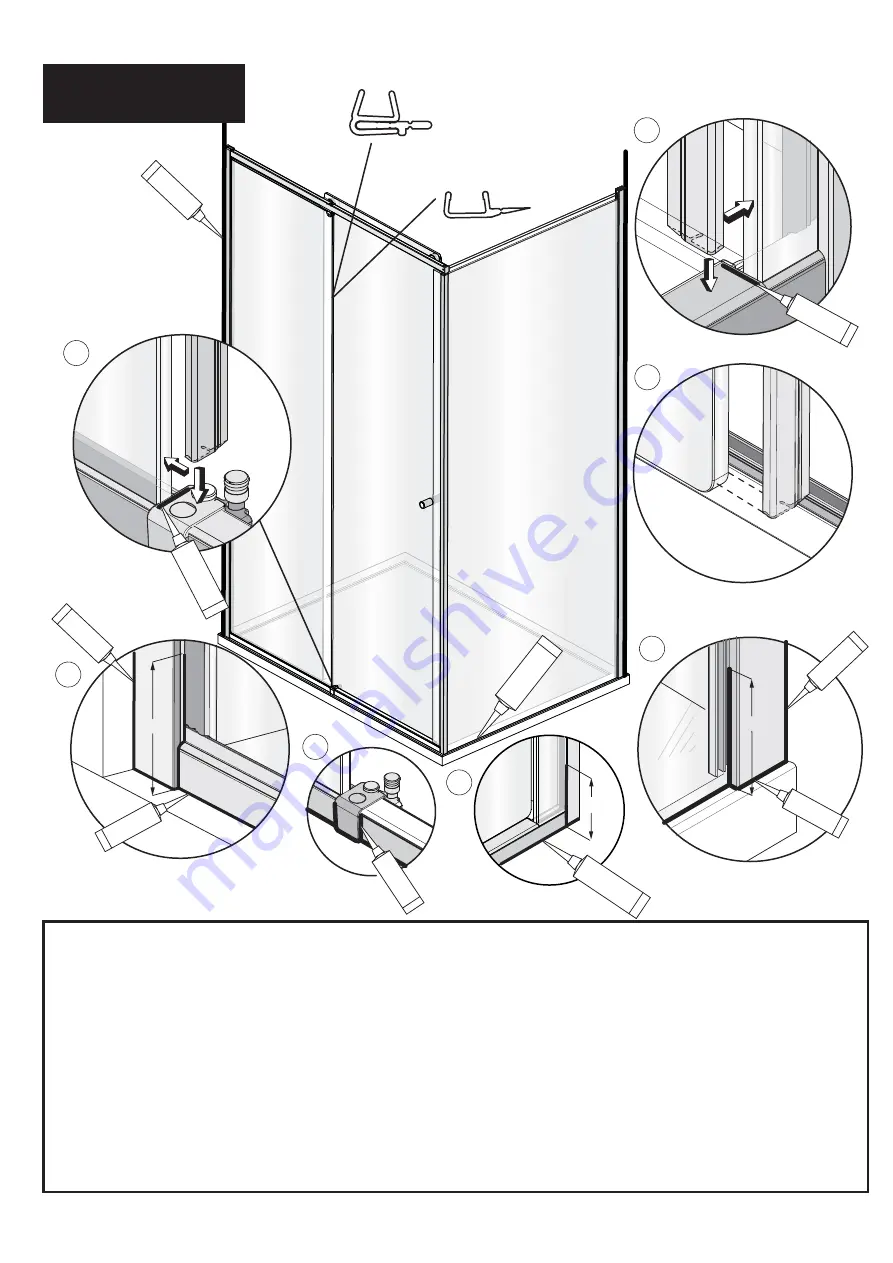
This stage is describing fitting of the Seals and Silicon
a.
Apply a bead of silicon along the top of the door guide. Fit the fixed panel vertical seal (shorter of the 3 seals) to the edge of the
fixed panel, ensuring it is pressed firmly against the face of the door guide. For 1000 model use the 2 part seal.
b.
Apply a bead of silicon along the top of the threshold cover where it meets the closure panel. Fit the closure panel vertical seal to
the edge of the closure panel, ensuring the seal sits firmly down onto the face of the threshold cover .
c.
Fit the door vertical seal to the back edge of the door glass, the bottom of the seal should be lined up with the top of the radius at the
corner of the glass.
d.
Apply a thin bead of silicon along the bottom edge of both the wall mounts and all the way up the outside of both the wall mount
extrusions between the wall mounts and the tiles. Apply a thin bead all the way along the threshold between the extrusion and the
finished floor surface/tray around the corner extrusion and along the bottom of the side panel where it meets the floor/tray. Continue
around the joint where the threshold joins the wall mounts and also 100mm up on the outside where the wall mounts and glass meet
and where the corner extrusion and glass meet. Apply a bead of silicon on the outside around the joints between the door guide and
threshold extrusion (e).
Masking tape can be used to achieve a tidy edge to the sealant. Remove the masking tape immediately and allow the silicon to cure for
24 hours before using the shower.
1100 / 1200 / 1400
1500 / 1600 / 1700
MODELS
1000
MODEL ONLY


