background image

11

Uses

The hose reels are available in 4 versions for oil, grease, water, air respectively.
When configuration has been chosen it can only be used for that particular liquid.

Description

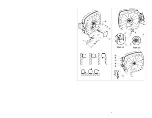
The hose reel consists of a rotary drum controlled by a spring which can rewind the hose after it has been taken
out.
The seal is secured by a special rotating joint.
The bracket 

R

  locks inlet pipe avoiding twisting.

A hose stop fitted on the outlet pipe allows the adjustment of the hose ( it is advisable not to leave more than 4
meters of hose out when the hose reel is not in use). 
The hose reels can be installed on the ceiling ( maximum height 4 meters), on the wall or on the ground if
required.

General recommendations


Please read the following handbook before use.


Use the hose reel only for the purpose of its original design


It is not suitable for delivery of corrosive or inflammable liquids.


Do not modify any component of the hose reel in order not to compromise the safety of users and the
validity of the guarantee.


Any repairs must be carried out with original spare parts only.

For safety reasons users must only carry out routine maintenance

 (

 See maintenance  section

), 

whereas

for repair or  replacement of components it is necessary to contact


manufacturer


Installation must be carried out by authorised personnel.


In order to avoid damage to people and objects close to the hose reel it is necessary to hold the delivery gun
until the hose has been completely rewound by the reel. 

For any application which is not mentioned in the handbook please contact our technical department

which will be available to give further information.

Hose assembly 


Select hose according to type of liquid, dimension and maximum pressure indicated on the label.


Position hose reel on a suitable worktop.


WARNING: Make sure that spring is not under tension

.


Remove the plastic cover 

C

.


Insert hose through outlet rollers, slip it through the hole on the drum and screw the end pipe fitting to the
fitting linked to the shaft.


Put plastic cover 

 C

 back on .


Insert appropriate key (

socket head screw 10

) in the support 

S

 and rewind counterclockwise the hose on the

drum.


Take the two shell stops

 L

, select the rubber reduction gasket 

M

 ( 

marked with 1-2-3 numbers

) which fits

the hose diameter and secure everything to the hose with screws 

H

 and nuts 

I

 leaving out the necessary

hose to apply delivery gun.


When the hose has been rewound it is necessary to adjust the spring tension as follows:
          

WARNING : This operation must be carried out by qualified staff

.  

1.


Insert suitable key ( ram ½ ”) in the square hole of the support

 S

.

2.


Unscrew screws 

T

 which fasten the support.

3.


Hold key firmly and rotate the support clockwise for 3-5 turns.

4.


Hold key firmly and screw screws 

T

 back on the support.


Install the hose reel ( 

see INSTALLATION section

 )

E

Summary of Contents for 35 543 54

Page 1: ...LIO GRASSO ACQUA ARIA HOSE REELS OIL GREASE WATER AIR ENROULEURS CARROSSES HUILE GRAISSE EAU AIR Bedienungsanleitung Manuale d istruzione Instructions manual Notice d utilisation 18835 04 04 MATO Masc...

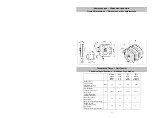
Page 2: ...2 Bauteil Parti principali Main Components Principaux composants...

Page 3: ...4...

Page 4: ...ten F r Auskunft ber Einsatzm glichkeiten anders als in dieser Bedienungsanleitung beschrieben wenden Sie sich bitte an unsere technische Abteilung wo wir Ihnen gerne mit weiteren Informationen helfen...

Page 5: ...Fest eingebauter Schlauchauflaufroller Den Halter N an eine Wand oder Decke befestigen Den Halter O an den Auflaufroller befestigen Den Schlauchauflaufroller in den Halter N einklinken und den Satz m...

Page 6: ...lzufuhr regulierenden H hne abstellen Die Springfeder wie folgt entspannen ACHTUNG Dieser Vorgang darf nur vom sachverst ndigen Fachpersonal durchgef hrt werden Einen passenden Schraubenschl ssel 1 2...

Page 7: ...vitare danni alle persone o alle cose poste nelle vicinanze dell avvolgitubo necessario tenere la pistola erogatrice fino a che il tubo non sia stato riavvolto sull avvolgitubo Per applicazioni partic...

Page 8: ...N e bloccare il tutto con le rondelle B e dadi A Bloccare le staffe O e N con dei bulloni e i dadi auto bloccanti come nel T e U part A Installare un rubinetto a monte del flessibile Collegarsi alla...

Page 9: ...are una chiave adatta cricchetto da nel foro quadrato del sopporto S Tenere saldamente la chiave e smontare le viti T che bloccano il sopporto Tenere saldamente la chiave e ruotare il sopporto in sens...

Page 10: ...personnel In order to avoid damage to people and objects close to the hose reel it is necessary to hold the delivery gun until the hose has been completely rewound by the reel For any application whic...

Page 11: ...ackets O and N with locking bolts and nuts as in T and U part A Install a tap at the top end of the hose Connect with mains with a flexible pipe 60 cm long Insert the hose in the appropriate bracket R...

Page 12: ...le of the support S Hold key firmly and unscrew screws T which fasten the support Hold key firmly and rotate the support counterclockwise for 3 5 turns Screw screws T back on the support Instruction t...

Page 13: ...e se renseigner aupr s de notre service technique Montage du flexible enrouleur carross nu Choisir le flexible en fonction du type de liquide de la dimension et de la pression maximum indiqu e sur la...

Page 14: ...ets Accrocher l enrouleur au support N et bloquer le tout avec les rondelles B et les crous A Bloquer les supports N et O avec les boulons et les crous autobloquants Voir T et U Part A Dans le cadre d...

Page 15: ...le Contr ler l efficacit de la but e du flexible Contr ler les fixations de l enrouleur Pr ter une attention particuli re aux boulons en v rifiant le serrage Maintenance extraordinaire ATTENTION Avant...

Page 16: ...ria Air Air l Olio Oil Huile Fett Grasso Grease Graisse H chst Druck Pressione Max Maximum pressure Pression Max bar 18 18 80 600 Schlauchl nge Lunghezza tubo da Hose length Longueur flexible m 10 15...

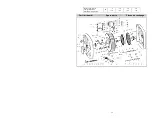
Page 17: ...18 H chst Temperatur Temperatura max Maximum temperature C 0 50 10 50 10 50 10 50 Parti di ricambi Spare parts Pi ces de rechange...

Reviews: