2. Check that your mains voltage is the same as
that marked on the rating plate of the battery
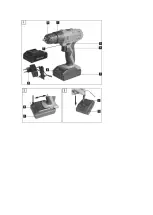
charger. Plug the mains plug of the charger (6)
into the mains socket outlet.
2. Zkontrolujte, zda se hodnota napětí v
síti shoduje
s
hodnotou napětí uvedené na informačním štítku
baterie. Zapojte zástrčku (6) do zásuvky.
3. Push the DC-Connector into the battery pack. The
flashing red LED will come on to indicate that the battery
pack is being charged. When the charging process is
finished, the red LED will extinguish and green LED will be
permanently lit. The time it takes to fully recharge
an empty battery is approximately 3-5 hours.
3. Strčte DC –
Konektor do baterie. Červeně rozsvícená
LED dioda značí napájení baterie. Po dokončení nabíjení
se červená LED dioda změní na zelenou, což značí plné
dobití baterie. Přibližná doba nabíjení prázdné baterie se
odhaduje mezi 3
–
5 hodinami.
4. The temperature of the battery pack may rise slightly during
the charging operation. This is normal. If the green LED
extinguishes during charging, the temperature is either above or
below the perfect charging temperature. In this case, pull the
plug of the charger and charge the battery in an environment in
which the temperature is either warmer or colder.
4. Při nabíjení se baterie zahřívá, což je běžné. Pokud se
v
procesu nabíjení zelená dioda zhasne, poukazuje na
nesprávnou teplotu prostředí, která může být příliš
vysoká či nízká. V
tomto případě adaptér odpojte a
přeneste do prostředí s
vhodnou okolní teplotou.
If the battery pack fails to become charged, please check
•
whether there is voltage at the socket-outlet
•
whether there is proper contact at the charging
contacts on the charger.
Pokud se baterie nenabije, zkontrolujte
• jestli adaptérem
putuje napětí
• jestli je funkční kontakt mezi adaptérem, baterií a
zásuvkou.
If the battery still fails to become charged, please
return
•
the charger
•
the battery pack
to our Customer Service Department.
Pokud se stále baterie nenabíjí, vraťte
• nabíječku
•baterii
Našemu Zákaznickému oddělení.
To ensure that the battery pack provides long
service you should take care to recharge it promptly.
K zajištění dlouhé životnosti baterie je nutné se řádně
starat o nabíjecí adaptér.
You must recharge the battery pack when you notice that the
power of the cordless screwdriver drops.
Vždy nabíjejte baterii, kdy se výkon vrtačky při práci
sníží.
Never fully discharge the battery pack. This will
cause the battery pack to develop a defect.
Nikdy kompletně nevybíjejte baterii. Tímto předejdete
k
snížení její životnosti.
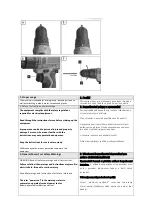
8.2 Torque setting (Fig. 4 / Item 1)
8.2 Nastavení kroutícího momentu
(Obr 4 / položka 1)
The cordless screwdriver is fitted with a
mechanical torque selector.
The torque for a specific size of screw is selected
with the set-collar (1). The correct torque
depends on several factors:
· on the type and hardness of mater
ial in question
· on the type and length screws used
· on the requirements needing to be met by the screwed
joint.
The clutch disengages with a grating sound to
indicate when the set torque is reached.
Important! The tool must be at a standstill when
you set the torque with the setting ring.
Akumulační vrtačka je doplněna nastavením kroutícího
momentu.
Nastavení kroutícího momentu
pro specifické vrtáky a
nástavce je možné přizpůsobit kroužkem
(1). Správná
rychlost závisí:
· na typu a tvrdosti materiálu
· na typu a délce vrtáku či nástavce
· na typu nástavce pro šroubování vrtáků
Zaseknutí spojky a klapací zvuk signalizují dovršení
kroutícího momentu.
Důležité! Zařízení musí být při nastavování kroutícího
momentu v
klidové pozici.
8.3 Drilling (Fig. 5 / Item 1)
8.3 Vrtání (Obr. 5 / položka 1)
For drilling purposes, move the set-collar to the
last step „Drill“. In this setting the slip clutch is
inactive.
The maximum torque is available in drilling
mode.
Pro vrtání nastavte kroužek na poslední pozici „Vrtání“.
V
tomto momentu je spojka neaktivní.
V této funkci je kroutící moment na maximum.
8.4 Forward/Reverse switch (Fig. 6 / Item 3)
8.4 Přední / zpětný spínač (Obr. 6 / položka 3)
With the slide switch above the On/Off switch you
can select the direction of rotation of the batterypowered
drill/screwdriver and secure it against being switched on
accidentally. You can choose between clockwise and
anticlockwise rotation. To avoid causing damage to the gearing it
is advisable to change the direction of rotation only when the
tool is at a standstill. The On/ Off switch is blocked when the
slide switch is in centre position.
Spínač na straně vrtačky umístěn nad tlačítkem On/Off
může změnit směr vrtání/šroubování
a jeho pozice
uprost
řed zamezuje nechtěnému spuštění vrtačky.
Můžete zvolit mezi směry po a proti směru hodinových
ručiček. K
zamečení poničení vrtací hlavice je
doporučeno směry přenastavovat pouze v
klidové pozici
nabíječky.

