114
9.21 CF CARD REPLACEMENT
CHAPTER 9: PART REPLACEMENT GUIDE
NOTE:
If the CF card has been used in a different 7xi console, it cannot be reused in another console. To reuse a CF card, it needs to
go through a special process by the Matrix Service Team.
1) Turn on the power to the
Elliptical Trainer
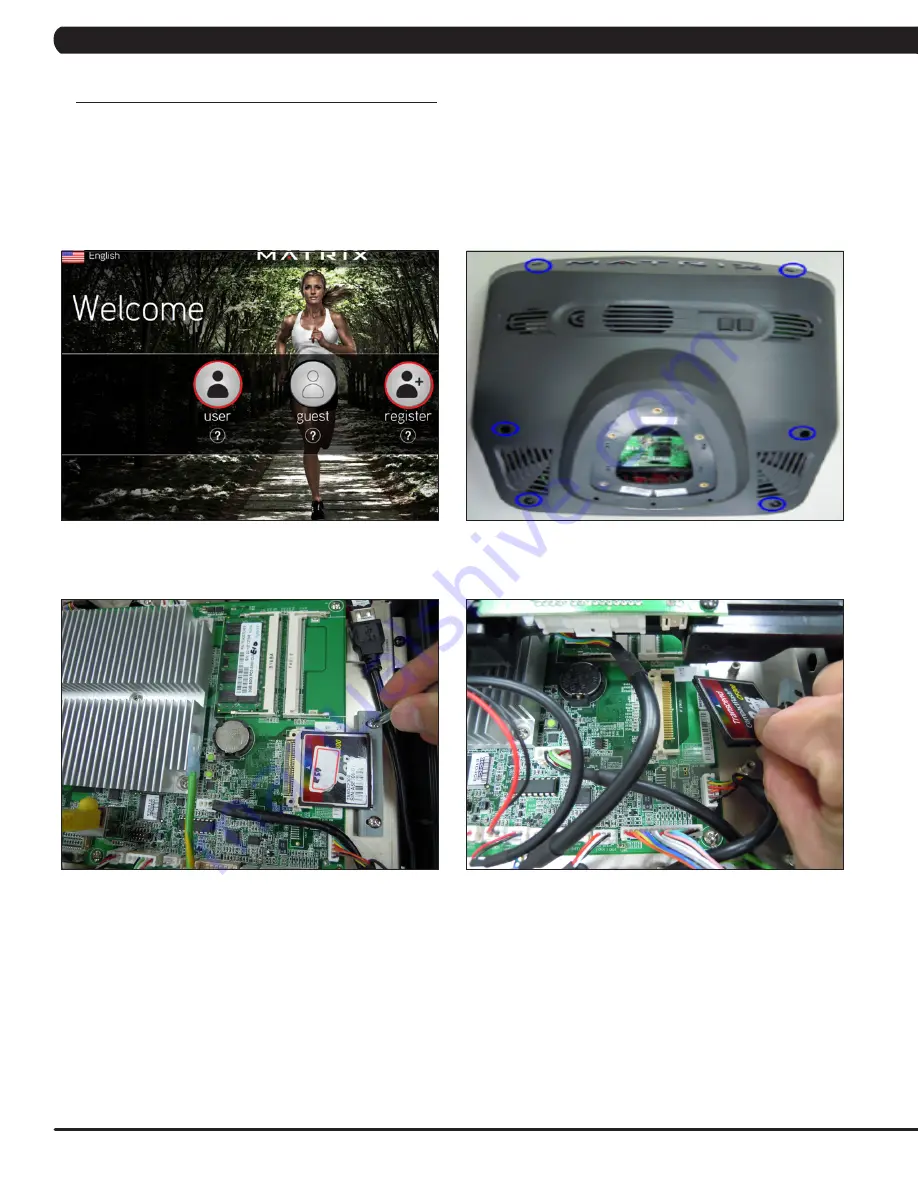
, wait until the welcome display picture has been come up (Figure A).
2) Enter Manager Mode by pressing ENTER, 1, 0, 0, 1, ENTER on the entertainment keypad.
3) Record the Accumulated Mileage, Accumulated Time, and Serial Number.
4) Press the HOME key to return to the welcome display picture.
5) Turn off power and disconnect the cord from the machine.
6) Remove the console from frame as outlined in Section 9.10 and remove the back cover of the console (Figure B).
7) The console shell will now separate. Remove the two screws holding the iron plate to the console frame (Figure C).
8) Carefully remove the CF card from the console frame (Figure D).
9)
Reverse Steps 7-8 to install a new CF card.
10)
Turn on the power to the
Suspension elliptical Trainer
. Wait about 8 minutes until the 7xi Setup Wizard display picture has come up. Select
the correct model on the model setup. Touch the Left / Right arrow to switch the setting. Continue with the language setting, date / time setting,
asset management setting and serial number setting. If the display shows 04A0, disable all errors by pressing ENTER, 3, 0, 0, 8, ENTER on
the
entertainment keypad. Reboot the console by pressing ENTER, 7, 3, 2, 6, 6, 8 ENTER on the entertainment keypad. Wait about 3 minutes
until
the welcome display picture has come up. If the display shows 04A0, turn off the machine and wait 30 seconds, then turn the machine
back on.
NOTE: Don’t power off the machine while the software is being installed.
11)
Enter Service Mode by pressing ENTER, 3, 0, 0, 1, ENTER on the entertainment keypad and press the general key on the screen. Check
if
the software versions are correct. Enter Service Mode by pressing ENTER, 3, 0, 0, 2, ENTER on the entertainment keypad and select the
correct model if necessary.
12)
Perform a software upgrade as outlined in Section 11.
13)
Enter Service Mode by pressing ENTER, 3, 0, 0, 1, ENTER on the lower keypad. Check the general settings, weather setting, applications
setting and virtual active setting. Performing the TV programming as outlined in Section 10.5.
14)
Test the
Suspension elliptical Trainer
for function as outlined in Section 9.23.
FIGURE B
FIGURE A
FIGURE D
FIGURE C
Summary of Contents for E7XI-01
Page 1: ...E 7 X I 0 1 S U S P E N S I O N E L L I P T I C A L S E R V I C E M A N U A L ...
Page 4: ...1 1 1 SERIAL NUMBER LOCATION CHAPTER 1 SERIAL NUMBER LOCATION SERIAL NUMBER LOCATION ...
Page 60: ...58 8 1 ELECTRICAL DIAGRAMS CHAPTER 8 TROUBLESHOOTING ...
Page 61: ...59 8 1 ELECTRICAL DIAGRAMS CONTINUED CHAPTER 8 TROUBLESHOOTING ...
Page 65: ...63 CHAPTER 8 TROUBLESHOOTING 8 3 LCB WIRING CONNECTIONS ...
Page 66: ...64 8 4 UCB WIRING CONNECTIONS CHAPTER 8 TROUBLESHOOTING ...
Page 148: ...167 NOTES ...


