background image

Undercounter fridge

Manual for installation, 
use and maintenance

MFU201

parts


+


1 year labour

year


guarantee

www.matrixappliances.co.uk

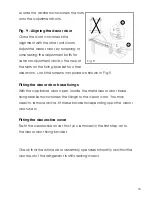
Summary of Contents for MFU201

Page 1: ...Undercounter fridge Manual for installation use and maintenance MFU201 parts 1 year labour year guarantee www matrixappliances co uk...

Page 2: ...nstructions on how to use the appliance by someone who is responsible for their safety Under no circumstances should any external covers be removed for servicing or maintenance except by suitably qual...

Page 3: ...is appliance can be recycle It must be taken to a special local authority differentiated waste collection centre or to a dealer providing this service Before disposing of an old appliance remove the d...

Page 4: ...er accidents do not place a microwave oven on top of the refrigerator or use any electric appliance inside the refrigerator Do not allow children to play with or near the appliance The internal surfac...

Page 5: ...idge to settle for 24 hours before adusting the temperature to the preferred setting Please note The appliance will work continuously until it comes down to the correct temperature If the appliance is...

Page 6: ...extra water is wiped away before putting into the fridge Wrap or cover food before putting into the fridge This will help prevent the loss of moisture keep food fresh and avoid unpleasant odours Sort...

Page 7: ...od in jars and bottles 3 Drinks e g milk 4 Cooked food 5 Yoghurts and cheese 6 Fresh meat and fish 7 Fruit and vegetables The fridge shelves can be moved according to the storage requirements within t...

Page 8: ...ng the Off setting and 6 being the coldest After changing the temperature setting the time taken to achieve the new temperature will depend on how big the change is from the previous setting Switching...

Page 9: ...ution of washing up liquid and water Do not put them in the dishwasher The water drain hole at the back of the fridge compartment and the evaporating tray should be cleaned periodically to prevent the...

Page 10: ...t the back of the fridge It is important to keep the channel clear at all times using the cleaning tool supplied The defrosted water is collected in the evaporating tray at the back of the appliance a...

Page 11: ...in to see if the socket is faulty If the appliance is working but not very well check the following The appliance is not overloaded The thermostat is set to an appropriate temperature The doors are c...

Page 12: ...you notice any and are unable to resolve the issue yourself contact CDA Customer Care so that the seal can be replaced If ice has formed on the back wall of the fridge It is normal for some ice dropl...

Page 13: ...he height adjustable feet at the front of the appliance The ventilation system at the bottom of the appliance must not be blocked Fig 4 shows the installation requirements for your appliance All measu...

Page 14: ...top of next unit door Unscrew and remove the nuts and washers from the top of the appliance door to remove the bracket Fig 7 Fitting the decor door bracket Subtract C from B and put the fixing bracket...

Page 15: ...rews into place as shown in Fig 9 Fitting the decor door base fixings With the appliance door open locate the metal decor door base fixing brackets and screw the fixings to the decor door You may need...

Page 16: ...screws that hold the hinges to the fridge cabinet and remove the door 4 Remove the screws that secure the hinge to the door 5 Place the door somewhere safe where it will not cause or receive damage 6...

Page 17: ...dryer to expand the seal and fill the gap between the door and the body of the appliance Take care not to use the hair dryer too close to the appliance which could damage the seal A distance of appro...

Page 18: ...r 3 Replace fuse cover Important Do not use the appliance without the fuse cover in position How to connect an alternative plug If the fitted plug is not suitable for your socket outlet then it should...

Page 19: ...or coloured BLACK The wire which is coloured BROWN must be connected to the terminal which is marked with the letter L or coloured RED If in doubt regarding the electrical connection of this applianc...

Page 20: ...necessary to remove one or more shelves Place said shelves in a place where they will not cause or receive damage Take care not to lean any weight on the salad crisper covers as this may damage them O...

Page 21: ...21 NOTES...

Page 22: ...22 NOTES...

Page 23: ...the appliance M 31 5 kg A Annual energy consumption AEc 124 kWh year The energy consumption is based on standard test results for 24 hours Actual en ergy consumption will depend on how the appliance i...

Page 24: ...or our Customer Care Department or for Service please contact us on Serviced by The CDA Group Ltd Harby Road Langar Nottinghamshire NG13 9HY Tel 01949 862012 Fax 01949 862003 Email customer care cda e...

Reviews: