background image

11

5.1 USiNg MANAgeR MoDe

The Manager's Custom Mode allows the club owner to customize the bike for the club.  

1)  To enter Manager Mode, press and hold down the UP and DOWN LEVEL keys.  Continue to hold down these two keys until the display 

reads Manager Mode and hit ENTER (Figure A).  

2)  To scroll through the list  of options in Manager Mode, use the UP and DOWN LEVEL keys.  Each of the custom settings will show on the 

display.  

3)  To select a custom setting, press the ENTER key when the desired setting is shown.  

4)  To change the value of the setting, use the UP and DOWN LEVEL keys.


5)  To confirm and save the value of the setting, press the ENTER key.  

6)  To exit the setting without saving, press the BACK key.  

7)  Press and hold the STOP key for 3-5 seconds to return to normal operation.  

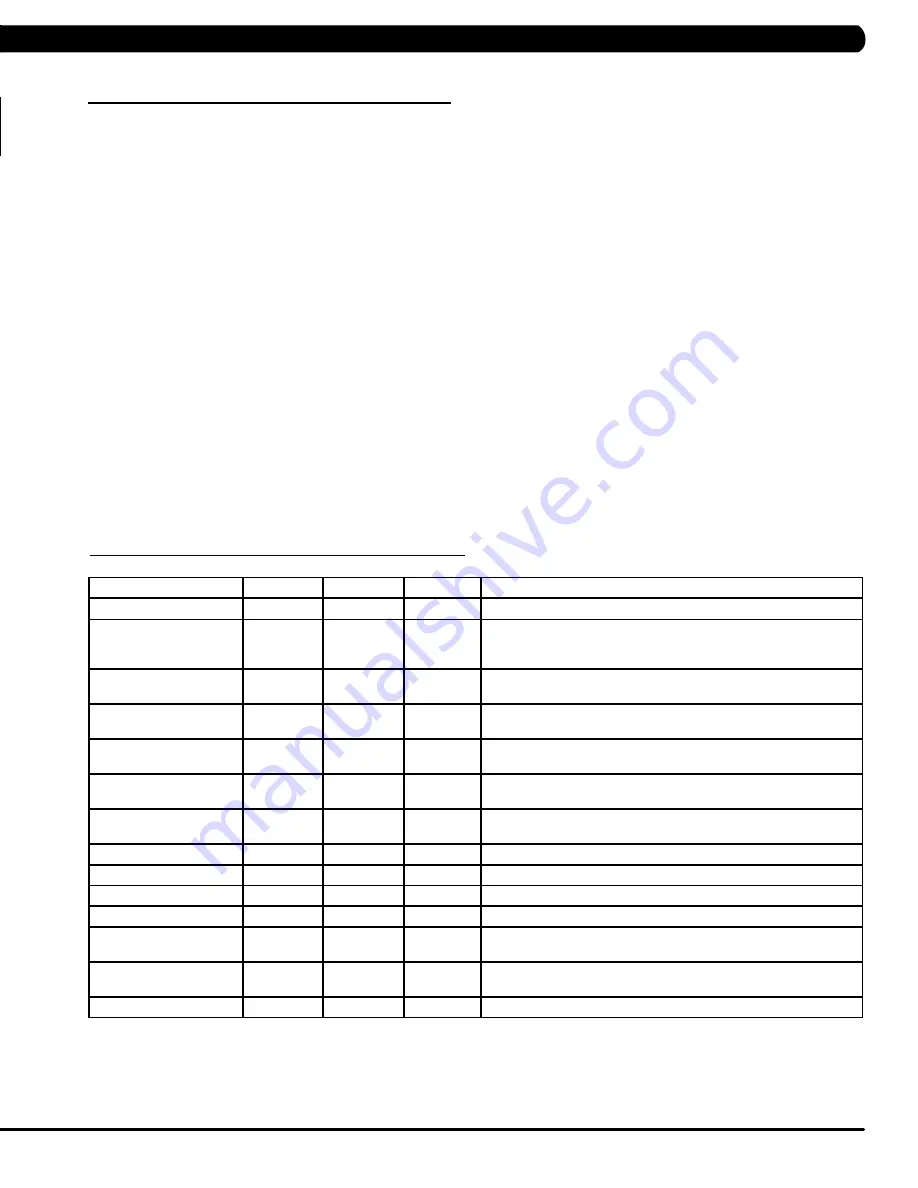
5.2  MANAgeR MoDe oVeRVieW

CUSTOM SETTING

DEFAULT

MINIMUM

MAXIMUM

DESCRIPTION

Maximum Time

60 min

5 min 

95 min

Sets the total run time of any program.  

Default Time

30 min

5 min

Maximum 

Time 

Setting

Workout time when GO is pressed or when no time is selected 

during program set up.  

Default Level

1

1

30

Starting resistance when GO is pressed or when no resistance is 

selected during program set up.  

Default Age

30

10

100

Starting age when GO is pressed or when no age is selected during 

program set up.  

Default User Weight

150 lbs / 

75 kg

80 lbs / 36 

kg

400 lbs / 

181 kg

Weight used for program calorie expenditure calculations.  

Accumulated Distance

N/A

0

99,999 

Miles

Total distance for all programs.  

Accumulated Time

N/A

0

999,999 

hours

Total time for all programs displayed in hours.  

Software Version

N/A

N/A

N/A

Current version of console software.  

Timer Mode

Up

Up

Down

Determines whether the timer counts up or down.  

Speed / Distance Mode

Mile

Mile

Kilometer

Displays distance in miles or kilometers.  

Out of Order

Off

On

Off

Locks the machine when out of order.  

Gender

Male

Male

Female

Determines the gender of the user when not selected during program 

set up.  

Language

English

English

English

Sets the language for the console.  Select between English, Spanish, 

German, French, Italian, and Dutch.  

Sound Mode

On

On

Off

Turns the chime on / off when a button is pressed.  

CHAPTeR 5: MANAgeR MoDe

Summary of Contents for R5x-04

Page 1: ...R 5 x 0 4 B i k e S E R V I C E M A N U A l ...

Page 2: ... Mode Overview 11 CHAPTER 6 ENGINEERING MODE 6 1 Using Engineering Mode 12 CHAPTER 7 SERVICE MODE 7 1 Using Service Mode 13 CHAPTER 8 TROUBLESHOOTING 8 1 Electrical Diagram 14 8 2 Error Codes on the Console 18 8 3 LCB LED Indicators 19 8 4 LCB Wiring Connections 20 8 5 Troubleshooting Error 04A0 21 8 6 Troubleshooting Error 04B0 22 8 7 Troubleshooting Error 0248 23 8 8 Troubleshooting Error 02B4 2...

Page 3: ...Replacement 49 9 17 Battery Replacement 50 9 18 Drive Belt Replacement 51 9 19 Generator Belt Replacement 52 9 20 Generator Replacement 53 9 21 Pulley Axle Set Replacement 54 9 22 Crank Axle Set Replacement 56 9 23 Testing the Bike 57 CHAPTER 10 BIKE SPECIFICATIONS AND ASSEMBLY GUIDE 10 1 R5x 04 Bike Specifications 58 10 2 Fasteners and Assembly Tools 59 10 3 Assembly Instructions 60 10 4 Adjustin...

Page 4: ...cation A serial number plate is located below the bottom of the console mast beneath a rubber boot There is also a serial number tag on the middle of the main frame pointed towards the floor Chapter 1 Serial Number Location ...

Page 5: ...2 Console serial number location 1 1 Serial Number Location chapter 1 Serial Number Location SN PLACEMENT ...

Page 6: ...p hands away from moving parts If the item cannot be reached contact a Matrix authorized dealer for assistance Never operate the unit if it is damaged not working properly when it has been dropped or has been dropped in water Keep hands and feet clear at all times from moving parts to avoid injury Do not use this product outdoors near swimming pools or in areas of high humidity Do not operate wher...

Page 7: ...ach outlet you plug Bikes into should not have anything else running on that same circuit besides other Bikes up to 3 per 15 amp circuit and 4 per 20 amp circuit The easiest way to verify this is to locate the main circuit breaker box and turn off the breaker s one at a time Once a breaker has been turned off the only thing that should not have power to it are the Bikes in question No lamps vendin...

Page 8: ...th a clean dry 100 lint free cloth and water soap mixture wipe down the entire console area including the hand grips and hand rails MONTHLY 1 Vacuum under and around the Bike If you need to move it unplug the unit first 2 Remove the shrouds and use a vacuum to remove any dust or dirt built up under the covers NOTE Be careful not to damage or unplug any of the wiring 3 Apply Corrosion Block to the ...

Page 9: ...xfitness com DAILY MAINTENANCE ITEMS 1 Look and listen for loose fasteners unusual noises and any other indications that the equipment may be in need of service 2 Attempt to wobble the unit from side to side and front to back Level if needed see Section 10 5 WEEKLY MAINTENANCE ITEMS 1 Check the pedal straps for damage 2 Clean the grooves on the foot pedals MONTHLY MAINTENANCE ITEMS 1 Frequently va...

Page 10: ...tment STOP Ends workout and shows workout summary data NUMBER KEYPAD Workout data input for workout setup Level adjustment during workout COOL DOWN Puts bike into Cool Down mode FAN Allows for fan speed selection fan has 3 operating speeds TOGGLE DISPLAY Allows user to select what information is displayed on the console LANGUAGE Select Language Chapter 4 Console Overlay and workout Description ...

Page 11: ...e display will read 3 2 1 Begin and then the program will start 4 3 workout setup steps fat burn ROLLING HILLS The Rolling Hills program is a level based program that automatically adjusts the resistance level to simulate real terrain 1 Start pedaling and press the ROLLING HILLS key Then press ENTER 2 Select Level by using the UP or DOWN LEVEL keys and press ENTER 3 Select Time by using the UP or ...

Page 12: ...e next level The test could take upwards of 30 minutes for very fit individuals Once the test ends a recovery period cool down will begin and the user s results are calculated and displayed Results are based on the number of stages completed Incline will not be adjustable during the test 1 Start pedaling and press the FITNESS TEST key Then press ENTER 2 Select Age by using the UP or DOWN LEVEL key...

Page 13: ...can grab these sensors in any program to view your current heart rate 1 Start pedaling and press the HEART RATE key Then press ENTER 2 Select Age by using the UP or DOWN LEVEL keys and press SELECT 3 Select Target HR Percentage by using the UP or DOWN LEVEL keys and press SELECT 4 Select Time by using the UP or DOWN LEVEL keys and press SELECT 5 Select Weight by using the UP or DOWN LEVEL keys and...

Page 14: ...kout time when GO is pressed or when no time is selected during program set up Default Level 1 1 30 Starting resistance when GO is pressed or when no resistance is selected during program set up Default Age 30 10 100 Starting age when GO is pressed or when no age is selected during program set up Default User Weight 150 lbs 75 kg 80 lbs 36 kg 400 lbs 181 kg Weight used for program calorie expendit...

Page 15: ...nnnnn YY is the year 11 12 MM is the month e g 08 09 10 nnnnn is the actual serial number Use the UP DOWN LEVEL keys to navigate the layers and the number keys to input the serial number The product name is dependent on the Machine Type setting For example the console is EP612 with ver A with ver A and the manufactured date is 2011 08 with 98765 The frame is RB91 with ver B and the manufactured da...

Page 16: ...ually sets the Accumulated Distance and Time Service 4 CSafe RF Test Press the ENTER key to test CSAFE Press the ENTER key again to test the RF Service 5 Error Log Shows the last 10 errors Press and LEVEL UP and DOWN for 3 seconds to clear the errors Service 6 Set Date Time Press the LEVEL keys to move cursor the number keys to set date time and the ENTER key to save Service 7 Export and Import Pa...

Page 17: ...14 8 1 Electrical Diagrams chapter 8 Troubleshooting HURES5x C Electrical block diagram ...

Page 18: ...15 8 1 Electrical Diagram CONTINUED Chapter 8 Troubleshooting r5x F Electrical block diagram ...

Page 19: ...16 8 1 electrical diagramS CONTINUED Pulse Sensor Wire Chapter 8 Troubleshooting POWER RESISTANCE WIRE ...

Page 20: ...17 Digital Communication Wire 8 1 electrical diagramS CONTINUED Chapter 8 Troubleshooting 8 1 electrical diagramS CONTINUED ECB Wire Chapter 8 Troubleshooting ...

Page 21: ... or over 15V Check the wire connections at the battery Replace the battery 0x0441 b When the UCB implements a command the LCB is not receiving this command Check the machine type in Engineering Mode Check the connections at the UCB and LCB 0x04A0 c Digital Communication Failure LCB has no return message for the UCB for 3 seconds Check the console cable connections at the UCB and LCB Replace the co...

Page 22: ...egulate Status bright Normal LED8 UCB LCB Communication Status blinking OK Hardware definition LED1 AC plug in Status bright AC LED2 DC 5V Status bright OK LED3 AC plug in Status bright AC LED4 DC 12V Status bright OK LED5 RPM LED9 UCB Power Supply Status bright Power on LED10 Resistance PWM Status bright Resistance ON ...

Page 23: ...20 Chapter 8 Troubleshooting 8 4 LCB wiring connectionS ...

Page 24: ...tion disconnected 2 SOLUTION 1 The console cable is damaged or not properly plugged in Check the connection of the console cable at the UCB and LCB Also check the console cable for damage Replace if needed 2 If the UCB is damaged replace the console 3 If neither the console nor console cable solve the issue replace the LCB ...

Page 25: ...ation disconnected 2 SOLUTION 1 The console cable is damaged or not properly plugged in Check the connection of the console cable at the UCB and LCB Also check the console cable for damage Replace if needed 2 The UCB is damaged replace the console 3 If neither the console nor console cable solve the issue replace the LCB ...

Page 26: ...Battery disconnection or fail When power is on LCB battery voltage is less than 6 VAC 2 SOLUTION 1 Check the battery wire connection between the battery and LCB Figure A 2 Check the battery voltage Figure B if it is less than 6 VAC replace the battery 3 If the battery voltage is more than 6 VAC replace the LCB ...

Page 27: ...or use on HUREA5x frame ERROR CODE 02B4 1 SYMPTOM 02B4 Resistance type error 2 SOLUTION 1 Check if the machine has the correct resistance system resistor or ECB Figures A B 2 Check if the console is matched with the correct frame and that the Machine Type is set correctly in Engineering Mode 3 Replace the LCB 4 Replace the console ...

Page 28: ... Troubleshooting 8 9 troubleshooting Error 02AB ERROR CODE 02AB 1 SYMPTOM 02AB Machine type error 2 SOLUTION 1 Enter into Engineering Mode and verify that the Machine Type setting is correct should be R5x Figure A ...

Page 29: ...DE 01AC 1 SYMPTOM 01AC Resistance over current 2 SOLUTION 1 Check if the resistance is short circuited by measuring amperage through the generator cable Figure A If the resistance value is under 10 ohms replace the generator If the resistance value is over 10 ohms replace the LCB ...

Page 30: ...OTING 1 SYMPTOM No resistance 2 SOLUTION 1 Check the power resistor wire connection between the power resistor and the LCB Figure A 2 Check if there is a resistance value by measuring amperage through the generator cable Figure A If there is not a resistance value replace the resistor If there is a resistance value replace the LCB ...

Page 31: ...console from the unit and verify continuity of the HR grip wiring With a multi meter set for ohms place one prong on the HR grip wiring coming up the console mast Figure C and the other on the appropriate plate match red with red and white with white a An ohm reading of less than 1 should be received If it is higher replace the HR grip wiring 3 Perform a continuity check on the console See Service...

Page 32: ...Figure B c While holding pressure with the wrench fully tighten the nylok nut to hold the roller bracket in place Figure C d Once the front roller brackets are tight repeat procedure with the rear roller brackets e Once the roller brackets are tightened test the seat movement for smooth travel NOTE If the seat sticks or is hard to move the pressure on the roller brackets may need to be loosened If...

Page 33: ...ness room power b If LED9 is still not lit check the incoming AC power to the LCB If the incoming power is not correct replace the power cord c Replace the LCB if all power components are OK and there are AC volts to the LCB 3 4 Remove the front disk and check to see if LED9 is lit on the LCB a If LED9 is lit check the connection of the console cable b If the console cable is connected properly LE...

Page 34: ...TER c Test the affected keypad If the keypad works in the keypad test it may not be a functioning key in the program used for testing it 2 Check the connections of the keypad at the UCB a Remove the console from the console mast b Remove the 6 screws holding the back of the console to the front Figure A c Inspect the keypad ribbon cable connection at the UCB Figure B d Even if the keypad ribbon ca...

Page 35: ... from the defective console and remove the console Figure B 3 Reinstall the wire connections to the new console 4 Carefully push the wires into the console and mast until they are clear of the console mast connection and attach the console to the mast using the 4 screws 5 Test the bike for function as outlined in Section 9 23 chapter 9 Part Replacement Guide ...

Page 36: ...res A B 2 Remove the 4 screws holding the heart rate handlebar to the console mast being careful to support the handlebar Figure C 3 Remove the defective handlebar Figure D 4 Reverse Steps 1 3 to install a new handlebar Figure A Figure B Figure c figure d Chapter 9 Part Replacement Guide ...

Page 37: ...LDER REPLACEMENT 1 Remove the 2 screws holding the cup holder to the frame Figure A 2 Remove the cup holder Figure B 3 Reverse Steps 1 2 to install a new cup holder Figure A Figure B chapter 9 Part Replacement Guide ...

Page 38: ...d disconnect the cord from the machine 2 Remove the console as outlined in Section 9 1 3 Remove the back cover of the console Figure A 4 Unplug and remove the faulty overlay Figure B 5 Clean the console area with alcohol to remove any left over adhesive Figure C 6 Remove the protective film over the display window of the overlay Figure D figure a figure b figure c figure d Chapter 9 Part Replaceme...

Page 39: ... the console Figure G 10 Press down on the corners of the overlay to keep it in place then remove the protective film Figure H I 11 Once the overlay is in the correct position press down on the overlay with a cloth to adhere it to the console plastic Figure J 12 Use the same procedure to replace any additional faulty overlays NOTE Overlays can not be reused 13 Test the bike for function as outline...

Page 40: ...ve the 4 screws holding the console mast to the frame Figure B 5 Pull the wires out the bottom of the console mast and remove the mast 6 Reverse Steps 1 5 to install a new console mast NOTE When installing a new console mast be sure to pull the console wires up through the new mast prior to installing the 4 screws into the frame 7 Test the bike for function as outlined in Section 9 23 Figure A Fig...

Page 41: ...ment Figure B Figure A 1 Remove the 4 screws holding the seat pad to the seat frame Figure A 2 Lift the seat pad away from the seat frame Figure B 3 Reverse Steps 1 2 to install a new seat pad chapter 9 Part Replacement Guide ...

Page 42: ...c cover onto the back of the seat pad and remove it Figure A 2 Remove the 4 screws holding the back pad onto the seat frame Figure B 3 Remove the back pad Figure C 4 Reverse Steps 1 3 to install a new back pad Figure A Figure B Figure C Chapter 9 Part Replacement Guide ...

Page 43: ...iring exposed when the seat pad is removed Figure A 4 Remove the 3 screws holding the heart rate handlebars to the seat frame Figure B 5 Remove the heart rate handlebars from the frame Figure C 6 Reverse Steps 1 5 to install a new heart rate handlebar 7 Test the bike for function as outlined in Section 9 23 figure a figure b figure c chapter 9 Part Replacement Guide ...

Page 44: ...the HR grip can be split into 2 pieces Figure B 3 Disconnect the keypad overlay and the HR plate wiring and remove the old HR grip Figure C 4 Reverse Steps 1 3 to install new HR grips The white wire should be on the back side HR plate the red wire on the front Figure D 5 Test the Bike for function as outlined in Section 9 23 Figure A Figure B Figure C Figure D ...

Page 45: ...emove the HR handlebar as outlined in Section 9 8 4 Remove the 4 screws holding the upper seat frame to the lower seat frame Figure A 5 Remove the upper seat frame from the lower seat frame Figure B 6 Reverse Steps 1 5 to install a new seat frame 7 Test the bike for function as outlined in Section 9 23 figure a figure b chapter 9 Part Replacement Guide ...

Page 46: ...remove the seat position plate Figures A B 4 Disconnect the HR wiring that is exposed when the seat pad is removed and slide it out the hole in the frame so it does not restrict the seat movement Figures C D 5 Remove the 4 screws holding the upper seat frame onto the lower seat frame and remove the upper seat frame Figures E F figure a figure b figure c figure d figure E figure F Chapter 9 Part Re...

Page 47: ...rack Figure H 8 Remove the end cap Figure I 9 Depress the seat position lever and pull the lower seat frame off of the seat track Figure J 10 Reverse Steps 1 9 to install a new lower seat frame 11 Test the bike for function as outlined in Section 9 23 figure g 9 11 lower seat frame replacement continued figure h figure J figure I chapter 9 Part Replacement Guide ...

Page 48: ...ing the seat adjustment handle to the seat frame Figure A 2 Remove the seat adjustment handle Figure B 3 Reverse Steps 1 2 to install a new seat adjustment handle 4 Test the bike for function as outlined in Section 9 23 figure a figure b Chapter 9 Part Replacement Guide ...

Page 49: ...ame and left shroud and remove it Figure A 2 Remove the 6 screws holding the left side shroud to the frame and remove it Figure B 3 Figure C shows the bike with both rear shrouds removed 4 Reverse Steps 1 2 to install a new rear shroud Figure A Figure B Figure C chapter 9 Part Replacement Guide ...

Page 50: ... the threads are normal For the left side pedal the threads are reversed the pedal turns off counterclockwise 2 Remove the pedal Figure B 3 Reverse Steps 1 2 to install a new pedal NOTE Be sure to tighten the pedal onto the crank using a commercial pedal wrench The pedal should be torqued as much as possible using the pedal wrench Figure A Figure B Chapter 9 Part Replacement Guide ...

Page 51: ...he frame and the left shroud and remove it Figure A NOTE You will need to angle the shrouds so that the crank passes through the hole in the shroud 3 Remove the 5 screws holding the left side front shroud to the frame and remove it Figure B 4 Reverse Steps 1 3 to install a new front shroud figure a figure b chapter 9 Part Replacement Guide ...

Page 52: ...nd remove the lower board 4 Reverse Steps 1 3 to install a new lower board Figure C shows the electrical connections to the lower board 5 Test the bike for function as outlined in Section 9 23 figure a figure b figure C 3 Pin Connector from the Generator 2 Pin Connector from the Resistor 7 Pin Connector from the Console 2 Pin Connector from the AC power source 2 Pin Connector from the Battery Chap...

Page 53: ... 11 2 Disconnect the 2 wires from the battery Figure A 3 Remove the wing nut on the battery bracket Figure B 4 Swivel the battery bracket out of the way and remove the battery Figure C 5 Reverse Steps 1 4 to install a new battery figure C figure B figure a chapter 9 Part Replacement Guide ...

Page 54: ...emove the tension from the belt Figure B 4 Remove the belt Figure C 5 Reverse Steps 1 4 to install a new drive belt NOTE Be sure to reattach the tension spring If more tension is needed on the drive belt multiple holes are available for the spring attachment Figure D 6 Test the bike for function as outlined in Section 9 23 fIGURE a fIGURE b fIGURE c figure d chapter 9 Part Replacement Guide ...

Page 55: ...ce the tension has been removed the generator belt can be walked off of the pulley Figure C 4 Pull the generator out of the frame towards the front of the unit and remove the generator belt Figure D 5 Reverse Steps 1 4 to install a new generator belt NOTE Re tension the new generator belt to 85 lbs 6 Test the bike for function as outlined in Section 9 23 fiGURE a fIgure b figure c figure d Chapter...

Page 56: ...Once the tension has been removed the generator belt can be walked off of the pulley Figure C 4 Pull the generator out of the frame towards the front of the unit and remove the generator belt Figure D 5 Reverse Steps 1 4 to install a new generator NOTE Re tension the generator belt to 85 lbs 6 Test the bike for function as outlined in Section 9 23 figure a figure b figure c figure d chapter 9 Part...

Page 57: ...uts holding the generator to the frame Figure A and remove the nuts putting tension on the generator belt Figure B 4 Once the tension has been removed walk the generator belt off of the pulley Figure C 5 Remove the C clip holding the bearing in place on the right side of the frame Figure D figure a figure b figure c figure D Chapter 9 Part Replacement Guide ...

Page 58: ...n the pulley axle assembly with a large channel lock pliers or a pipe wrench Figure F 8 Once the large nut is removed the pulley axle set can be removed from the left side of the frame Figure G 9 Reverse Steps 1 8 to install a new pulley axle set 10 Test the bike for function as outlined in Section 9 23 chapter 9 Part Replacement Guide ...

Page 59: ...Bend the tabs of the nut on the left side of the frame so that this nut will turn Figure B 5 Use a 32 mm wrench to remove the crank axle nuts Figure C NOTE This nut is reverse threaded 6 Once the nuts are removed the crank axle can be removed from the right side of the frame 7 Reverse Steps 1 6 to install a new crank axle set 8 Test the bike as outlined in Section 9 23 Figure A Figure B figure c C...

Page 60: ...TOP key for 3 5 seconds to return to normal function 2 If the unit has an add on TV program the TV channels see Entertainment Owner s Manual 3 Without hitting start or entering any program modes sit on the bike and hold the handlebars while pedaling to simulate exercising While moving listen for any odd noises or squeaks 4 After stopping movement press the green GO key and begin pedaling 5 Grasp t...

Page 61: ...RS OR MILES CALORIES SPEED LEVEL RPM HEART RATE METS WATTS STATIC PROFILE DIS PLAY User defined multi language dis play YES English German French Italian Spanish Dutch Portuguese Swedish Finnish Japanese Resistance levels 30 Workouts MANUAL ROLLING HILLS INTERVAL TRAINING RANDOM FAT BURN FITNESS TEST HEART RATE CONSTANT WATTS Netpulse ready yes CSAFE FitLinxx ready Yes On the fly program change Ye...

Page 62: ...on head screw m5 x 20L white 8 Z21 button head screw M8 x 20l black 8 Z22 flat washer black 8 z23 spring washer black 4 z31 button head screw M8 x 15L yellow 4 z32 flat washer yellow 4 z33 spring washer yellow 2 z34 button head screw M8 x 25L yellow 4 Z41 button head screw M8 x 15l red 4 Z42 button head screw m8 x 50L red 4 Z43 flat washer red 8 Z44 spring washer red 3 Z45 button head screw m8 x 1...

Page 63: ...60 10 3 ASSEMBLY INSTRUCTIONS step 1 step 2 after these assembly steps are complete be sure to setup and test the unit as outlined in section 9 23 Chapter 10 Bike Specifications and Assembly Guide ...

Page 64: ...61 10 3 Assembly Instructions Continued step 3 chapter 10 Bike SpecificationS and Assembly Guide ...

Page 65: ...62 step 4 10 3 ASSEMBLY INSTRUCTIONS CONTINUED Step 5 Chapter 10 Bike Specifications and Assembly Guide ...

Page 66: ...63 final assembly 10 3 assembly instructions continued chapter 10 Bike SpecificationS and Assembly Guide ...

Page 67: ...ptimum position will allow movement through the bottom of the stroke without locking the knees or shifting in the seat The knees should have a slight bend at the point of fullest leg extension If the seat needs to be adjusted lift the spring loaded seat lever on the right side of the seat to make adjustments Slide the seat forward or backward to its desired location Release the spring loaded seat ...

Page 68: ...ing indicates that your bike needs to be leveled Determine which leveler is not resting completely on the floor Loosen the nut with one hand to allow the leveler to rotate Rotate the left or right leveler and repeat the adjustment as necessary until the bike is stable Lock the adjustment by tightening the nut against the rear foot support chapter 10 Bike SpecificationS and Assembly Guide ...

Page 69: ... program the television 1 Remove the console from the unit as outlined in Section 9 1 2 Remove the 6 screws holding the console front to the back and split the console Figures A B 3 Remove the 2 screws holding on the blank headphone jack plastic to the console and remove the plastic Figures C D 4 Remove the wire in the console that goes from the UCB to the board on the console back Figure E 5 Inst...

Page 70: ...ved in Step 3 Figure H NOTE Steps 8 13 should only be done if installing a MYE TV the PCTV does not use the entertainment overlay 8 Remove the existing heart rate overlay from the lower portion of the console Figure I 9 Clean the console area with alcohol to remove any left over adhesive from the console plastic Figure J 10 10 Peel off the protective film from the back of the entertainment keypad ...

Page 71: ...lack connector to the power wire coming up the console mast from the base of the unit 16 Plug the side of the controller wire labeled To Console into the CSafe board mounted on the console back Figure Q The MYE TV should be plugged into the TV port the PCTV should be plugged into the PCTV port If installing a PCTV also change switch SW1 to the top location 17 Route the net cable through the consol...

Page 72: ...s Figure U The small cover with the Matrix logo that makes up the top of the rear console cover is no longer used with a TV bracket 20 Mount the console back onto the unit making sure to make all the necessary wire connections including the coax cable 21 Mount the plastic front plate to the TV Figure V 22 Plug the coax cable into the back of the TV Figure W 23 Plug the power wire into the back of ...

Page 73: ...bracket being sure to tuck the tabs of the plate installed during Step 20 into the console plastic Figure BB 28 Mount the TV to the TV bracket using 4 screws sent with the TV Figure CC 29 Put the back cover onto the TV and secure with 4 screws Figure DD 30 Install the console back onto the unit making sure to connect the coax cable and net wire 31 Plug a network wire if using a PCTV not using wire...

Page 74: ...he software files into the UCB folder on the USB flash drive the access should read MATRIX FW UCB Figure B 3 Insert the USB flash drive into the USB port on the console Figure C 4 With the display is in standard operation mode press ENTER 9 0 0 1 ENTER on the keypad Press the LEVEL UP or DOWN keys to choose the correct software if there are more than one version on the USB flash drive Once the cor...

Page 75: ...72 NOTES ...

Page 76: ...73 MATrix Fitness systems corp 1610 Landmark Drive Cottage Grove wi 53527 USA TOLL FREE 866 693 4863 www matrixfitness com FAX 608 839 1717 REV 01 KO ...

Reviews: