background image

Introduction


R4K-80 series -LEt option


1.  Introduction 


1-1  Greeting 


Thank you very much for adding -LE

  option to our product.   

We have done our best for our quality control of our products. Please handle this unit properly 
according to this instruction manual so that you can use the full capacity of this unit and operate it 
safely and smoothly in high efficiency for long. If, however, you find any doubtful or unknown point or 
omission in the instruction manual, please contact us.


1-2  Summary of –LEt option Greetin 

 
-LEt option comes with the digital communication interface for Matsusada power supplies that is 
directly connected to the network to connect Matsusada power supplies. Therefore it enables to 
locate the power supply on the network, and no separate interface is needed to control it. 
 

1-3  LAN connector 


Connect with RJ45 (10BASE-T, 100BASE-T) 


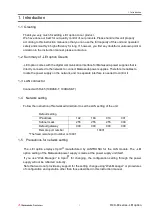
1-4    Network setting 

 
Follow the instruction of Network administrator to set the LAN setting of the unit. 
 

Default setting 
IP address 

192 

168 

010 

001 

Subnet mask 

255 

255 

255 

000 

Default gateway 

000 

000 

000 

000 

Remote port number 

10001 


*The fixed remote port number is 10001. 


1-5    Precautions for network setting 


The  -LEt  option  employs  Xport

®

  manufactured  by  LANTRONIX  for  the  LAN  module.  The  –LEt 

option setting of the Matsusada power supply is made at the power supply unit itself. 

If  you  use  “Web  Manager”  in  Xport

® 

for  changing,  the  configuration  setting  through  the  power 

supply will not be reflected correctly. 
Note that we do not provide any support for the setting change using “Web Manager” or procedures 
of configuration and operation other than those described in this instruction manual. 


Summary of Contents for R4K-80 Series

Page 1: ...Instruction manual MODEL R4K 80 series ag LEt option B N 094 9 142 094 9 142 Rev 0 1 ...

Page 2: ...nstruction manual are correct If however you notice any irregularities or errors please feel free to contact our sales office about them Trademarks LANTRONIX and Xport are trademarks or registered trademarks of Lantronix Inc in the United States and other countries MS Microsoft Windows Visual Basic and Visual C are trademarks or registered trademarks of Microsoft Corporation in the United States a...

Page 3: ...g 1 1 2 Summary of LEt option Greetin 1 1 3 LAN connector 1 1 4 Network setting 1 1 5 Precautions for network setting 1 2 How to Use 2 2 1 Connection example of R4K 80 LEt option 2 2 2 Network address setting 3 3 Sample Program 8 3 1 VB sample program 8 3 2 VC sample program 10 ...

Page 4: ... power supply on the network and no separate interface is needed to control it 1 3 LAN connector Connect with RJ45 10BASE T 100BASE T 1 4 Network setting Follow the instruction of Network administrator to set the LAN setting of the unit Default setting IP address 192 168 010 001 Subnet mask 255 255 255 000 Default gateway 000 000 000 000 Remote port number 10001 The fixed remote port number is 100...

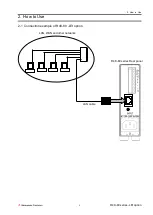
Page 5: ...2 How to Use 2 R4K 80 series LEt option 2 How to Use 2 1 Connection example of R4K 80 LEt option R4K 80 series Rear panel LAN cable LAN WAN and other networks ...

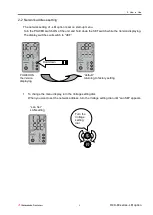
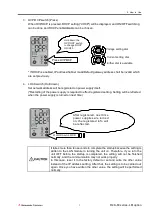
Page 6: ...he SET switch while the Version displaying The display switches will switch to dEF 1 To change the menu display turn the Voltage setting dial When you want to set the network address turn the Voltage setting dial until Lan SEt appears Lan Set LAN setting Turn the Voltage setting dial VOLTAGE CURRENT Hold down POWER ON the Version displaying default returning to factory setting ...

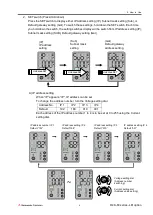
Page 7: ... IP appears IP IP address can be set To change the address number turn the Voltage setting dial Address No IP 1 IP 2 IP 3 IP 4 Default 192 168 010 001 Each address of the IP address number 1 to 4 is to be set at 0 to 255 using the Current setting dial VOLTAGE CURRENT Voltage setting dial Address number switching Current setting dial Address value setting IP address number IP 1 Default 192 IP addre...

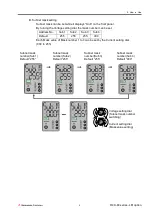
Page 8: ...ss No Sub 1 Sub 2 Sub 3 Sub 4 Default 255 255 255 000 Each Mask value of Mask number 1 to 4 can be set by the Current setting dial 000 to 255 VOLTAGE CURRENT Voltage setting dial Subnet mask number switching Current setting dial Mask value setting Subnet mask number Sub 1 Default 255 Subnet mask number Sub 2 Default 255 Subnet mask number Sub 3 Default 255 Subnet mask number Sub 4 Default 000 ...

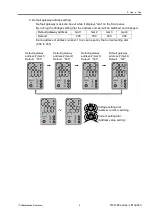
Page 9: ... Default gateway address Gat 1 Gat 2 Gat 3 Gat 4 Default 000 000 000 000 Each address of address number 1 to 4 can be set by the Current setting dial 000 to 255 VOLTAG CURREN Voltage setting dial Address number switching Current setting dial Address value setting Default gateway address Gat 1 Default 000 Default gateway address Gat 2 Default 000 Default gateway address Gat 3 Default 000 Default ga...

Page 10: ...e power supply is required to effect registered setting Setting will be reflected when the power supply is turned on next time After registered next time power supplies are turned on the registered info will be reflected Hold down LOCK It takes more than ten seconds to complete the startup because the setting is written to the LAN module in turning the unit on Therefore if you turn the unit OFF be...

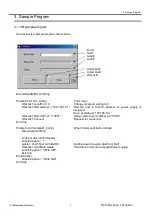
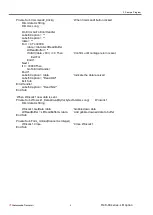
Page 11: ...0 1 Remote host is that IP address of power supply is assigned Here set Default 192 168 10 1 Winsock1 RemotePort 10001 Assign remote port number as 10001 Winsock1 Connect Request for connection End Sub Private Sub Command1_Click When Command1button clicked Dim wdata As String On Error GoTo ErrorHandler Label5 Caption wdata Text1 Text Chr HD Gobble down the word data from Text1 Winsock1 SendData wd...

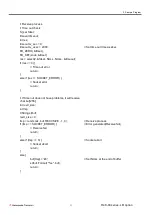
Page 12: ...n is sent Exit For End If Next I If I 30000 Then GoTo ErrorHandler End If Label3 Caption rdata Indicate the data received Label5 Caption Read OK Exit Sub ErrorHandler Label5 Caption Read NG End Sub When Winsock1 new data is sent Private Sub Winsock1_DataArrival ByVal bytesTotal As Long Winsock1 Dim rdata As String Winsock1 GetData rdata Gobble down data strReadBuffer strReadBuffer rdata Add gobble...

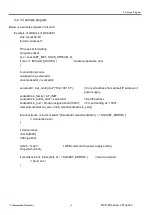
Page 13: ...serveradd inet_addr char 192 168 10 1 Convert address from default IP address of power supply sockaddr sin_family AF_INET sockaddr sin_addr s_addr serveradd Set IP address sockaddr sin_port htons unsigned short 10001 Fix port setting as 10001 memset sockaddr sin_zero int 0 sizeof sockaddr sin_zero if connect sock struct sockaddr sockaddr sizeof sockaddr SOCKET_ERROR Connection error Sent process c...

Page 14: ...ULL timeout if res 0 Time out error return else if res SOCKET_ERROR Socket error return If time out does not have problems it will receive char buf 256 int revd_size int tmp CString strbuf revd_size 0 tmp recv sock buf RECVSIZE 1 0 Receive process if tmp SOCKET_ERROR Error generated Receive fail Receive fail return else if tmp 0 Socket abort Socket abort return else buf tmp 0 Set NULL at the end o...

Page 15: ...Revision History Rev No Rev Date Revision Contents 0 0 2016 02 First edition 0 1 2021 02 Changed Format and revised words ...

Page 16: ......

Reviews: