background image

14

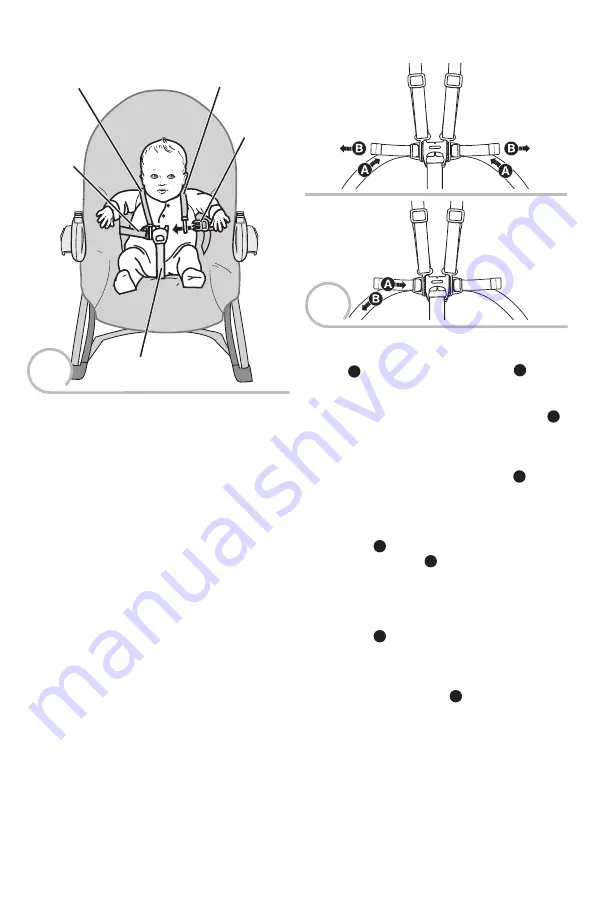
Securing Child    Comment installer l’enfant

1

2

TIGHTEN

SERRER

LOOSEN

DESSERRER

Crotch Belt
Courroie d’entrejambe

Waist Belt
Courroie 
abdominale

Waist Belt
Courroie 
abdominale

Shoulder Belt
Courroie d’épaule

Shoulder Belt
Courroie d’épaule

• Place your child in the seat. Position the crotch 

belt between your child’s legs.

• Insert the ends of the waist belts through the 

slots in the shoulder belts.

• Fasten the waist/shoulder belts to the crotch 

restraint. 

Make sure you hear a "click" on 

both sides.

• Check to be sure the restraint system is 

securely attached by pulling it away from 
your child. The restraint system should 
remain attached.

• Tighten the waist/shoulder belts so that the 

restraint system is snug against your child. 
Please refer to the next section for instructions 
to tighten the waist/shoulder belts.

• Mettre l’enfant dans le siège. Positionner la 

courroie d’entrejambe entre les jambes 
de l’enfant.

• Insérer les extrémités des courroies abdominales 

dans les fentes des courroies d’épaule.

• Attacher les courroies abdominales/d’épaule 

à la courroie d’entrejambe. 

S’assurer 

d’entendre un clic de chaque côté.

• Tirer sur le système de retenue pour s’assurer 

qu’il est bien fixé. Il doit demeurer attaché.

• Serrer chaque courroie abdominale et d’épaule 

de sorte que le système de retenue soit bien 
ajusté contre l’enfant. Pour serrer les courroies 
abdominales et d’épaule, consulter les 
instructions dans la section suivante.

• 

To tighten the waist belts: 

Feed the anchored 

end of the belt up through the buckle to form 
a loop 

A

. Pull the free end of the belt 

B

Repeat this procedure to tighten the other belt.

• 

To loosen the waist belts:

 Feed the free end of 

the belt up through the buckle to form a loop 

A

Enlarge the loop by pulling on the end of the loop 
toward the buckle. Pull the anchored end of the 
belt to shorten the free end of the belt. Repeat 
this procedure to loosen the other belt 

B

.

• 

Pour serrer les courroies abdominales : 

Glisser l’extrémité fixe de la courroie 
abdominale dans le passant de façon à former 
une boucle 

A

. Tirer sur l’extrémité libre de la 

courroie abdominale 

B

. Répéter ce procédé 

pour serrer l’autre courroie.

• 

Pour desserrer les courroies abdominales :


Glisser l’extrémité libre de la courroie 
abdominale dans le passant de façon à former 
une boucle 

A

. Agrandir la boucle en tirant 

sur son extrémité, vers le passant. Tirer sur 
l’extrémité fixe de la courroie pour raccourcir 
l’extrémité libre. Répéter ce procédé pour 
desserrer l’autre courroie 

B

.

Summary of Contents for Fisher Price CCL87

Page 1: ...es four D LR20 alkaline batteries not included for operation Product features and decorations may vary from photographs IMPORTANT Conserver ce mode d emploi pour s y r f rer en cas de besoin Lire atte...

Page 2: ...oung infants have limited head and neck control If seat is too upright infant s head can drop forward compress the airway and result in DEATH When used as an infant seat or rocker Fall Hazard Never us...

Page 3: ...s aux chutes et les risques d tranglement avec le syst me de retenue Ne jamais laisser l enfant sans surveillance Ce produit n est pas con u pour remplacer un lit d enfant ou un berceau pour de longue...

Page 4: ...r cleaning Coussin avec tube du dossier Remarque La section Entretien explique comment retirer le tube du dossier pour nettoyer le coussin Cross Brace Traverse 2 Swing Bases 2 bases de balancelle 2 Fe...

Page 5: ...other side rail Ins rer la cheville du pied dans le trou situ l extr mit du montant lat ral Remarque Les pieds sont con us pour tre ins r s d un c t pr cis Si un pied ne semble pas s ins rer correcte...

Page 6: ...s rer la traverse entre les montants lat raux comme illustr Remarque La traverse est con ue pour tre fix e dans un sens seulement Si elle ne semble pas s ins rer correctement essayer dans l autre sens...

Page 7: ...er les vis While pressing the buttons on the ends of the seat back tube inside the pad insert the seat back tube into the sockets in each side rail Push until the buttons snap into place Make sure you...

Page 8: ...on the lower pad pocket to the hooks underneath the footrest Passer le rabat inf rieur du coussin autour du repose pieds Ins rer les crochets sous le repose pieds dans les fentes du rabat inf rieur du...

Page 9: ...at the hubs face each other Fit the tubes on the swing frames onto the tubes on the bases Hint The swing frame tubes are designed to fit the tubes on each base one way If the swing frame tubes do not...

Page 10: ...ies of different types alkaline standard carbon zinc or rechargeable nickel cadmium Insert batteries as indicated inside the battery compartment Remove batteries during long periods of non use Always...

Page 11: ...ants have limited head and neck control If seat is too upright infant s head can drop forward compress the airway and result in DEATH When used as an infant seat or rocker Fall Hazard Never use on any...

Page 12: ...l enfant peut pencher vers l avant obstruer les voies respiratoires et causer la MORT En mode si ge pour b b ou chaise bascule Danger de chute Ne jamais utiliser sur une surface en hauteur car les mo...

Page 13: ...edress e Note Use the kickstand only when using as an infant seat Rotate the kickstand out Push down on the seat bottom to be sure the kickstand is in position Remarque Utiliser la b quille uniquement...

Page 14: ...yst me de retenue pour s assurer qu il est bien fix Il doit demeurer attach Serrer chaque courroie abdominale et d paule de sorte que le syst me de retenue soit bien ajust contre l enfant Pour serrer...

Page 15: ...down B To loosen the shoulder belts Slide the adjuster down Pour serrer les courroies d paule Tenir la boucle de r glage A et tirer l avant de la courroie d paule vers le bas B Pour desserrer les cou...

Page 16: ...after approximately 20 minutes Press the music sounds button to restart Press the volume buttons to adjust the volume level Balancelle Mettre l interrupteur la position MARCHE Appuyer sur les boutons...

Page 17: ...es extr mit s des courroies sous les courroies du coussin Toy Bar Barre jouets Fit the plugs on each end of the toy bar into the sockets in each side rail Hint The toy bar is removable Press the ends...

Page 18: ...la r gion To remove the pad Unfasten the buckles around each side rail Unfasten the rear strap buckle on the pad Remove the lower pocket on the pad from the footrest Press the seat back tube buttons o...

Page 19: ...for compliance could void the user s authority to operate the equipment This device complies with Part 15 of the FCC Rules Operation is subject to the following two conditions 1 this device may not ca...

Page 20: ...S cher s par ment basse temp rature et retirer rapidement de la machine une fois sec Essuyer les cadres de la balancelle et du si ge la barre jouets et les jouets avec un linge humide et une solution...

Reviews: