background image

100 I/C-UBL Adjustable Base Owners Manual 290-0029

8

InstaLLatIon

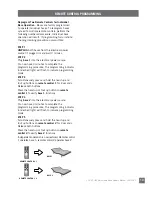
steP 5
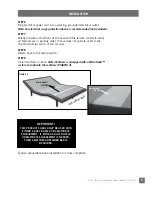
Remove the plastic packaging from the adjustable base frame. Carefully 
rotate the base frame over so it is resting on its legs.

steP 4
Carefully lift the adjustable base frame from the shipping carton, 
keeping the unit top-side-down. 

steP 2
Take the learn switch out of the hardware box and 
place in corner of base. Uncoil the main power cord 
and extend out head end of base, then remove the 
hardware box from shipping container.

AT LEAST TWO PEOPLE ARE RECOMMENDED 

FOR HANDLING AND MOvING ADjUSTABLE 

BASE. 

WARNING

WARNING

POWER CORDS MUST NOT 

INTERFERE WITH ANY ADjUSTABLE 

BASE


MECHANISMS.

DO NOT WEAvE CORDS THROUGH 

BASE STRUCTURE.

WARNING

WARNING

steP 3
Install (4) legs into the base frame. Simply screw each 
leg into a tapped hole at the corner of the base frame 
(

FIGURE 1

). Push pin in to adjust leg height (achieve leg 

height of 6 inches to 10 inches).

FIGURE 1

LEGS – SCREW 

INTO TAPPED 

HOLE AT EACH 

CORNER

PUSH PIN IN 

TO ADjUST LEG 

HEIGHT 

(6 INCHES TO 

10 INCHES)

Summary of Contents for 100 I/C-UBL

Page 1: ...owners manual 100 I C UBL...

Page 2: ......

Page 3: ...7 Remote Control Function 10 Remote Control Programming 11 Troubleshooting 14 Accessories 15 1 2 10 Warranty 16 contents If adjustable base does not operate or if parts are missing call 844 MATT FRM D...

Page 4: ...se Reliable operation and full life expectancy will be realized as long as the lift motor operation does not exceed two 2 minutes over a twenty 20 minute period or approximately 10 duty cycle Any atte...

Page 5: ...to comply with the limits for a Class B digital device pursuant to Part 15 of the FCC Rules These limits are designed to provide reasonable protection against harmful interference when the equipment...

Page 6: ...ive noise or vibration is experienced reverse the movement action up or down of the base with the remote control This should realign the base s activating mechanisms to the proper operational position...

Page 7: ...g procedures in the order indicated below and on the following pages STEP 1 Before discarding any packing materials open the adjustable base shipping carton and verify the following items are included...

Page 8: ...and extend out head end of base then remove the hardware box from shipping container at least two people are recommended for handling and moving adjustable base WARNING WARNING Power cords must not i...

Page 9: ...perate refer to the Troubleshooting section of this manual STEP 8 Return base to the level position STEP 9 Install mattress on base Note mattress is equipped with a MicroHook system to captivate the m...

Page 10: ...aise the head and foot sections simultaneously foot up button Press and hold to raise the foot section head down button Press and hold to lower the head section head foot down button Press and hold to...

Page 11: ...e remote control to verify base functions One remote control is now programmed to operate one base Step 1 UNPLUG both bases from the electrical power source if plugged in and wait 3 minutes STEP 2 Plu...

Page 12: ...emote control 1 and remote control 2 Two remote controls are now programmed to operate one base Step 1 UNPLUG both bases from the electrical power source if plugged in and wait 3 minutes STEP 2 Plug b...

Page 13: ...complete the programming procedure The programming indicator under bed light will flash to indicate programming mode Step 5 Simultaneously press and hold the head up and foot up buttons on remote con...

Page 14: ...rge protection device or electrical outlet Test outlet by plugging in another working appliance Verify power down device unplugged from base after usage If the base was operated over the rated duty cy...

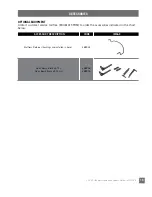
Page 15: ...ional equipment Contact customer service toll free 844 MATT FRM to order the accessories indicated in the chart below 4B8524 4B8808 4B8809 Mattress Retainer bushings preinstalled in base Head Board Br...

Page 16: ...the number of months that the base has been owned by you since the third anniversary of the Warranty Commencement Date By the end of the 10th year no portion of the replacement cost is covered by L P...

Page 17: ...able to perform service due to lack of accessibility the service call will be billed to You and the service will have to be rescheduled L P makes no other warranty whatever express or implied and all...

Page 18: ......

Page 19: ......

Page 20: ...290 0029 EDR13835 11 16 NATIONWIDE CUSTOMER SERVICE toll free 844 MATT FRM 2016 Mattress Firm Inc...

Reviews: