background image

6

Installation Guide

NOTE:

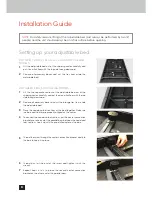
 For safety reasons, lifting of the adjustable bed must always be performed by two (2) 

people; and the unit should always be on a flat surface before opening.

Setting up your adjustable bed

1

2

Lift the adjustable bed out of the shipping carton carefully, and 

put it on a flat floor with the top side facing downward. 

Remove all accessory boxes and cut the ties from inside the 
adjustable bed.

FOR TWIN, TWIN XL, FULL, FULL XL, AND SPLIT CAL KING 
MODELS

FOR QUEEN, KING, AND CAL KING MODELS

1

2

5

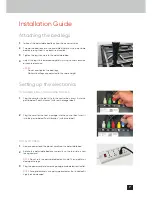
Lift the two separate sections of the adjustable bed out of the 
shipping carton carefully, and put them on a flat floor with the top 
side facing downward.

Remove all accessory boxes and cut the orange ties from inside 

the adjustable bed.

Move the head and foot sections of the bed together. Make sure 

the bars and frames are properly aligned at the center.

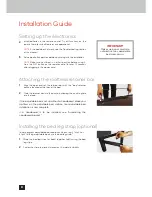
To connect the head and foot sections, put the center connection 
bracket over one end of the parallel bars between the head and 
foot sections. Line it up with the pre-drilled holes on the bars.

Thread the screw through the center connection bracket and into 
the bars to keep it in place.

Thread a nut at the end of the screw, and tighten it with the 
wrench.

Repeat steps 4 to 6 to place the second center connection 
bracket on the other end of the parallel bars.

3

6

7

4

Summary of Contents for 900 POWER BASE

Page 1: ...g issued and pending U S patents including Nos 7448100 D657157 D663542 D657158 D657156 8209801 8209800 D663544 D663543 and other patents pending Photos are for illustration purposes only COPYRIGHT 201...

Page 2: ...ation Guide Remote Control Guide Special Functions Troubleshooting Warranty Registration 3 5 6 10 13 14 18 Table of Contents 07 09 2018 CUSTOMATIC is a trademark of PPJ LLC All other trademarks are th...

Page 3: ...esult in a void of the Warranty Only those authorized may conduct repairs or part replacement on your adjustable bed Unauthorized modifications to this product could void the electrical portion of you...

Page 4: ...Warranty The structure of the bed will support the recommended weight when distributed evenly across the bed The head and foot sections are not designed to individually support or lift this amount of...

Page 5: ...l 1 AAA batteries 3 Mattress retainer bar 1 Only available with Queen King and Cal King models Only available with Twin XL and Split Cal King models Twin Twin XL Full Full XL and Split Cal King models...

Page 6: ...ut of the shipping carton carefully and put them on a flat floor with the top side facing downward Remove all accessory boxes and cut the orange ties from inside the adjustable bed Move the head and f...

Page 7: ...ics FOR QUEEN KING AND CAL KING MODELS Plug the cord for the foot lift into the control box Insert it into the port labeled Foot Actuator with red orange label Plug the cord for the foot massage into...

Page 8: ...adboard is to be installed see Assembling the headboard bracket If the adjustable bed is set up without a headboard place your mattress on the adjustable bed surface Your adjustable bed installation i...

Page 9: ...the bar Insert a retainer bolt fitted with a washer into the slot under the inner headboard bracket and through the round panel Tighten the bolt using the Allen key wrench Place the open side of the...

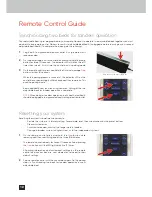
Page 10: ...watching TV reading or laptop use Zero Gravity 6 Press this button to activate the zero gravity position This preset position elevates the legs slightly higher than the chest in effect allowing the b...

Page 11: ...7 colors Press this button multiple times to change colors Press and hold to turn the under bed light off Understanding the remote control features The adjustable bed uses BLE Bluetooth Low Energy re...

Page 12: ...function using Remote A Pairing of the two adjustable beds for tandem operation is complete NOTE When doing a tandem operation both Bed A and Bed B should be plugged into a grounded and working elect...

Page 13: ...ports located on each side of your adjustable bed provides easy access for charging today s tech devices Connecting your bed to a smart device Your adjustable bed is equipped with the Bluetooth techn...

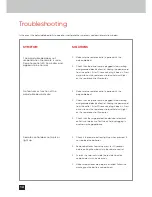
Page 14: ...ed Check that the power cord is plugged into a working and grounded electrical outlet Unplug the power cord from the outlet After 30 seconds plug it back in Press any button on the remote control and...

Page 15: ...to flat position SYMPTOM SOLUTIONS Check the batteries in the remote control Replace with new batteries if necessary Make sure that you are following the duty cycle of the motors Do not operate for mo...

Page 16: ...ray the nuts bolts and white bushings with a lubricant The adjustable bed is squeaking SYMPTOM SOLUTIONS 1 Clear any clutter or obstructions under and around the adjustable bed Radio frequency interfe...

Page 17: ...and possible solutions below Hard surface flooring may cause added vibration To correct place carpet pieces or rubber furniture cups under each leg or caster of the bed Elevate the head or foot secti...

Page 18: ...tronics electrical components drive motors and massage motors are excluded Purchaser shall pay 18 19th of the then current replacement cost of the defective part Any consumer of a CUSTOMATIC adjustabl...

Page 19: ...clusions or limitations of incidental or consequential damages This warranty allows the purchaser specific legal rights The purchaser may also have other rights which can vary from state to state This...

Page 20: ...E CONSULT THE TROUBLESHOOTING GUIDE PROVIDED WITH YOUR BED AND ONLINE IF APPLICABLE IF PROBLEMS PERSIST PLEASE CALL CUSTOMER SERVICE TOLL FREE NUMBER 1 843 800 8372 Please have your receipt ready and...

Reviews: