background image

9

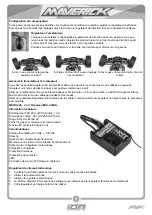
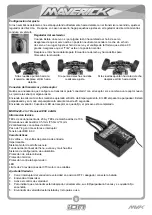
Configuración del ajuste 

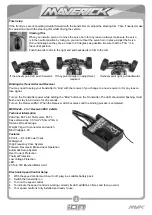
Si los neumáticos delanteros no están apuntando directamente hacia delante con el transmisor encendido, ajuste el 

regulador de dirección.   Después, en caso necesario, haga pequeños ajustes en el regulador de dirección mientras 

conduce el vehículo.

Conexión del transmisor y del receptor

Quizás se

a necesario que configure su transmisor para “conectarlo” con el receptor, si se cambia a un receptor nuevo 

o si pierde la señal por alguna razón. 
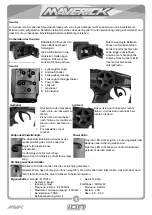
Encienda la emisora mientras mantiene apretado el Botón de Emparejamiento. El LED empezará a parpadear. Estará 

parpadeando y en modo emparejamiento durante más de 20 segundos. 

Encienda el variador. Cuando el LED del receptor se queda fijo, el proceso está completado.

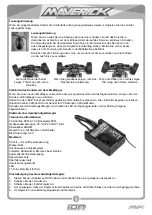
MSRS-249- 2 in 1 Receiver/ESC 2.4GHz 
Información técnica

TECs de accionamiento de 20 A y TECs de marcha atrás de 10 A

Dimensiones del bastidor: 35.1mm*25.3mm*14mm 

22 calibradores con cables de silicio

Peso de 7.4g con conectores e interruptor

Tensión del BEC 6,0 V

Características

6,0 voltios — 8,4 voltios de potencia de entrada

Impermeable

Sistema motor de alta frecuencia

Funcionamiento lineal del freno, avance y marcha atrás

Sistema de configuración de automático

Protección de sobrecorriente

Protección térmica

Protección contra la baja tensión

LED

Límite de 20 revoluciones del 370 motor con ecobillas

Ajuste del Variador

1.  Con el interruptor del variador de velocidad en posicion OFF ( apagado ) conecte la bateria

2.  Encienda el transmisor

3.  Active el control de velocidad

4. 

Para indicar que el variador está trabajando correctamente, su LED parpadeará 3 veces y se quedará fijo         

encendido. 

5.  El variador de velocidad esta instalado y listo para su uso

Regulador del acelerador

Cuando instale un servo o si por alguna razón ha cambiado el horn de servo, 

asegúrese de que el servo está en posición neutral al encender el coche sin el horn 

de servo en su lugar. Ajuste el horn de servo y el varillaje de tal forma que estén a 90 

grados. Asegúrese que el “Trim” está en la posición central. 
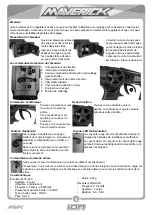
Desplace el trim hacia delante para trimearlo a la derecha y hacia detrás para           

trimearlo a la izquierda.

Si las ruedas apuntan hacia la 

izquierda, desplace el trim hacia 

delante

Si las ruedas apuntan hacia la derecha, 

desplace el trim hacia detrás

Si apuntan derechas no debe 

realizarse ajuste.

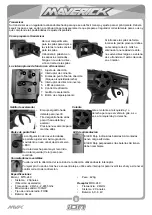
Summary of Contents for MTX-249

Page 1: ...INSTRUCTIONS ...

Page 2: ...ton Pull the trigger to go forwards and speed up Push the trigger forward to brake Push again for reverse Steering Wheel Turn the steering wheel to the left or right to make the vehicle turn left or right Reverse Switch You can reverse the direction travel on the steering by using this switch Example When the car is driving away from you and a left input is made on the Transmitter but the car stee...

Page 3: ...olt Power Input Waterproof High Frequency Drive System Forward Reverse Brake Linear Operation Automatic Setup System Over Current Protection Thermal Protection Low Voltage Protection LED 20 Turn 370 Brushed Motor Limit Electronic Speed Control Setup 1 With the speed control switch set to off plug in a suitable battery pack 2 Switch the transmitter on 3 Turn on the speed control 4 To indicate the s...

Page 4: ...e um rückwärts zu fahren Ziehen Sie den Gashebel nach hinten um vorwärts zu fahren und zu beschleuni gen Für rückwärts erneut drücken Lenkrad Das Lenkrad nach links oder rechts drehen um das Auto nach links bzw rechts zu lenken Richtungswechsel Schalter Mit diesen Schalten können Sie die Lenkrichtung umkehren Beispiel Wenn das Fahrzeug von Ihnen weg fährt Sie am Sender nach links lenken das Auto a...

Page 5: ...lvorgang Überstromschutz Überhitzungsschutz Unterspannungsschutz LED 13 Turns Motorlimit 370er Einstellvorgang des Geschwindigkeitsreglers 1 Stellen Sie den Schalter auf Off Position und schließen Sie einen geladenen Akkupack an 2 Schalten Sie den Sender ein 3 Schalten Sie den Fahrtenregler ein 4 Um anzuzeigen dass der Regler korrekt arbeitet wird seine LED 3 Mal blinken und dann durchgängig leuch...

Page 6: ...oussez une nouvelle fois pour la marche arrière Roue directrice Tournez la roue directrice vers la gauche ou la droite pour que le véhicule aille dans cette direction Commutateurs de marche arrière Vous pouvez inverser la direction sur le volant en utilisant cet interrupteur Par exemple Vous tournez le volant sur la droite lorsque la voiture s éloigne et que la voiture se dirige sur la gauche vous...

Page 7: ...on 6V centre électrique à bus Caractéristiques Entrée alimentation 6 0 Volts 8 4Volts Etanche Système de conduite haute fréquence Marche avant arrière et frein linéaire Fonctionnement Système de configuration automatique Protection surintensité Protection thermique Protection basse tension LED 20 Limites de tour du 370 moteur à charbons Régulateur de vitesse électronique 1 Contrôler que l interrup...

Page 8: ...ia delante para invertir Tire del gatillo hacia atrás para ir hacia delante y acelerar Presione nuevamente para marcha atrás Volante Gire el volante a la izquierda y o derecha para que el vehículo gire a su vez a la izquierda y o derecha Conmutadores reversibles Puede invertir la dirección del recorrido de la dirección utilizando este interruptor Por ejemplo Cuando el coche se encuentra lejos util...

Page 9: ...ada Impermeable Sistema motor de alta frecuencia Funcionamiento lineal del freno avance y marcha atrás Sistema de configuración de automático Protección de sobrecorriente Protección térmica Protección contra la baja tensión LED Límite de 20 revoluciones del 370 motor con ecobillas Ajuste del Variador 1 Con el interruptor del variador de velocidad en posicion OFF apagado conecte la bateria 2 Encien...

Page 10: ...not cause harmful interference and 2 This device must accept any interference received including interference that may cause undesired operation WARNING Changes or modifications made to this equipment not expressly approved by the party responsible for compliance may void the FCC authorization to operate this equipment RF Exposure Statement The MTX 249 transmitter has been tested and meets the FCC...

Page 11: ...11 Notes Notizen Notas ...

Page 12: ...12 HPI RACING A S Jegindoevej 21 8800 Viborg Denmark Tel 45 89281800 WWW MAVERICK RC COM ...

Reviews: