Page 105 P/N 03521015 Rev U1
Bio-Medical Devices Intl
17171 Daimler Street Irvine, CA 92614 800-443-3842 www.maxair-systems.com
Don Battery, Belt, Helmet and Hood
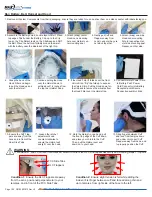
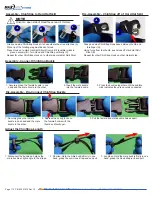
1. Remove all System Components from their packaging, ensure they are ready for use, and lay them on a clean counter with labels facing you.
5. Attach (snap) one side
Hood-Lens mounting
hole to respective Hel-
met side mounting post.
Repeat on other side.
3. Attach (snap) center
Hood-Lens mounting
hole over Helmet cen-
ter mounting post.
6. Grasp the back of the
Hood Filter and begin
to pull the Hood up and
over the Helmet.
2. Assemble the Battery onto a double layer of Belt. Place
top edge of Belt under the Battery Clip, up to the Clip
top, so the Clip Detent rests on the Clip Base and NOT
the Belt. Place the belt comfortably around the waist
with the battery near the side-back of the right hip.
7. Continue pulling the Hood
over the Helmet down to
within about 1-2 inches from
the top rear Helmet Snap.
10. Ensure the Cuff Flap
-
pers are away from the
Lens and in front of the
Liner Side Tabs.
4. Gently pull Cuff and
Flappers away from
Lens to ensure they are
not stuck together.
8. If the Hood Filter if folded over the front
Velcro Strip, “flip” the fold up to expose
the Velcro Strip. Pull the Hood down fur-
ther in back to remove the wrinkles from
the Hood Filter over the Helmet top.
9. Connect Helmet Power Cord
to Battery. Push Power
Cord Connector into Battery
Receptacle until Secure
Connection audibly clicks.
13. Slide fingers between Cuff
and face from temples down
and under chin to pull Cuff
Flappers away from Lens, and
to properly position the Cuff.
11. Loosen the ratchet
adjustment knob
counter-clockwise to
ensure the Helmet will
easily fit over the head.
12. Hold the Helmet in one hand, pull
the front top edge of the Cuff down,
and place your chin into the Cuff.
Then, pull the Helmet over and
down on to your head.
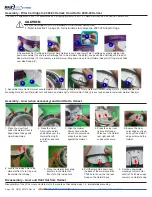
WARNING
If conditions 1 and 2 both are not achieved, switch to other size DLC and repeat Assembly and Donning steps 1-13point.
Condition 1:
Ensure the DLC Flappers are away
from the Lens, positioned perpendicular to your
temples, and in front of the FCC Side Tabs.
Condition 2:
Ensure slight tension is felt while sliding the
index or first finger between cuff and face all along chin and
up to temples, from right side of the face to the left.
DLC Flappers
FCC Side Tabs

