background image


- 23 -


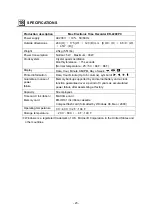
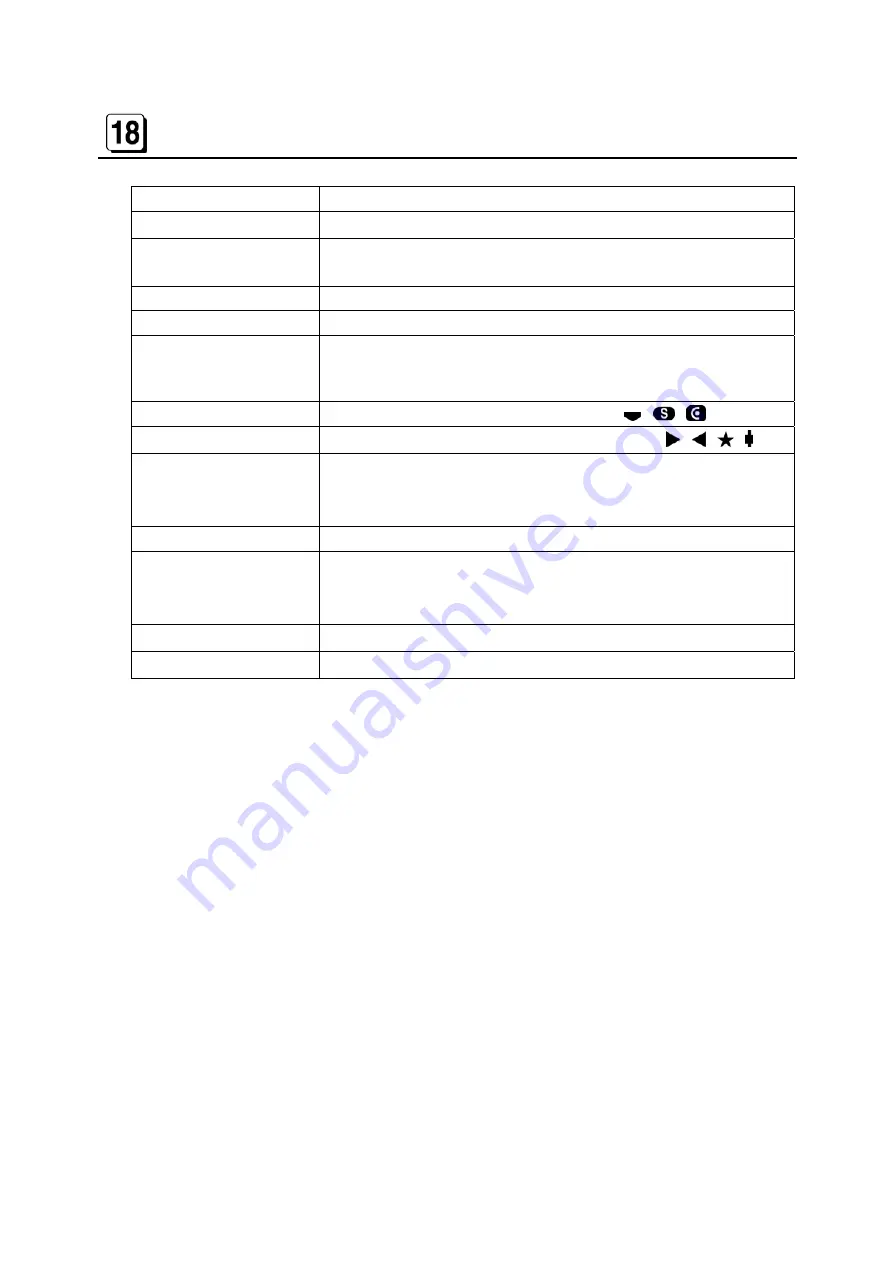
SPECIFICATIONS 


Production description 

Max Electronic Time Recorder ER-2200PC 

Power supply 

AC230V  

±

10%  50/60Hz 

Outside dimensions 

240 (H) 

×

 175 (W) 

×

 120 (D) mm  [9 4/9

(H) 

×

 6 8/9

(W) 

×

 4 5/7

(D)] 

Weight 2.5kg 

(5.51lbs.) 

Power Consumption 

Normal : 5W,    Maximum : 30W 

Clock system 

Crystal quartz oscillation 
Monthly tolerance 

±

15 seconds 

(Normal temperature : 25

±

5 C / 68 F

86 F) 

Display 

Date, Hour, Minute, AM/PM, Day of week, 

Printed information 

Date, Hour/minute (Up to 6 columns), symbol of 

,  , 

Guarantee in case of 
power  

failure 

Memory backup supported by an internal battery and a clock   

function guaranteed over a period of 3 years as accumulated   

power failure after assembling at factory 

Capacity 50 

employees 

Time card / Ink ribbon /   

Memory card 

MAX time card   

ER-IR101 ink ribbon cassette 

Compact flash card (formatted by Windows 98, Me or 2000) 

Operating temperature 

0 C

40 C / 32 F

104 F 

Storage temperature 

20 C

60 C / 

4 F

140 F 

 Windows is a registered trademark of U.S. Microsoft Corporation in the United States and 

other countries. 

Summary of Contents for ER-2200PC

Page 1: ......

Page 2: ...MODE NUMBER AND PAY CLOSING DATE MODE 1 10 SETTING YEAR MONTH DATE HOUR AND MINUTE MODE 2 12 SETTING LINE SHIFT TIME IN OUT AND DAYLIGHT SAVING TIME MODE 3 13 LATE IN EARLY OUT OVERTIME WORKING AND NEXT DAY OVERTIME SYMBOLS 16 REGISTERING TIME CARDS 17 EXPORTING TIME DATA TO THE MEMORY CARD 18 REPLACING THE INK RIBBON CASSETTE 19 WALL MOUNTING AND LAID DOWN POSITION INSTALLATION 20 ERROR CODES 21 ...

Page 3: ... do An indication in or near this symbol shows a specific prohibition Denotes What you must do An indication in this symbol shows a specific in struction WARNING Clean regularly the plug of power cord Dust on the plug could cause a fire Obtain the power directly from a single plug socket Avoid connecting many wires to one plug socket It could lead to a fire Do not connect disconnect a power plug w...

Page 4: ...ge Otherwise it could trouble the instrument Do not splash water or chemicals on the instrument If water gets inside the instru ment disconnect the power plug immediately from the plug socket and contact your dealer distributor for a repair It could damage the instrument or cause a fire or elec tric shock Do not put paper or cloth on the instrument It could cause a fire Do not place any heavy mate...

Page 5: ...hat catches direct sunlight or is located close to a heat source Do not insert cards or paper other than the specified time card for this instrument Do not use time cards that are bent or torn Be sure to use a dry cloth for cleaning Do not use solvents al cohol benzene thinner etc or a damp cloth Do not re ink cartridge Replace with ink ribbon cassette ER IR101 Do not hang this instrument on a wal...

Page 6: ...ertime in the 6th column on the same line of the day 9 Key Card for the protection of setting data 10 Three kinds of pay period formatting Monthly Weekly or Bi weekly 11 Available for Daylight Saving Time the summer time 12 Printing past midnight time in the same line of the day by Line Shift Time 13 Built in lithium battery protects the clock calendar and program data for 3 years 14 Three kinds o...

Page 7: ... 6 PARTS DESCRIPTIONS TO OPEN AND CLOSE FRONT COVER ...

Page 8: ...Use these keys for setting modes In case of pressing for 3 seconds without inserting Key Card Use these keys for registering the time card or exporting time data to the memory card D I Use these keys for changing data after inserting the Key Card J K Use these keys for operating the machine ...

Page 9: ...inting automatically in the order of IN1 OUT1 IN2 OUT2 IN3 and OUT3 without the user pressing any external keys A Insert time card to the position where automatic feed starts B Time card will be ejected automatically after printing the time 3 MANUAL OPERATION ER 2200PC allows manual operation for shifting the column to print A Select a desired column to print on the time card by pressing or key B ...

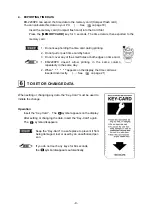
Page 10: ...s at both edges on time card 1 ER 2200PC doesn t allow printing in the same column repeatedly in the same day 2 When appears on the display the time card was inserted incorrectly See on page 21 TO SET OR CHANGE DATA When setting or changing any data the Key Card must be used to initiate the change Operation A Insert the Key Card The symbol appears on the display B After setting or changing the dat...

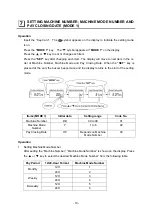
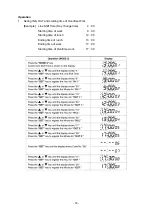
Page 11: ... and Pay Closing Date When the SET key is pressed at the end the buzzer beeps twice and the display returns to the start of the setting mode Items MODE 1 Initial data Setting range Code No Machine Number 00 00 to 99 01 Machine Mode Number 1 1 to 6 02 Pay Closing Date 31 Depends on Machine Mode Number 03 Operation 1 Setting Machine Mode Number After setting the Machine Number Machine Mode Number is...

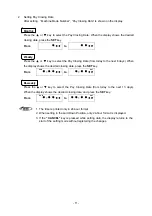
Page 12: ... days When the display shows the desired closing date press the SET key From to SAT SUN Bi weekly Press the or key to select the Pay Closing Date from today to the next 13 days When the display shows the desired closing date and press the SET key From to SAT SUN 1 The time is printed only in 24 hour format 2 When setting in the Laid Down Position only 24 hour format is displayed 3 If the CANCEL ke...

Page 13: ...key The symbol appears at MODE 2 on the display C Press the or key to change Year Month Date Hour and Minute D Press the SET key after changing each item When the SET key is pressed at the end the buzzer beeps twice and the display returns to the start of the setting mode Example 1 35 PM 21st May 2002 Clock starts every 00 seconds when SET key is pressed at the end ...

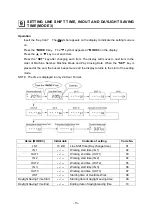
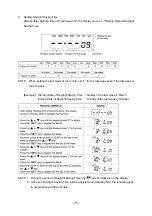
Page 14: ...the SET key is pressed at the end the buzzer beeps twice and the display returns to the start of the setting mode NOTE The time is displayed in only 24 Hour Format Items MODE 3 Initial data Contents of setting Code No LST 3 00 Line Shift Time Day change time 01 IN 1 Working start time IN 1 02 OUT 1 Working end time OUT 1 03 IN 2 Working start time IN 2 04 OUT 2 Working end time OUT 2 05 IN 3 Worki...

Page 15: ...UT and starting time of Overtime Work Example Line Shift Time Day change time 4 00 Starting time of work 9 00 Starting time of lunch 12 00 Ending time of lunch 13 00 Ending time of work 17 00 Starting time of Overtime work 17 30 ...

Page 16: ...last week even if the last week is the 4th week Example Starting Date of Daylight Saving Time Sunday of the last week in March Ending Date of Daylight Saving Time Sunday of the last week in October NOTE 1 During the period of Daylight Saving Time the symbol appears on the display 2 Once set Daylight Saving Time will be adjusted automatically from the following year in accordance with the set data ...

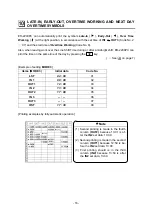
Page 17: ...on the same line of the day by pressing the key See on page 7 Example of setting MODE 3 Items MODE 3 Initial data Code No LST 04 00 01 IN 1 09 00 02 OUT 1 12 00 03 IN 2 13 00 04 OUT 2 17 00 05 IN 3 06 OUT 3 07 OST 17 30 08 Printing examples by fully automatic operation Note 1 Second printing is made in the fourth column OUT2 because 13 01 is af ter the IN2 set data 13 00 2 Second printing is made ...

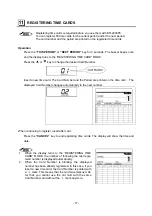
Page 18: ...and the Period are printed on the time card The displayed Card Number changes automatically to the next number When continuing to register insert after card D Press the CANCEL key to end registering time cards The display will show the time and date 1 When the display turns to the REGISTERING TIME CARD MODE the number of following the last regis tered number is displayed automatically 2 When the C...

Page 19: ...tomatically E Push the eject button to remove the memory card While CArd is displayed the time recorder cannot be operated CAUTION Use the memory card only for ER 2200PC Storing other data in the memory card may cause damage to the data Do not remove the memory card while exporting time data to it Re moval could cause damage to the data in the memory card Format the memory card by Windows 98 Me NT...

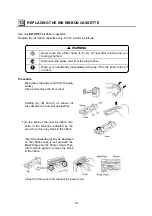
Page 20: ...nk ribbon rubs off on them Procedure A Disconnect the power cord from the plug socket Open and remove the front cover B Holding A B and C as shown lift the cassette out And pull up together C Turn the knob of the new ink ribbon cas sette in the direction indicated by the arrow to remove any slack in the ribbon D Insert the cassette properly as illustrated so that ribbon tape is set between the Mas...

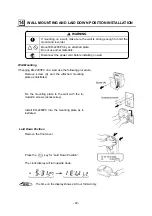
Page 21: ...g on wall Wall Mounting If hanging ER 2200PC on a wall use the following procedure A Remove screw A and the attached mounting plate as illustrated B Fix the mounting plate to the wall with the in cluded 4 screws accessories C Install ER 2200PC into the mounting plate as il lustrated Laid Down Position A Remove the front cover B Press the key for Laid Down Position C The clock display will turn ups...

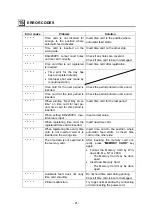
Page 22: ...t Day Over time on time card for last pe riod time card for this period is inserted Insert time card for the last period When setting ER 2200PC inva lid value is input Input correct value When registering time card the registered time card is inserted Insert new time card When registering time card time card is not inserted well or is inserted on the wrong side Insert time card to the position whe...

Page 23: ...g time data TROUBLE SHOOTING CAUTION Never disassemble the instrument by yourself Contact your dealer distributor if you could not solve the problem after checking the following table Problem Points to Check See No display Is the power cord connected to the plug socket cor rectly No print out on time card Is the ink ribbon cassette inserted correctly Card insertion obstructed Is the card being ins...

Page 24: ...ed information Date Hour minute Up to 6 columns symbol of Guarantee in case of power failure Memory backup supported by an internal battery and a clock function guaranteed over a period of 3 years as accumulated power failure after assembling at factory Capacity 50 employees Time card Ink ribbon Memory card MAX time card ER IR101 ink ribbon cassette Compact flash card formatted by Windows 98 Me or...

Page 25: ...e This instruction manual is subject to change without notice due to functional enhancement 6 6 NIHONBASHI HAKOZAKI CHO CHUO KU TOKYO JAPAN POST CODE 103 8502 TELEPHONE 81 3 3669 8131 FAX 81 3 3669 7104 URL http www max ltd co jp int 02 05 Vol 1 PRINTED IN JAPAN ...

Reviews: