background image

7

3. SPECIFICATIONS AND TECHNI-

CAL DATA

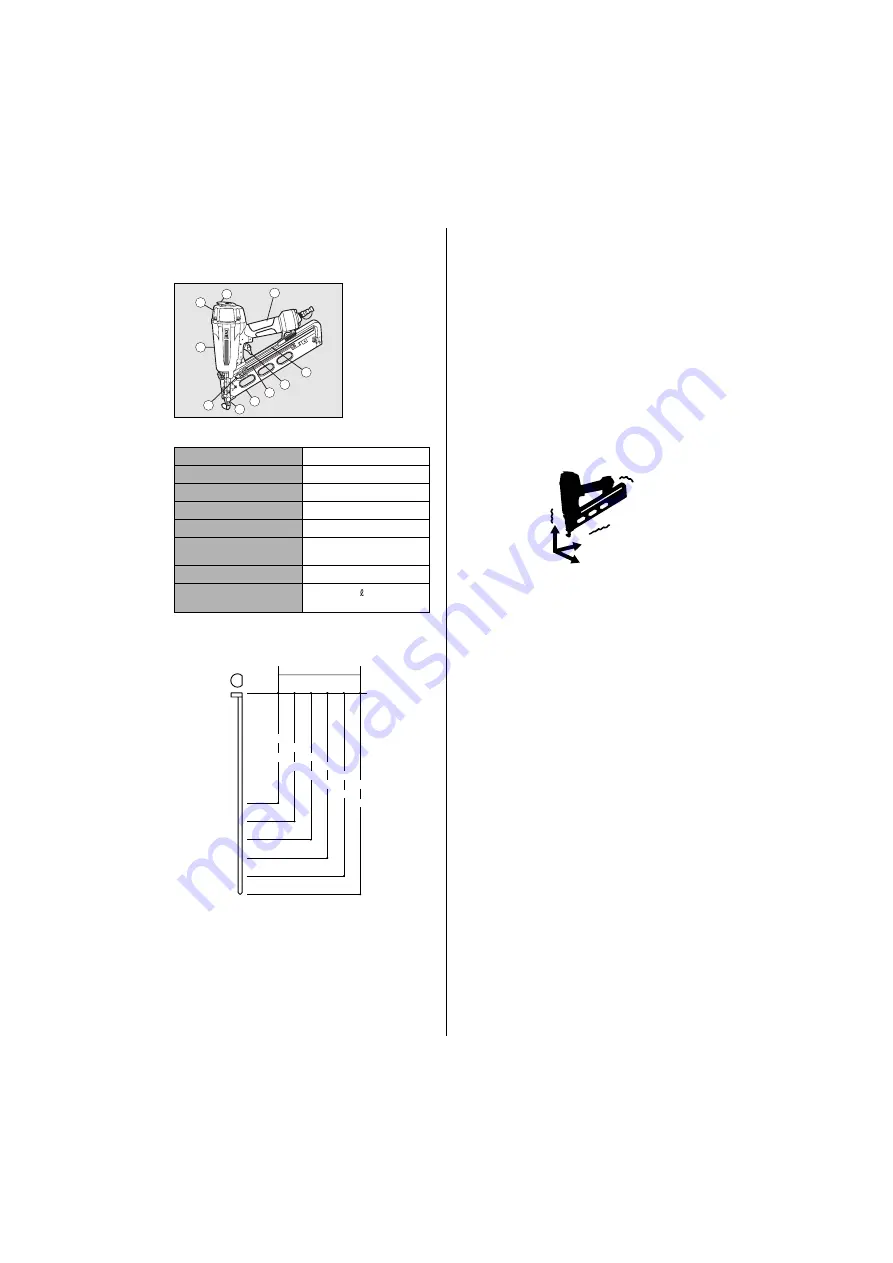
1.

NAME OF PARTS

2.

TOOL SPECIFICATIONS

The machine has been compactly designed in order to im-
prove operating weight balance.

3.

BRAD NAIL SPECIFICATIONS

TOOL AIR FITTINGS:

This tool uses a 1/4" N.P.T. male plug. The inside diameter 
should be .28" (7mm) or larger. The fitting must be capable of dis-
charging tool air pressure when disconnected from the air supply.

RECOMMENDED OPERATING PRESSURE:

70 to 100 p.s.i. (5 to 7 bar). Select the operating air pressure with-
in this range for best fastener performance.

DO NOT EXCEED 120 p.s.i. (8.3 bar).

4.

TECHNICAL DATA

1

NOISE

A-weighted single-event sound power level 

NF665/15------ LWA, 85.5 dB

A-weighted single-event emission sound pressure level at 
work station 

NF665/15------ LpA, 79.4 dB

These values are determined and documented in accord-
ance to EN12549 : 1999.

2

VIBRATION

Vibration characteristic value

= 3.2 m/s

2

These values are determined and documented in accord-
ance with ISO 8662-11.
This value is a tool-related characteristic value and does not 
represent the influence to the hand-arm-system when using 
the tool. An influence to the hand-arm-system when using 
the tool will, for example, depend on the gripping force, the 
contact pressure force, the working direction, the adjust-
ment of mains supply, the workpiece, the workpiece sup-
port.

5.

APPLICATIONS

Door and window casings

Plywood, decorative boards, and other interior finish works

Panel assembly and moldings

Sub flooring

Furniture assembly including drawer assembly, case back 
nailing, blind pinning, and other finishing works

Cabinet assembly

1

Frame

2

Cylinder Cap

3

Exhaust Port

4

Magazine

5

Slider Unit

6

Trigger

7

Grip

8

Warning Label

9

Outlet

0

Pusher

PRODUCT NO.

NF665/15

HEIGHT

12-5/8" (322 mm)

WIDTH

3-11/16" (94 mm)

LENGTH

12-5/8" (322 mm)

WEIGHT

3.97 lbs (1.8 kg)

RECOMMENDED
OPERATING PRESSURE

70 to 100 p.s.i.

(5 to 7 bar)

LOADING CAPACITY

106 Nails

AIR CONSUMPTION

0.096 ft

3

 (2.7  ) at 7 bar

operating pressure

9

10

6

5

4

2

1

7

3

8


Summary of Contents for NF665/15

Page 1: ...KEEP THESE INSTRUCTIONS WITH THE TOOL FOR FUTURE REFERENCE AVANT D UTILISER CET OUTIL LIRE CE MANUEL ET LES CONSIGNES DE S CURIT AFIN DE GARANTIR UN FONCTIONNEMENT S R CONSERVER CE MANUEL EN LIEU S R...

Page 2: ...une situation ventuellement dangereuse qui si elle n est pas contourn e pourrait provoquer la mort ou des blessure s rieuses ATTENTION Indique une situation ventuellement dangereuse qui si elle n est...

Page 3: ...9 and provide both frontal and side protection The employer is responsible to enforce the use of eye pro tection equipment by the tool operator and all other person nel in the work area NOTE Non side...

Page 4: ...bar as the tool can burst 3 DO NOT OPERATE THE TOOL NEAR A FLAMMABLE SUBSTANCE Never operate the tool near a flammable substance e g thinner gasoline etc Volatile fumes from these substanc es could b...

Page 5: ...G THE FASTENERS AFTER COMPLETING OPERATION If fasteners are left in the magazine after the completion of operation there is the danger of a serious accident occur ring prior to the resumption of opera...

Page 6: ...Always carry the tool by the grip never carry the tool by the air hose The tool must be used only for the purpose it was designed Never remove tamper with the operating controls e g TRIGGER CONTACT A...

Page 7: ...2 These values are determined and documented in accord ance with ISO 8662 11 This value is a tool related characteristic value and does not represent the influence to the hand arm system when using th...

Page 8: ...ly 6 Check the air leakage The Tool must not have the air leakage 7 Hold the Tool with finger off the trigger then push the con tact arm against the work piece The tool must not oper ate 8 Hold the To...

Page 9: ...fire the fastener 3 With the tool off the work piece pull the trigger Then depress the connect arm against the work piece The tool must fire the fastener 4 Adjust the air pressure as much as the lowe...

Page 10: ...d Switching SEQUENTIAL TRIP to CONTACT TRIP ALWAYS disconnect air supply before switching the trigger ing method 1 Press the button on the trigger 2 Turn the switching lever in the direction of the ar...

Page 11: ...ils to a soft material Use the contact tip at the back of the rear side of the magazine as necessary CLEARING JAMMED NAILS ALWAYS disconnect air supply before clearing jammed nails 1 Disconnect the ai...

Page 12: ...th the jet oiler Recommended Oil ISO VG32 5 INSPECT AND MAINTAIN DAILY OR BEFORE OPERA TION Disconnect air supply and empty the magazine when inspect ing or maintaining the tool 1 Drain air line filte...

Page 13: ...the quality of our products Les caracteristiques et la conception des produits mentionnes dans ce manuel sont sujettes a des modifications sans preavis en raison de nos efforts continus pour ameliore...

Reviews: