background image

71

MAXDATA Notebook PRO 6000 I

  UK

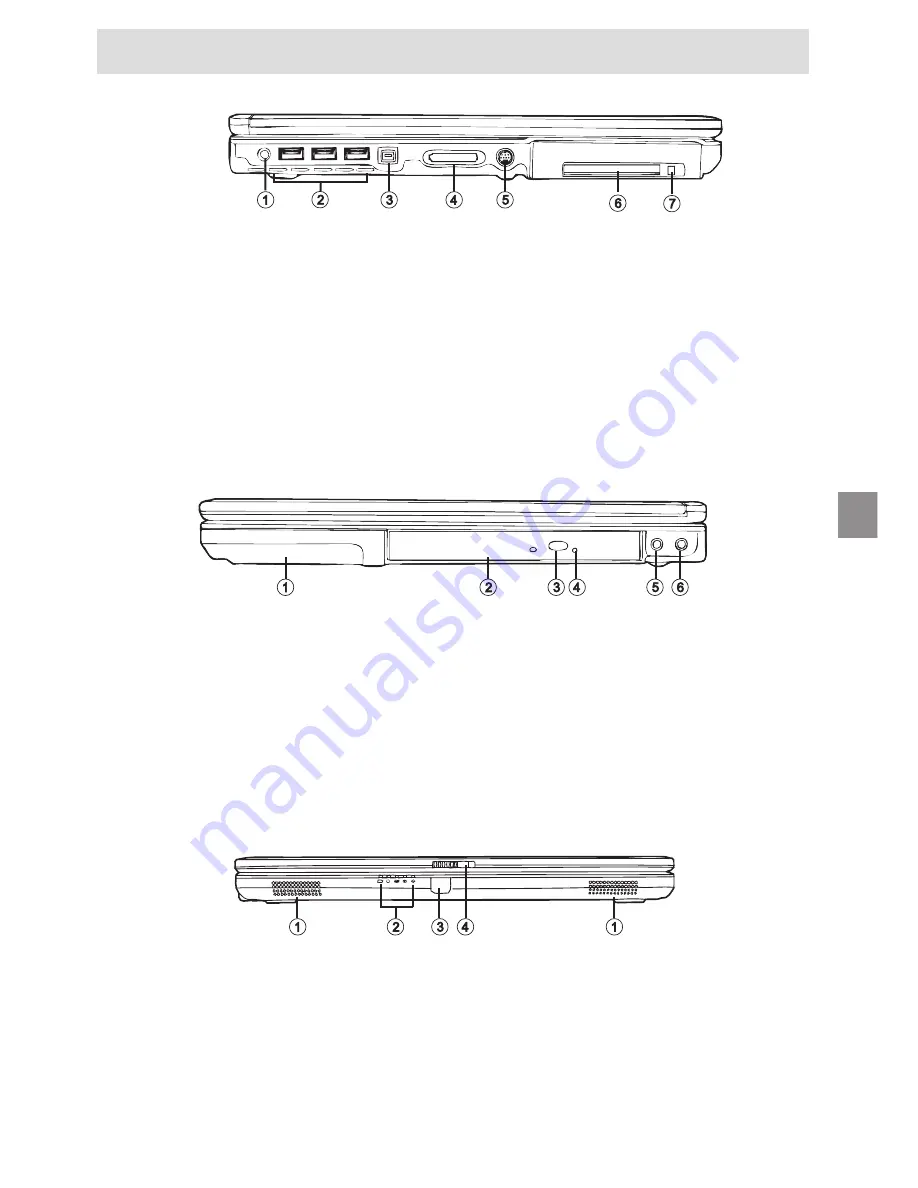
Right Side

Fig. 7

System Overview

Front View

Fig. 8

(1)

Loudspeakers

(2)

Status LEDs

(3)

Infrared sender/receiver (Fast IrDA)

(4)

Display release

(1)

Lithium ion battery

(2)

Optical drive

(3)

Eject button for optical drive

(4)

Emergency release for optical drive (only if 
notebook is switched off)

(5)

Microphone socket (mono)

(6)

Loudspeaker/headphones socket

Fig. 6

(1)

Power adapter socket

(2)

USB ports

(3)

IEEE 1394 port

(4)

Memory card slot

(5)

S-Video TV output

(6)

PC card slot

(7)

PC card release catch

Left Side

Summary of Contents for PRO 6000 I

Page 1: ...UK MAXDATA Notebook PRO 6000 I User s Manual...

Page 2: ...48...

Page 3: ...LAN 61 Legal requirements exception clauses 62 Shipping Contents 63 Preparation 65 Inserting the Battery 66 Removing the Battery 66 Power Supply 67 Switching the notebook on 68 Power Management 69 Sys...

Page 4: ...50 Installation Instructions 81 Restoring the Drivers 81 The Utility CD 81 Setting the Resolution 81 Speci cations 83 Fault Diagnosis andTroubleshooting 87 Index 89 Contents...

Page 5: ...to the product or manufacturer MAXDATA 2005 Legal Information Acrobat and the Acrobat Logo are trademarks of Adobe Systems Incorporated or its sub sidiaries In certain jurisdictions these trademarks...

Page 6: ...devices through original replacement parts or exchange of modules or devices with cost for at least 5 years from end of production Operator Note This device has been carefully RF suppressed and teste...

Page 7: ...or further use or dismantled and recycled in an environmentally sound manner The return is handled through your dealer Rechargeable and disposable batteries containing heavy metals should not be throw...

Page 8: ...54...

Page 9: ...t be tted with a grounded earthed plug Never pull on the cable to unplug the power supply always pull the plug itself Disconnect the external power supply power adapter or car adapter before cleaning...

Page 10: ...he device to the risk of electrical shock If servicing is required consult quali ed service personnel Disconnect the computer from the power supply If the following problems occur consult quali ed ser...

Page 11: ...AN so that users in different parts of a building can work at different times There are two different ways to operate a WLAN In xed WLANs wireless stations devices with radio network cards or external...

Page 12: ...its radio components are switched on do not place the Notebook close to in ammable gases or in an environ ment which could be at risk of explosion e g paint shop since the radio waves which are transm...

Page 13: ...ossible restrictions in its operation can be obtained from the appropriate authorities in each country If your country is not included in the above list then please contact the appropriate supervising...

Page 14: ...lso required to use the unit in internal areas For more detailed information about the necessary procedure to do this please contact your provider It is forbidden to use the unit outside of enclosed a...

Page 15: ...z Because of the DSSS procedure Direct Sequence Spread Spectrum each of the 11 usable radio channels takes up a width of 22 MHz this means that up to three independent channels are available e g 3 8 a...

Page 16: ...it The manufacturer is not liable for radio disruptions during the reception of radio and television signals which are due to non authorised alterations to the unit or to the exchange or connection of...

Page 17: ...e shipping contents is missing from your computer package please contact your dealer immediately Notebook Battery Utility CD Power adapter Power cable User guide DVD ROM drive or DVD CD RW combo or DV...

Page 18: ...64...

Page 19: ...TouchPad 5 Status LEDs 6 Fast IrDA 7 Power button 1 Release catch 2 Open the display Fig 1 Fig 2 Preparation Before rst using the computer make sure you are familiar with the individual components of...

Page 20: ...contents This battery is only partially charged Note that the charging time for the battery is three hours if the computer is switched off or four to six hours if the computer is switched on It is abs...

Page 21: ...r adapter to the DC IN socket on the computer 2 Connect the power cable to the power adapter 3 Connect the power cable to a power outlet You can choose to run the notebook via batte ry or power supply...

Page 22: ...ld always switch off the computer as follows Click the Start button Select Shut Down Click OK This avoids any prob lems with the hard disk and operating system The operating system is installed the rs...

Page 23: ...ng the on off button the computer returns to the normal operating state The user must log on again Sleep without power adapter no energy consumption The current operating state is saved to the hard di...

Page 24: ...70...

Page 25: ...lay release 1 Lithium ion battery 2 Optical drive 3 Eject button for optical drive 4 Emergency release for optical drive only if notebook is switched off 5 Microphone socket mono 6 Loudspeaker headpho...

Page 26: ...ternal monitor 5 Kensington Lock anti theft device Fig 9 Rear View All air intake and ventilation openings must be kept free from obstructions at all times If not the device is liable to overheat Syst...

Page 27: ...es in power saving mode Lights when the hard disk is being accessed Lights when optical disk is accessed Lights when the wireless LAN is activated Lights when Caps Lock is on Lights when Num Lock is o...

Page 28: ...LCD display monitor both Fn F4 Reduces LCD brightness Fn F5 Increases LCD brightness Fn F6 Switches the loudspeaker on off Fn F7 Reduces the volume Fn F8 Increases the volume Fn F9 Switches between P...

Page 29: ...ns are available via these keys You can nd more detailed information on this in the relevant handbooks Special keys These keys and key combinations are used for controlling various hardware functions...

Page 30: ...for the basic functions If you wish to use the advanced functions you can nd the driver to activate the function on the Utility CD To do this please follow the instructions in the Installation Instruc...

Page 31: ...wn onto the spindle Push the CD tray back in until it locks into place The CD is now ready to read Some CDs have an autostart function This means that installation programs or music CDs automatically...

Page 32: ...s inserted correctly into place it is recognized as an additional drive The data on the card can then be accessed To remove it simply pull the card out Never remove the card while data is being read f...

Page 33: ...modem to an ISDN telephone socket This would re sult in serious damage to the device The LAN Port The built in network adapter enables your computer to connect to the Internet via a 10 100 1000 Mbps n...

Page 34: ...80...

Page 35: ...ve If this is not the case you can run the CD as follows select My Computer CD Drive and then the utility exe le You can select the driver that you want to install in the Drivers section Recommended I...

Page 36: ...82...

Page 37: ...ry Two DDR 450 533 SODIMM sockets Display and Video 15 inch XGA TFT display Supported resolution 1024 768 with up to 16 7 million colors Intel 915GM with integrated graphics controller Shared memory t...

Page 38: ...et One microphone input socket mono One infrared port FIR Four USB ports v2 0 One standard telephone socket RJ 11 One standard network port RJ 45 One DC IN socket One IEEE1394 i Link port One Type II...

Page 39: ...O 6000 I UK Operating System O S Microsoft Windows XP Other Data Dimensions 270 D 339 W 34 H mm Weight 2 7 kg depending on model Operating temperature 5 to 35 C Operating humidity 20 to 80 RH Storage...

Page 40: ...86...

Page 41: ...ting Make sure that the battery is in the battery compartment and is inserted properly Check that the battery terminals are making direct contact Connect your notebook to the power adapter so that the...

Page 42: ...ches itself off Troubleshooting Press any key or press the on off button if none of the status LEDs are lit Possible cause of the problem A software error has caused a system crash Troubleshooting Add...

Page 43: ...75 Function keys 75 G Garbage collection service 55 Graphics gunctions basic 68 H Household waste 53 55 I Instructions 68 ISDN connector 79 Index K Keyboard 65 75 Keys 74 L LAN Port 79 LCD display 65...

Page 44: ...90 Sunlight 55 Switch on 68 System crash 88 T TouchPad 65 76 84 Typewriter 75 V Voltage 52 67 W Warm start 68 Warranty 52...

Reviews: