background image

8

Caution

1
2

3

Recommended body parts

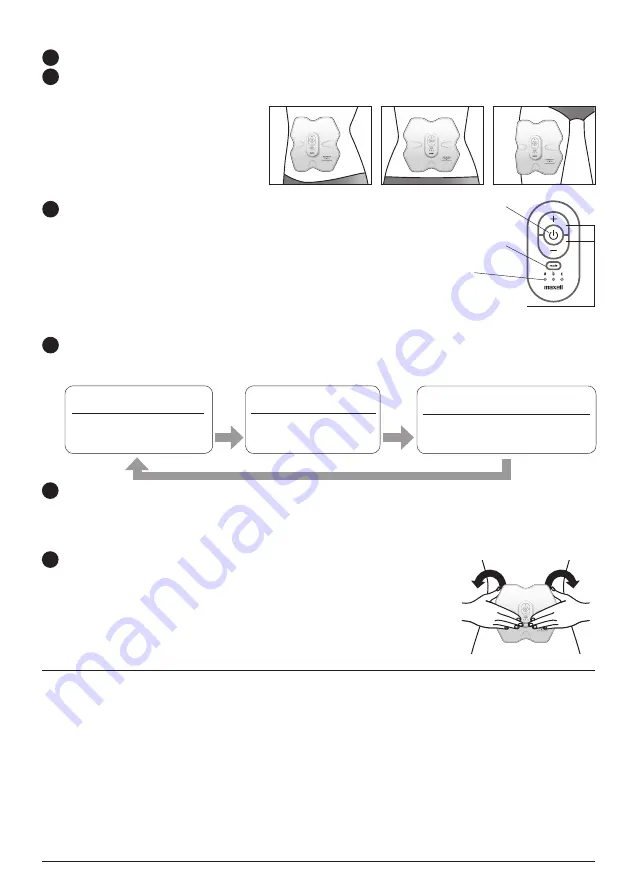
Remove the protective sheet of the device
Place gel pads to the device. Attach the device onto the targeted area to begin training

Press the power button

Abdomen

Waist

Thigh

If gel pads do not attach to your body well, the “beep”  sound

     will continue and LED will flash, but the device will not work.

If the power is turned on without being attached to the body, 

1 minute waiting time will start. please paste on your 

body to use within 1 minutes.

When you hear a “beep” sound, LED flash and training begin.

When the device turns on, the intensity is preset as 1 (minimum).

Please paste the body according to 

     the direction of muscle texture.

• If you feel pain or numbness during use,  switch off the device and try on a different position of your body.

• Do not forcibly increase the intensity. 

• Traning steps will be switched automatically and does not support manual operation. 

• When the device is stopped during the training, next training will start from the beginning.

• Use within 10-35°C.

• When removing the device, please proceed slowly and carefully. Electrode may be damaged when 

  peel with strong force.

• If the LED does not turn on or the electrical stimulus cannot be felt, the charge in the battery is low. 

  Please charge the battery.

• If there is no working or electrical stimulation, the gel pad may have deteriorated. Replace the original 

  gel pad. 

• Be sure to disconnect the charging cable before use.

• The electrodes parts may darken depending on the method of use and frequency of use.  


Usage

Before applying to the body, wipe off 

sweat, moisture and dirt from the 

skin. It may cause a decrease in 

adhesive strength.

(Approx. 1sec)

Beep

Beep

Beep

Beep

Beep

Beep

4

Mode selection button

Once mode is switched, intensity returns to 1. 

Training to add a strong

feeling of tension and 

tightness

Careful training for long periods 

of soft stimulation suitable for 

women

Training to stimulate in a 

balanced manner

a. Balance Mode 

approx. 20mins 

b. Hard Mode

approx. 15mins 

approx. 30mins 

c. Long period 

• 

Soft Mode

Intensity selection

button

Power button

LED

Mode selection

button

6

5

Adjust intensity

•  There are 25 levels of strength. Select “+” or “-” from the strength selection button. When you operate
    the “+” or “-” button,  it will have “beep” sound and the strength changes.
•  When the strength level reaches 25 (maximum) or 1 (minimum),  it will have “beep” sound.

   Training finishes

•  Remove the device in vertical direction 

slowly 

after use.

•  After starting the operation, a mode approx. 20 mins, b mode approx. 15 mins, 

   c mode 30 mins and then automatically closed.
•  To turn off the power in halfway, press and hold the power button 

   (approx. 2 seconds) until you hear the beep sound, the LED light turns off 

   and the power is turned off.

Three modes would be switched between by pressing the mode button.

Summary of Contents for ActivePad MXES-R410PRWPK

Page 1: ...ease read this user manual in advance and use the product safely Please keep this user manual for future reference Motecare 10 11 12 Index Preface 2 3 6 6 9 Safety caution Names of parts of the device Usage Maintenance Troubleshooting Device disposal Specification 1 2 3 4 5 6 7 8 ...

Page 2: ... Maxell shall not be responsible for any damage caused by fires earthquakes action of a third party any accidents intended or unintended misuse or other usage under abnormal conditions All explicit and implicit contents not stated in the user manual are not covered Maxell shall not be responsible for failure due to any damage caused by usage other than described in the user manual This product is ...

Page 3: ...th written description next to it Graphic symbols representing specific instructions are shown in white color in the shape of Caution to fire electric shock high temperature when handling the product Details will be illustrated inside the symbol Graphic symbols representing specific instructions are shown in white color in the shape of Instruction which must be followed Details will be illustrated...

Page 4: ...cause electric shock If you feel unwell stop use immediately This may cause accidents or physical deterioration Discontinue use and consult a doctor if you feel any discomfort or abnormality such as dry skin itchiness redness burning or inflammation during use Continued use may aggravate the symptoms Do not use near your heart head face eyes neck or vulva This may cause accidents or physical deter...

Page 5: ...body part for more than once a day Do not use for more than 20 minutes each time Continuous usage may result in muscular or neuropathic pain Do not leave the gel pads on your body This may cause skin inflammation Do not use other electrical devices such as mobile phones during use This may cause accidents Do not use before or whilst driving This may cause traffic accidents Do not use any other cha...

Page 6: ...ge the device Do not use for purposes other than body training This may cause accidents or injury Do not use the belt for other purposes It may cause injury Charge the battery every 3 months The battery may deteriorate and the product will become unusable Do not exercise while using this product It may cause injury Charging Cable Power Adaptor Charging only Not for data communication When the powe...

Page 7: ...tward Stick Intensity 25 Charging time is approximately 2 hours charging time varies depending on the remaining battery capacity and the charging environment The buttons cannot be operated while charging Please use only the supplied charging adapter and charging cable Charge in an ambient temperature between 10 35 C The number of times that can be used per charge varies depending on the strength s...

Page 8: ...electrical stimulation the gel pad may have deteriorated Replace the original gel pad Be sure to disconnect the charging cable before use The electrodes parts may darken depending on the method of use and frequency of use Usage Before applying to the body wipe off sweat moisture and dirt from the skin It may cause a decrease in adhesive strength Approx 1sec Beep Beep Beep Beep Beep Beep 4 Mode sel...

Page 9: ...Gel Pad Dip your finger tip in water and wipe away the dirt on the adhesive side Wipe away the water place the adhesive side on top and dry in a cool well ventilated location Ensure there is no water left and cover with the protective film Please use dry and soft cloth to wipe away the dirt on the device For severe dirt please use damp soft cloth to wipe away the dirt on the device gently Please s...

Page 10: ...nsation Sensation is too strong or feels painful Gel pads detached from the device Battery level is low Charge the device Gel pads not properly placed Reattach the gel pads well and try again Reattach the gel pads well and try again Battery level is low Charge the device Troubleshooting Power supply cannot turn on Continuous warning sounds There is air between the gel pads and the device Place the...

Page 11: ...k disassemble remodel Do not touch terminal by metal Do not put together with necklace hair pin etc Do not put close to flame or fire or any hot location Caution Removed lithium ion battery should be kept out of reach of children If you think it has been swallowed consult a doctor immediately In case of liquid leakage from the battery do not touch with bare hands and follow below If liquid gets in...

Page 12: ... Battery Charging time Gel Pad Weight Material Input Output Length Length Power adapter Charging cable Fitting Belt W178 H170 D15mm without Gel Pad W45 H75 D0 8mm pc Approx 3g pc Hydro Gel AC100 240V 50 60Hz DC5V 1A Max Approx 50cm Approx 125cm Approx 71g without Gel Pad DC5V 200mA Max Lithium ion battery 3 7V 200mAh Approx 2 hours ...

Reviews: