Copyright 2013: Maxford USA
Page
Blériot XI: S130926
c.
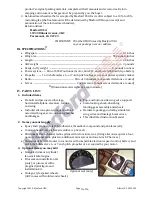
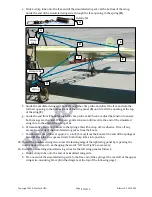
Guide the free end of the simulated wing wire from
G
down into the nearest opening in the top
of the left wing panel (
H
) until it exits the opening at the bottom of the wing (
I
). Pull on the
simulated wing wire from
I
until the simulated wing wire between
G
and
H
is drawn snug and
the spring at
G
is approx. doubled.
f.
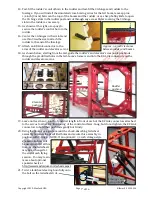
Direct the simulated wing wire from
the crimp tube into the furthest
opening in the bottom-rear of the
left wing panel (
K
) until it exits the
opening at the top of the wing (
L
).
g.
Pull the free end of the simulated
wing wire from
L
at the top of the
left wing panel until the simulated
wing wire between points
I
,
J
1
,
J
2
and
K
is drawn snug and the spring at
G
is approx. doubled.
h.
Guide the free end of the simulated wing wire from
L
back through the crimp tube near the end
of the spring attached to the rear left side of the upper wing wire brace (
G
) and securely tie the
loose end of the simulated wing wire beside the original knot at the end of the spring on the
left side of the upper wing-wire-mounting brace at
G
.
i.
Permanently secure both knots to the spring with a drop of CA adhesive. Trim off any excess
loose ends of the simulated wing wire from the knots.
j.
Position the crimp tubes at approx.
1/4
-inch (5 mm) from the knots at the end of the spring at
G
and from the left end of the arm at the bottom of the lower wing-wire-mounting brace (
J
1
).
Use pliers to squeeze firmly both crimp tubes into position.
41.
Install the remaining simulated wing wires for the right wing panel by repeating the instructions
in step 40 and exchanging the words ‘left’ and ‘right’ where necessary.
42.
Ensure all nuts, screws and EZ Link connectors are securely tightened and apply threadlock
compound to secure all metal-to-metal connections.
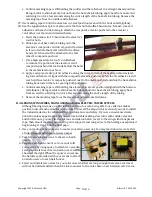
Congratulations! Assembly is finished!
G
Crimp
tube
J
1
J
2
d.
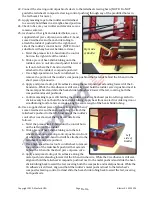
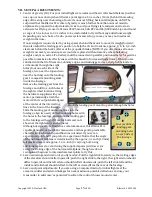
Guide the simulated wing wire from
I
into the back side of
the opening nearest the end of the arm at the bottom of the
lower wing-wire brace (
J1
).
e.
As shown below, guide the simulated wing wire from
J
1
into the second opening in the end of the arm
(
J2
), bring it
back through
J1
, then direct the simulated wing wire back
through the crimp tube.
J
1
J
2
From
I
To
K
Crimp
tube
Crimp
tube
I
H
at
top
of
wing
K
L
at
top
of
wing
Detail of
G
G
Detailed view
14
of 16


