/
j.
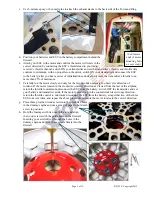
Use two 5/16-inch wood screws to attach the tail
wheel strut’s metal mounting base to the bottom
of the fuselage.
k.
Twist a control horn onto the elevator’s and the
rudder’s pushrod. Use the supplied bolts and
backplates to secure the control horns to the rudder
and elevator.
l.
Test fit the elevator’s metal joiner and CA hinges.
m.
Secure the elevator’s metal joiner into each half of
the elevator with a small dab of epoxy; before the
epoxy has time to cure …
1) Using thin CA and the supplied CA hinges, attach
each half of the elevator to the horizontal
stabilizer.
2) Viewing both horizontal surfaces of the elevator at
the same time, determine if one appears to be at a
slightly different angle than the other. If you see
any difference, gently apply and hold enough
pressure to align both surfaces of the elevator until
the epoxy has fully cured.
n.
Center the rudder and elevator servos, hold the rudder
at a neutral ‘straight ahead’ position, and tighten the
rudder servo’s EZ Link connector onto its pushrod.
While holding the elevator at a neutral ‘level flight’
position, tighten the elevator servo’s EZ Link
connector onto its pushrod.
o.
Cut off and discard the ends of the rudder and/or
elevator pushrods that extend excessively forward of
their EZ Link connectors.
p.
Connect the aileron’s Y-cable to your receiver’s
aileron port. Secure the receiver inside the fuselage.
q.
Insert the two forward-projecting portions of the
wing’s root ribs into the opening in the center of the
fuselage former located between the back of the
battery compartment and the front of the fuselage’s
radio compartment/wing opening.
r.
Secure the wing to the fuselage by gently pressing the
trailing edge of the wing into the wing saddle and
driving two machine screws into the wooden wing
hold-down plate inside the fuselage. Firmly ‘snug’
but do not over-tighten these wing attachment screws.
s.
View both the wing and the horizontal stabilizer at
the same time to determine if one appears to be at a
slightly different angle than the other. If you see a
difference, remove the wing attachment screws, insert
enough paper between the wing and the wing saddle to shim the left or right side of the wing to align the
wing to the horizontal stabilizer, and secure the paper to the wing saddle with CA adhesive or tape.
t.
With the wing aligned to the horizontal stabilizer, reinstall the wing
attachment screws and use wood screws to attach the outboard ends of
each of the four struts to the wing. (NOTE: The outboard ends of the
struts have elongated openings that may be used to slightly adjust the
wing as you tighten each wood screw against the strut and to the
wing’s surface.)
Page 9 of 12 S121029 Copyright 2012


