Copyright Maxford USA 2017
Page 7 of 12
S171201
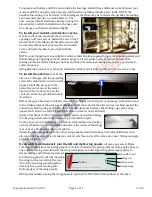
Guide the throttle-servo extension from the opening in the
top of of the wing into the notched end of the pedestal and
bring out approx. 1- to 2-inches inside the pod.
Test-fit the notched end of the pedestal down into the round
opening in the top of of the wing panel – all the way to the
‘floor’ at the base of each of these round openings.
When satisfied with the position of the pedestal, throttle
extension, and any wires for your onboard glow-plug driver
if used, permanently secure the pedestal into the wing with
epoxy. (Do NOT glue the pod to the pedestal at this time.)
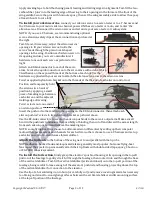
Decide how you will position your engine, then test-fit it to the front of the pod. NOTE: since a glow
engine that is mounted inverted or on its right side may have problems with hydro lock or fouling of
the glow plug, we advise positioning the engines with their cylinders pointing straight up.
Once you have decided how you will position your engines, test-fit engine mounts, engine, throttle
servo, throttle pushrod and cowl. Mark and drill the necessary holes in the pod, then mount the engine
to the firewall, install your throttle servo, and connect a throttle pushrod. Install the fuel tanks with
their vent and clunk lines as pictured at the right.
NOTE: to maximize the fuel tank’s usable capacity, install the vent line
as near as possible to the top-center of the tank, then install the fuel tank
inside the engine mounting pod. If using the the supplied almost
11-ounce fuel tanks, position them on their sides to fit inside each pod’s
fuel tank compartment; if necessary, trim wood around the tanks to
ensure each fuel tank fits fully down inside the allotted fuel tank space
and to ensure the pod’s hatches are able to fully close.
Test-fit to determine where the supplied fuel-tank’s clunk and pressure
lines need to be routed to your engine and muffler. Mark and drill the
necessary holes in the front of the pod. Connect the tank’s ‘clunk’ line to
the carburetor and the ‘vent’ line to the muffler.
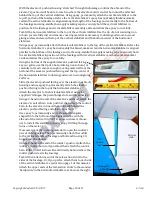
Mount your propeller onto the engine, then position the pod on its pedestal so the pod’s lower surface
is approx.
1/4
-inch above the wing. If necessary, gently twist the pod on its pedestal to give the
propeller blades zero-degrees of left/right offset relative to the leading edge of the wing.
When you are satisfied with the position and alignment of the pod, use epoxy to secure the pod to the
pedestal and to provide an extra measure of fuel-proofing. (NOTE: you may also wish to fuelproof and
waterproof at the pedestal’s round opening in the wing by filling any gap with epoxy, Shoe Goo or ZAP
GOO adhesive/sealant.)
Remove your propellers and perform a final test-fitting of the cowl, then cut or trim the cowl as
necessary to fit your engine, muffler, throttle linkage and the tank’s fuel and/or pressure lines.
Attach the pod to the cowl with your choice of screws, glue and/or tape.
If you use an electric power system
, your Lipo flight-power battery and ESC may be able to fit
inside the pods. If so, follow the process for installing servo leads outlined in the preceding glow-engine
instructions, using the preinstalled strings to guide the servo-like lead from each ESC through the wing.
If your ESC and Lipo battery will not fit inside the pods, you may mount your battery and ESCs down
inside the fuselage.
NOTE: any electric power system needing longer wires between its Lipo flight battery and motor
should be given that additional length only by extending the three wires between the ESC and the
motor. NEVER lengthen the wires between your battery and ESC unless recommended or approved by
the maker of your motor and ESC. We recommend using a Y-harness to control both ESCs from your
transmitter’s throttle channel; however, if you are a twin-engine pilot who likes to setup your
transmitter with differential steering, if necessary, use separate servo extensions to connect and
control each ESC from its own transmitter channel.
Extension from
top of wing panel
(and glow-plug
driver’s wires
if used)


