background image

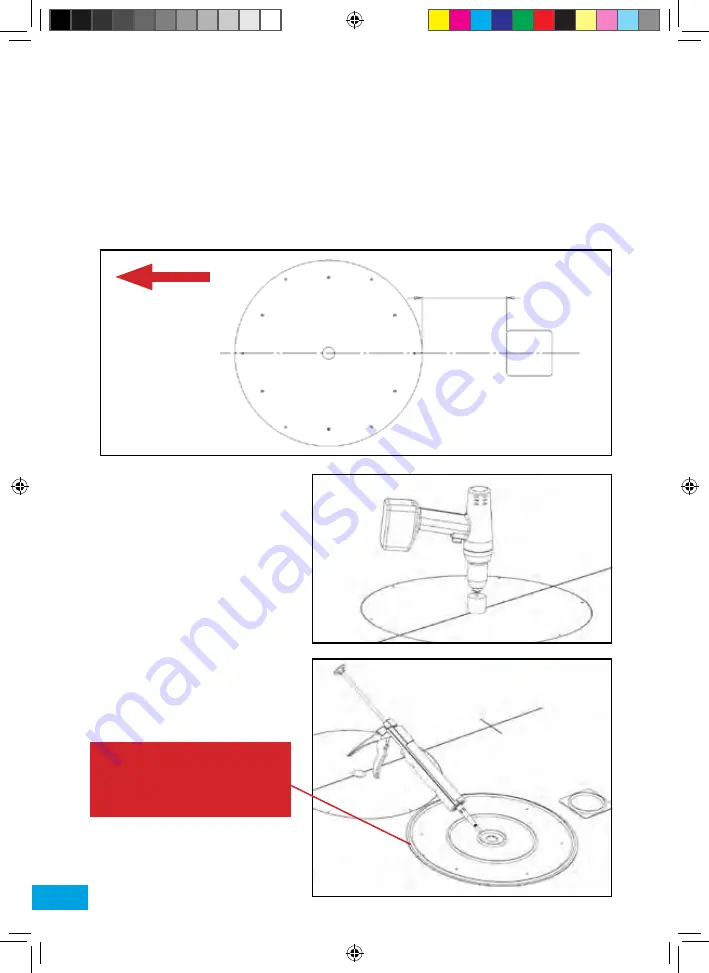
Attaching Antenna Mount Plate & LNB Park Plate

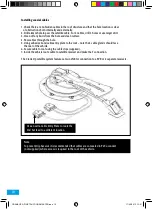
1. Remove antenna unit from wooden transit packaging.

2. Remove mounting plate from Antenna Unit by removing 6 x M6 nuts using 10mm spanner.

3. Clean roof, Mounting Plate and LNB Park Plate in accordance with adhesive manufacturer’s guidelines.

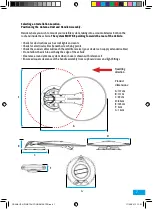
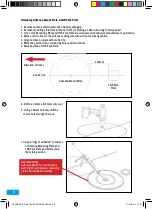
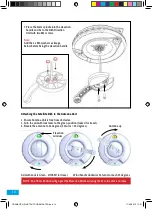
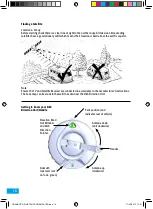
4. Mark a centre line for the antenna making sure dish will not overhang vehicle.

5. Align notches on plate with centre line. 

6. Mark the position of 6 screw fixing holes and centre hole.

7. Mark position of LNB Park Plate.

8. Drill 6 x 2.5mm pilot holes into roof

9. Using a 32mm holesaw drill the 

   centre hole through the roof. 

10. Apply rings of adhesive* to surface 

      of Antenna Mounting Plate and 

      LNB Park Plate and firmly place 

      them into position.

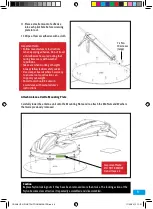
Important Note:

Adhesive MUST be used to give a 

water tight seal between mounting 

plate and installation surface


        8


LNB   Park   Plate   

Direction   of   travel   

Centre   

Line   

Antenna   Mount   Plate   


Centre line

Antenna Mount Plate

LNB Park 

Plate

350mm

Direction of travel

CRANK UP NZ INSTRUCTIONS MASTER.indd   8

17/09/2013   13:01

Summary of Contents for Crank-Up B2590/85AU

Page 1: ...STEM Date of purchase _________________ Retailer _________________ Installer _________________ Serial Number _________________ Please fill in the below information as soon as the system has been insta...

Page 2: ...ch Antenna Unit to Mounting Plate 9 Installing coaxial cables 10 Installing the Handle 11 14 Attach Satellite Dish to Antenna Unit 14 Operation Guide 16 Connecting the Decoder 16 Notes for Vast Viewer...

Page 3: ...the following ready when you call Model Number Serial Number Date of purchase Clear and concise details of the fault Details of who installed the product The warranty does not apply where The product...

Page 4: ...ocate a television broadcast satellite when the vehicle is stationary Use of the equipment for any other purpose than the one specified is not permitted and will invalidate the warranty All instructio...

Page 5: ...times vary with weather conditions Power tools should be used in accordance with manufacturer s instructions All electrical work should be carried out by a competent person If in doubt seek advice fro...

Page 6: ...recommends the following adhesives Sikaflex 512 Caravan Geocel Geobond HM Sikaflex 252 Product Contents Antenna Unit Handle Assembly 85cm Antenna separate carton Accessory Pack which includes LNB Par...

Page 7: ...k for electrical cables beneath screw fixing points Check the coaxial cables will reach the satellite receiver your dealer can supply extended cables Do not allow the dish to overhang the edge of the...

Page 8: ...position of 6 screw fixing holes and centre hole 7 Mark position of LNB Park Plate 8 Drill 6 x 2 5mm pilot holes into roof 9 Using a 32mm holesaw drill the centre hole through the roof 10 Apply rings...

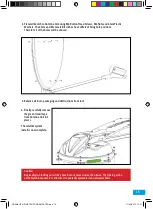
Page 9: ...essary to ensure roof construction can support your weight Power tools should be used in accordance with manufacturer s instructions Attach Antenna Unit to Mounting Plate Carefully lower the antenna u...

Page 10: ...he roof note the 3 cable glands should face the rear of the vehicle 6 Secure cable to roof using the cable clips supplied 7 Inside the vehicle route cable to satellite receiver and make the F connecti...

Page 11: ...nna unit through the hole in the ceiling With the plastic coupler pushed up tight to the ceiling mark the aluminium tube along all four sides Drilled hole Aluminium tube Coupler Installing the Handle...

Page 12: ...t the 4mm spindle so that it is 40mm longer than the tube REAR OF VEHICLE 40mm 4 With the Coupler Bush aligned to the rear of the vehicle insert the Tube and Coupler Bush through the ceiling hole and...

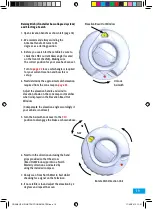
Page 13: ...ws fix the Base Plate to the ceiling 6 Take the Dish Direction Unit and turn the azimuth lock lever to the red position to release the brake Locate the Dish Direction onto the Coupler Bush and use thr...

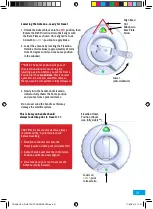
Page 14: ...Ensure Antenna Unit is free from obstacles 2 Turn the azimuth lock lever to the green position locked for travel 3 Elevate the antenna to 25 degrees 25 turns 25 degrees Azimuth Lock is Green LOCKED fo...

Page 15: ...5 Remove all tools packaging and obstructions from roof 6 Finally carefully remove the green transit tape from Antenna Unit in 2 places The satellite system install is now complete Caution Replace Ny...

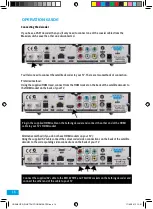
Page 16: ...o the HDMI socket on the back of your TV Alternative method if you do not have HDMI sockets on your TV Using the supplied AV cable connect the colour coded video connections on the back of the satelli...

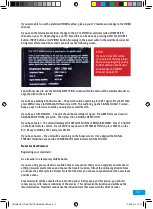
Page 17: ...SIGNAL IS BEING RECEIVED Press TV GUIDE on the Foxtel remote control Press SETUP move down to SYSTEM SETTINGS press SELECT on the R C Move to SIGNAL TEST and press SELECT If you have Austar The unit...

Page 18: ...and Satellite Receiver are connected in accordance to the manufacturer s instructions The Zone map can be stuck to the wall if needed near the Dish Direction Unit Antenna down anti clockwise Antenna...

Page 19: ...Adjust the elevation handle and wind to elevation shown on the zone map so it matches what is displayed in the Elevation Read Out Window Compensate the elevation angle accordingly if your vehicle is...

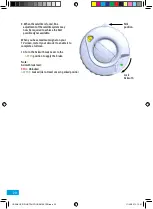
Page 20: ...you have maximum signal on your TV screen restart your decoder to enable it to complete a full scan 10 Turn the Azimuth Lock Lever to the GREEN position to apply the brake Note Azimuth lock lever RED...

Page 21: ...tion Be sure you count this twice so that you can be sure system is fully collapsed 3 Slowly turn the handle until elevation indicator fully shows the home position and you feel some park resistance D...

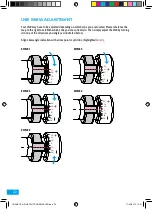
Page 22: ...rently in Then simply adjust the LNB by turning it in one of the directions and angles as illustrated below Align skew angle indication with arrow point or split line highlighted in red 20 10 30 0 10...

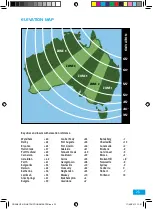
Page 23: ...41 Kulgera 39 Coober Pedy 33 Port Augusta 25 Port Lincoln 26 Adelaide 21 Tennant Creek 45 Cooktown 29 Cairns 25 Georgetown 28 Townsville 19 Cloncurry 32 Hughenden 23 Mackay 10 Rockhampton 4 Gladstone...

Page 24: ...eight min 167mm Antenna Height max 1130mm Handle dimensions H 80 x W 120 x D 25mm Antenna Weight 11kg Handle Weight 140g Elevation Angle Range 10 70 Azimuth Rotation Angle 380 Skew Angle 45 YOUR LOCAT...

Reviews: