background image

Powering/Inbetriebnahme

1. 

Make sure all connections are made as shown on page 5.

2.

 Turn on the TV and satellite receiver.

3. 

Press POWER on the VuQube 2 control panel.

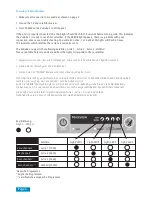
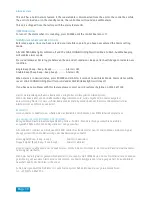
If the unit is properly connected, the COAX light should flash for 10 seconds before turning solid. This indicates 
the VuQube 2 is ready to search for satellites. If the ERROR light appears, there is a problem with your 
connection, please see troubleshooting. You will also notice, 1 of 4 SAT SCAN lights will flash 3 times. 
This indicates which satellite the system is currently set to.

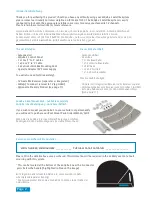
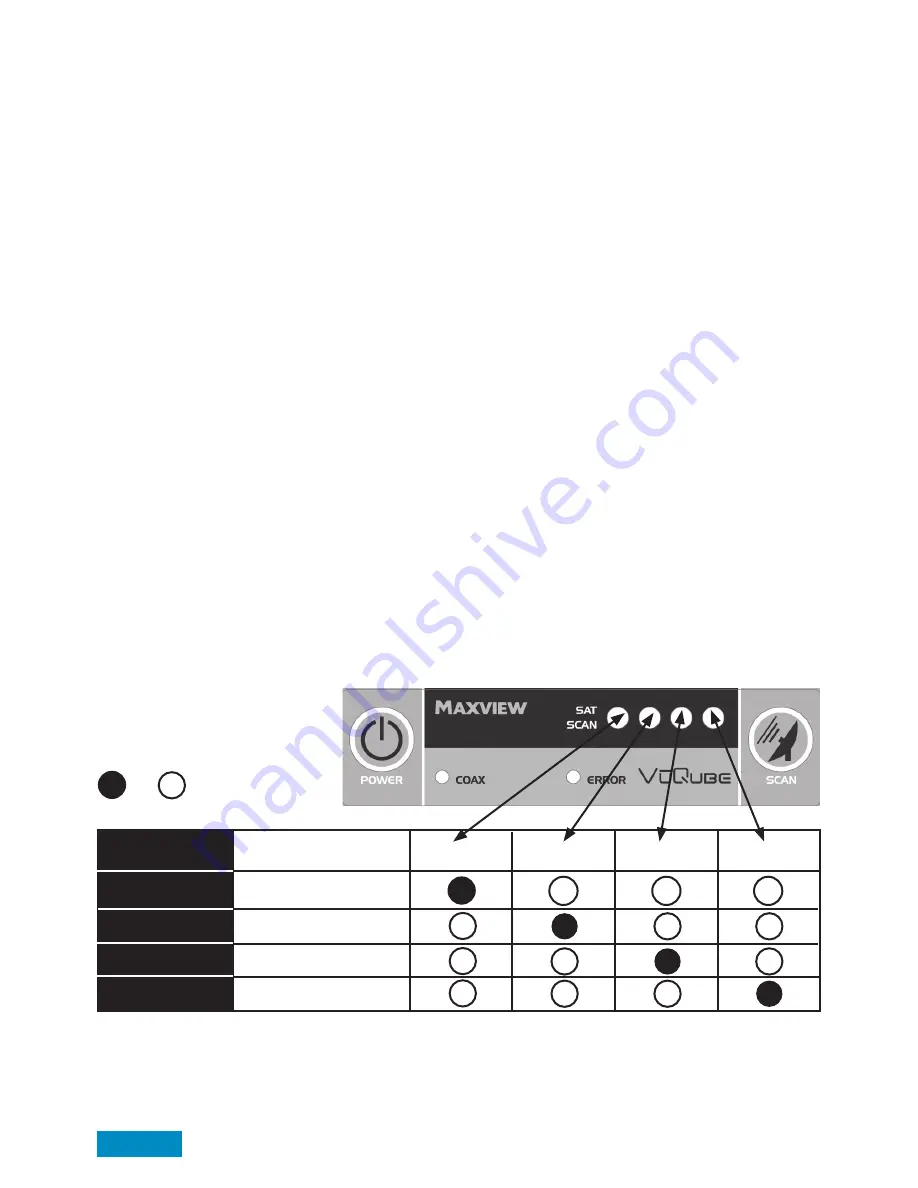
The VuQube 2 supports the following Satellites: Astra 1 - Astra 2 - Astra 3 - Hotbird
Please see table below to understand how the lights correspond to these satellites.

1.

 Vergewissern Sie sich, dass alle Verbindungen, wie auf Seite 5 beschrieben durchgeführt wurden.

2.

 Starten Sie Ihr Fernsehgerät und den Receiver.

3.

 Drücken Sie den “POWER” Knopf auf der Steuerbox der VuQube - Auto.

Wenn das Gerät richtig angeschlossen ist, sollte die COAX-LED erst für 10 Sekunden blinken und dann dauerhaft 
leuchten. Dies zeigt an, dass die VuQube - Auto betriebsbereit ist.
Sollte die “ERROR”LED leuchten gibt es ein Problem mit der Verkabelung, siehe hierzu die Fehlerbehebung. 
Die Sat-Scan LED 1-4 zeigt an welchen Satellit Sie zur Suche ausgewählt haben. Die LED blinkt dreimal auf.

Die VuQube Auto unterstützt folgende Satelliten: Astra 1, Astra 2, Astra 3 und Hotbird
Siehe Tabelle unten, um zu verstehen welche LED welchen Satelliten entspricht.

Euro channels*

UK channels**

Euro channels**

Euro channels***

Satellite

Astra 1 (19.2E)

Astra 2 (28.2E)

Astra 3 (23.5E)

Hotbird (13.0W)

Light/LED 1

Light/LED 2

Light/LED 3

Light/LED 4

Key/Erklärung
On/

An

   Off/

Aus

Page 6

*deutsche Programme
**englische Programme
***verschiedene europäische Programme

Summary of Contents for MXL023

Page 1: ...1000 Email support maxview co uk Web www maxview co uk Maxview reserve the right to change specifications without prior notice Technische nderungen sowie Irrt mer vorbehalten 9111200 Iss 3 22216 Rev C...

Page 2: ...ry Product see page 11 Page 2 Record your purchase Bitte ausf llen Please fill in the details above once purchased This information will be required in the unlikely event of a fault occurring with thi...

Page 3: ...erm of the guarantee This guarantee gives you specific legal rights but does not affect your statutory rights See page 16 further details Page 3 Sicherheitsma nahmen Verlegen Sie das Koax Anschlusskab...

Page 4: ...table application Aufbau Satellite line of sight IMPORTANT HAND TIGHTEN COAX CONNECTIONS DO NOT USE A WRENCH Do not allow the coax cable to become bent or kinked Do not leave the coax cable where it c...

Page 5: ...mmend a switching PSU rated at minimum of 2 amps B A AUX ATTENTION Avoid sharp bends when routing cable ACHTUNG Vermeiden Sie ein starkes knicken des Koax Kabels C D E Main TV Hauptfernsehger t ANT RE...

Page 6: ...e 5 beschrieben durchgef hrt wurden 2 Starten Sie Ihr Fernsehger t und den Receiver 3 Dr cken Sie den POWER Knopf auf der Steuerbox der VuQube Auto Wenn das Ger t richtig angeschlossen ist sollte die...

Page 7: ...will now remain the pre set satellite on the control box until this process is repeated Die VuQube 2 ist werksseitig auf ASTRA1 eingestellt In den meisten F llen ist Ihr zweiter Lieblingssatellit den...

Page 8: ...atellites by repeating the scan process Halten Sie Scan Taste f r 3 Sekunden gedr ckt und die VuQube Auto startet die Suche des gew nschten Satelliten Die duchlaufenden Sat Scan LED s best tigen den S...

Page 9: ...r VuQube 2 Hold down the POWER button for 3 seconds All lights will turn off The system can now be disconnected Nach einer gewissen Zeit versetzt sich die VuQube Auto von selbst in den Stanby Modus Da...

Page 10: ...eil verf gt ber ein integriertes Alarm System Wenn das Koax Kabel von der Au eneinheit abgeschlossen wird wird umgehend ein Alarm ausgel st Voraussetzung hierf r ist dass sich das Bedienteil im Standb...

Page 11: ...from your Vuqube 2 Code B2020 Single socket Code B2007 Twin socket Available from most Maxview Dealerships or order online at www maxview co uk Optional Weatherproof Sockets Original Au ensteckdosen...

Page 12: ...ad connec tion between the antenna and the control box Problem with connection between control box and receiver or receiver and TV Receiver isn t set to correct satellite CAUSE OF ACTION Verify power...

Page 13: ...nd Receiver oder Receiver und Fernseher L SUNG berpr fen Sie den 12 V Stecker vergewissern Sie sich das Spannung an der Steckdose anliegt Bei Verwendung des 230 V Netzteil vergewissern Sie sich das da...

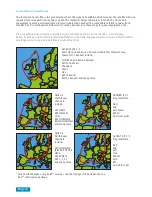
Page 14: ...rh ltnisse zu Beeintr chtigungen kommen sodass nicht alle Sender empfangbar sind oder gar kein Satellitenfernsehenm glich ist ASTRA 2F 28 2 Most UK TV channels can be found within this footprint map s...

Page 15: ...he use of certain hazardous substances in electrical and electronic equipment 2002 95 EC Die VuQube Auto wurde konstruiert gebaut und vermarktet in bereinstimmung mit den Sicherheitsanforderungen der...

Page 16: ...lace if necessary without charge This guarantee does not cover installation and external wiring or re manufactured units This guarantee does not cover damage caused by the use of a mounting bracket ot...

Reviews: