background image


- 17 -

                    VENTAMATIC, LTD.   


1-800-433-1626   


ETL Listed    4005272 

                        TROUBLE SHOOTING                     

Fault codes


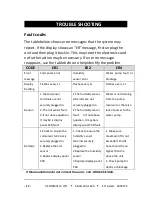
The table below shows error messages that the system may 
report. If the display shows an “ER” message, first unplug the 
unit and then plug it back in. This may reset the electronics and 
no further action may be necessary. If an error message 
reappears, use the table below to help identify the problem.


CODE 

ER1 

ER2 

ER4 

Error 

message 

Coil sensor error 

Humidity   

sensor error 

Water  pump  fault  or 

blockage 

Display 

Reading 

Flashes every 1s 

Flashes every 1s   

Flashes every 1 s 


Reason 

1.the coil sensor 

terminals are not 

securely plugged in. 

2.The coil sensor fault .   

3.If not above question, 

It maybe is display 

panel PCB fault. 

1.The humidity sensor 

terminals are not 

securely plugged in. 

2.The humidity sensor 

fault .    3.If not above 

question, It maybe is 

display panel PCB fault. 

Water is not draining 

from the pump 

reservoir or there is a 

lack of power to the 

water pump. 


Remedy 

1.Check to ensure the 

coil sensor terminal is   

securely plugged in. 

2.Replace the coil 

sensor . 

3.Replace display panel 

PCB 

1. Check to ensure the 

humidity sensor 

terminal securely 

plugged in. 

2.Replace the humidity 

sensor . 

3.Replace display panel 

PCB 

1. Make sure 

maximum lift is not 

exceeded. End of 

hose should be no 

higher than 3m 

above the unit. 

2. Check pump for 

debris or blockage. 

If these solutions do not correct the error, call 1-800-433-1626.


Summary of Contents for DH 065 BLU

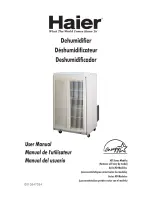
Page 1: ...Metal Dehumidifier 115v Model DH 065 BLU Owner s Manual Please read this owner s manual before operating and keep safe for future reference ...

Page 2: ...y packaging until you have checked the appliance is operational After removing the packaging ensure the contents are intact and complete In the unlikely event of missing parts contact Customer Service at 1 800 433 1626 Do not leave children unattended with any of the packaging since it is a potential source of danger Disposal of all packaging must be carried out responsibly safely and in accordanc...

Page 3: ... appliance as a toy 3 This appliance is not intended for use by persons including children with reduced physical sensory or mental capabilities or lack of experience and knowledge unless they have been given supervision or instruction concerning use of the appliance by a person responsible for their safety 4 Do not operate any product with a damaged power cord or plug after the product malfunction...

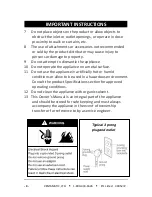
Page 4: ... attempt to dismantle the appliance 10 Do not operate the appliance on a metal surface 11 Do not use the appliance in artificially hot or humid conditions or allow to be used in a hazardous environment Consult the product Specifications section for approved operating conditions 12 Do not clean the appliance with organic solvent 13 This Owner s Manual is an integral part of the appliance and should...

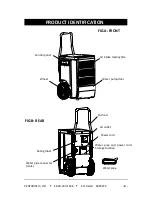
Page 5: ...d 4005272 4 Control panel Air intake metal grille Wheel Water pipe and power cord Storage location Water pipe Pull rod Rating label Water pipe connector male PRODUCT IDENTIFICATION Water pump door FIG A FRONT FIG B REAR Air outlet Power cord ...

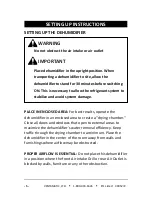
Page 6: ...void system damage PLACE IN ENCLOSED AREA For best results operate the dehumidifier in an enclosed area to create a drying chamber Close all doors and windows that open to external areas to maximize the dehumidifier s water removal efficiency Keep traffic through the drying chamber to a minimum Place the dehumidifier in the center of the room away from walls and furnishings where airflow may be ob...

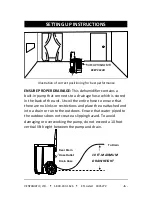
Page 7: ...hose which is stored in the back of the unit Uncoil the entire hose to ensure that there are no kinks or restrictions and place the unattached end into a drain or run to the outdoors Ensure that water piped to the outdoors does not create a slipping hazard To avoid damaging or overworking the pump do not exceed a 10 foot vertical lift height between the pump and drain KEEP CLEAR 10 FT MAXIMUM DRAI...

Page 8: ...ge The pump will close automatically after forty seconds continuous operation FUNCTION Press the FUNCTION key The screen will display Humidity setting Ambient humidity Total running hours Ambient temperature REGULATE Press REGULATE key to adjust humidity or set total running hours and job hours or setting fahrenheit and centigrade Long press REGULATE key 5 seconds The coil sensor temperature will ...

Page 9: ...AMATIC LTD 1 800 433 1626 ETL Listed 4005272 8 CONTROL PANEL The LCD displays symbols Dehumidify ON Defrost ON Draining Fan start up Setting humidity Ambient humidity Total running hours Ambient temperature ...

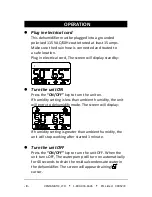
Page 10: ... Turn the unit ON Press the ON OFF key to turn the unit on If humidity setting is less than ambient humidity the unit will entry to dehumidify mode The screen will display If humidity setting is greater than ambient humidity the unit will stop working after started 1 minute Turn the unit OFF Press the ON OFF key to turn the unit OFF When the unit turns OFF The water pump will turn on automatically...

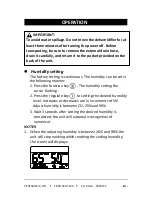
Page 11: ...tory setting is continuous The humidity can be set in the following manner 1 Press the function key The humidity setting the cursor flashing 2 Press the regulate key to setting the desired humidity level Increases or decreases are in increments of 5 Adjust humidity is between CO 25 and 90 3 Wait 3 seconds after setting the desired humidity is completed the unit will automatic recognition of numeri...

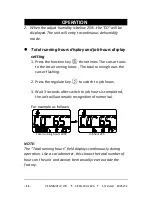
Page 12: ... turns to the total running hours The total running hours the cursor flashing 2 Press the regulate key to switch to job hours 3 Wait 3 seconds after switch to job hours is completed the unit will automatic recognition of numerical For example as follows Total running hours 200h Job hours 8h NOTE The Total running hours field displays continuously during operation Like a car odometer this shows the...

Page 13: ...ess the function key twice the cursor turns to the centigrade The centigrade the cursor flashing 2 Press the regulate key to switch to fahrenheit 3 Wait 3 seconds after switch to fahrenheit is completed the unit will automatic recognition of numerical For example as follows Centigrade 25 Fahrenheit 77 ...

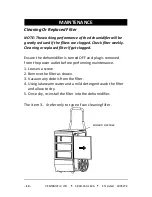
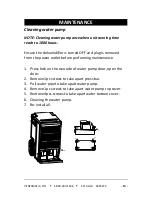
Page 14: ... replaced filter if get clogged Ensure the dehumidifier is turned OFF and plug is removed from the power outlet before performing maintenance 1 Loosen a screw 2 Remove the filter as shown 3 Vacuum any debris from the filter 4 Using lukewarm water and a mild detergent wash the filter and allow to dry 5 Once dry re install the filter into the dehumidifier The item 3 4 refer only to type of can clean...

Page 15: ... turned OFF and plug is removed from the power outlet before performing maintenance 1 Press lock on the two side of water pump door open the door 2 Remove 1pc screws to take apart press bar 3 Pull water pipe to take apart water pump 4 Remove 1pc screws to take apart water pump top cover 5 Remove 4pcs screws to take apart water bottom cover 6 Cleaning the water pump 7 Re install all ...

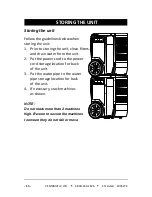
Page 16: ... the unit clean filters and drain water from the unit 2 Put the power cord to the power cord storage location for back of the unit 3 Put the water pipe to the water pipe storage location for back of the unit 4 If necessary stack machines as shown NOTE Do not stack more than 2 machines high Be sure to secure the machines to ensure they do not fall or move ...

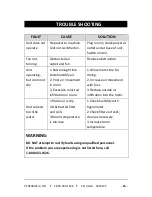
Page 17: ...dify air 2 Poor air movement in room 3 Excessive moist air infiltration in room 1 Allow more time for drying 2 Increase air movement with fans 3 Reduce outside air infiltration into the room Unit collects too little water 1 Room air is dry 2 Obstructed filter and coils 3 Room temperature is too low 1 Check humidity with hygrometer 2 Check filter and coils clean as necessary 3 Increase room tempera...

Page 18: ...ecurely plugged in 2 The coil sensor fault 3 If not above question It maybe is display panel PCB fault 1 The humidity sensor terminals are not securely plugged in 2 The humidity sensor fault 3 If not above question It maybe is display panel PCB fault Water is not draining from the pump reservoir or there is a lack of power to the water pump Remedy 1 Check to ensure the coil sensor terminal is secu...

Page 19: ...ditions 86 F 80 RH 100pints day Dehumidifying Capacity AHAM Conditions 80 F 60 RH 65pints day Power Supply AHAM Conditions 80 F 60 RH 115V 60Hz 720W 6 3A Refrigerant R410A 19oz 540g Working Temperature 41 F 95 F Controls Electronic Touchpad Process Air 300CFM Unit Size inch 20x15x26 8 Packing Size inch 21 3x16 1x29 1 Net Gross Weight lbs 82 93 ...

Page 20: ...ce or repair the defective part or component only and return the new or repaired part to you freight prepaid You must bear all other expenses incurred in obtaining repairs including labor required for field repair or replacement and the cost of shipping the defective part to us You must also bear the cost of repair to or replacement of any part or component and the shipping charges incurred for th...

Page 21: ...rmal dispute settling mechanism available in the event of a controversy involving this warranty Any and all implied warranties which may exist terminate upon the expiration of this warranty one 1 year from the date of the original retail purchase Some states do not allow limitations on how long an implied warranty lasts so this limitation may not apply to you Ventamatic Ltd is not liable to you fo...

Reviews: