11
When green LED and yellow LED is lit, it means the unit is working in the cold preservation
stage .
4.Red LED:
power indicator light.
The power is on when the red LED is lit.
5. Mode button:
Mainly for service. When this button is pressed, it can change from ice making mode to ice harvest
mode, or from ice harvest mode to ice making mode. You can judge the mode from the status of the
green and yellow LEDs.
6. Ice size adjust:
1.
Press and hold the “
Clean
” button and the “
Mode
” button together for at least 3 seconds. The
unit will enter the Ice Size Adjustment mode. The “
ICE
” LED (green) will be blinking
continuously during the ice size adjustment.
2.
While in the Ice Size Adjustment mode, press the “
Clean
” button or the “
Mode
” button for the
desired ice size.
Smaller ice setting:
By pressing the “Clean” button, you can decrease the size of the ice cubes. The “FULL” LED (red)
will flash as you lower the ice size and will finally be blinking at the setting of smallest ice size.
Larger ice setting:
By pressing the “Mode” button, you can increase the size of the ice cubes. The “HARVEST” LED
(yellow) will flash as the larger size is set and will blink when the setting of largest ice size has been
reached.
After 10 seconds without any operation, the unit will automatically memorize the current state and
return to the previous mode.
NOTE
: If during the ice size adjustment, the “BIN FULL”, “ICE” and “HARVEST” LEDS blink
all at once, this indicates that the unit is in the default factory setting of the ice size adjustment.
Summary of Contents for MIM1000
Page 1: ...1 Automatic Ice maker Service manual MIM452 MIM600 MIM1000...
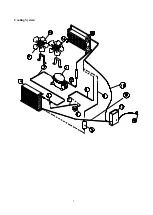
Page 5: ...5 Cooling System...
Page 9: ...9 Wiring Connection...
Page 12: ...12 Exploding Drawing...
Page 16: ...16...
Page 17: ...17...
Page 18: ...18...
Page 19: ...19...
Page 20: ...20...

