background image

9


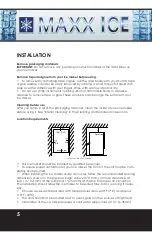
To replace door on hinges:

1. Using a flat screwdriver, remove the plug buttons from the screw holes opposite

the door hinges, top and bottom. Set aside.

2. Remove the bottom hinge and place it on the opposite side at the bottom of the

door.

3. Position the door on the bottom hinge.

4. Align the door on the bottom hinge and replace the top hinge and top hinge

mat.

5. Replace top hinge cover.

6. Push the plug buttons into the original screw holes.

Water Supply

The water supply should be ready at the point of installation. The water supply pres-

sure should be a minimum of 15 psig with a static pressure not more than 80 psig. (A

wall outlet directly behind the ice machine will make installation easier.)

IMPORTANT:

All installations must be in accordance with local

plumbing code requirements. Professional installation is

recommended.

Make certain that the hoses are not pinched or

kinked or damaged during installation. 

Check for leaks after connection.

Tools required: 1/2” open-end wrenches, 

Phillips screwdriver

Connecting the water line:

1. Turn off main water supply. Turn on the nearest faucet long enough to clear the

line of water.

2. Find a 1/2” to 3/4” vertical cold water pipe near the installation location. The dis-

tance should be less than 9 feet. The water supply hose provided with the ice maker

is about 9 feet.

3. A shut-off valve must be installed to the main water supply. If the water pipe has a

plain piece of copper tubing, attach a 1/4” O.D. compression union to the tubing

and remove the nut.

4. Connect nuts of water supply hose to the tap, and connect the other end with the

water inlet. Tighten firmly by hand, then one-half turn with wrench.

5. Turn on main water supply and tap. Check for water supply connections leaks.

Tighten every connection (including connections at the water inlet).

When you connect the water supply hose and the drain hose, pay attention to the

indications of “Water inlet” and “Drain outlet” on the machine.


Rear of unit 

Water inlet 

Drain outlet 

Summary of Contents for MIM50-0

Page 1: ...INSTRUCTION MANUAL PLEASE READ THESE INSTRUCTIONS CAREFULLY BEFORE USE English MIM50 0 Automatic Outdoor Ice Maker MIM50 0MAN 0511 REV A...

Page 2: ......

Page 3: ...disconnected and the water line is shut off EXCEPTION When cleaning the machine s ice making and water systems See pages 23 25 Before operating put all panels back into place Never allow children to o...

Page 4: ...ad the material safety instructions on the container of the ice machine cleaner Do not use this apparatus for other than its intended purpose Electrical Connection Do not under any circumstances cut o...

Page 5: ...data and performance index listed above should be used for refer ence only They are subject to change The actual quantity of ice produced per day can vary with room and water conditions Fahrenheit or...

Page 6: ...f your ice maker before using it See Interior cleaning in the Cleaning and Maintenance section Location Requirements This ice maker should be installed by qualified personnel To ensure proper ventilat...

Page 7: ...tions in ac cordance with all state and local codes The unit should be located on a firm and level surface It is important for the ice maker to be leveled in order to work properly If needed you can a...

Page 8: ...cle installed by a qualified electrician Installation of Casters Casters are provided with the ice maker They are ideal for rolling the unit from place to place out doors If a mobile installa tion is...

Page 9: ...d side to side 2 Adjust the height of the legs as follows Turn the leveling legs to the right to lower that side of the ice maker Turn the leveling legs to the left to raise that side of the ice maker...

Page 10: ...r damaged during installation Check for leaks after connection Tools required 1 2 open end wrenches Phillips screwdriver Connecting the water line 1 Turn off main water supply Turn on the nearest fauc...

Page 11: ...ontal runs of drain lines must have a fall of 1 4 per foot An air gap will likely be required between the ice maker drain hose and the drain waste recepta cle A stand pipe with a trap below it would b...

Page 12: ...erior and exterior of the ice maker 2 Did you clean the ice storage bin 3 Have the installation instructions been followed including connecting the machine to water drain and electricity 4 Has the mac...

Page 13: ...porator when the machine is running Except to take ice from the unit keep the door closed to reduce ice melting and insure proper ice formation How the Machine Makes Ice Turn the Power switch to the O...

Page 14: ...hear air being forced over the condenser by the condenser fan During the harvest cycle you may hear the sound of ice cubes falling into the ice storage bin Preparing the Ice Maker for Long Storage If...

Page 15: ...e condenser 4 Water distribution tube 5 The ice making system WARNING Before proceeding with cleaning and maintenance operations make sure the unit s power line is disconnected and the water line is s...

Page 16: ...leaned at least once every six months 1 Unplug the ice maker or disconnect power 2 Remove the 2 screws on the front cover and gently pull it off 3 Locate the condenser filter This can be lifted out an...

Page 17: ...on into the water trough After about 5 minutes set the Power switch to ON At the same time press the Clean switch on the front of the unit and the Clean indicator light will light then initiate the Cl...

Page 18: ...g the water trough to its maximum level 10 Repeat step 5 to rinse the ice making system one more time 11 Press the ON OFF button again The machine will return to the regular ice making mode Discard th...

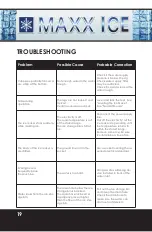
Page 19: ...ove some ice making sure the ice full probe is free of ice The water doesn t feed in after the machine starts The water supply tap is turned off The water supply line is not properly connected Turn on...

Page 20: ...full of ice Reconnect the power supply line Cut off the electricity let the ice maker stop working until the temperature returns to within the stated range Remove some ice be sure ice full probe is f...

Page 21: ...20 NOTES...

Page 22: ...21 NOTES...

Page 23: ...22 NOTES...

Page 24: ...3355 Enterprise Ave Suite 160 Fort Lauderdale FL 33331 Phone 954 202 7419 Fax 954 202 7337 www maxxice com...

Reviews: