background image

Installation 


25


 Figure 26 Assemble the glass dosing vessel 

3.3.2.3 Dosing vessel for flow-proportional sampling 


Figure 27 Calibrate the flow-proportional dosing vessel via the service menu 


Summary of Contents for TP5 C

Page 1: ...Portable Sampler MAXX TP5 W P C TP5 W TP5 P TP5 C pic with optional Box TP5 C P W 0250030E May 2012 MAXX GmbH 2011 All rights reserved Printed in Germany...

Page 2: ...Access code for programming and settings Password Your Password 6299...

Page 3: ...ommission of the equipment 20 3 3 1 Tube connection 20 3 3 2 Set the individual sample volumes 21 3 3 2 1 Plastic dosing vessel 21 3 3 2 2 Glass dosing vessel 23 3 3 2 3 Dosing vessel for flow proport...

Page 4: ...oubleshooting 43 5 3 1 Change the fuse 43 5 4 Instrument decommissioning and storage 45 Section 6 Replacement parts and accessories 47 6 1 Spare parts 47 6 2 Accessories 50 Section 7 Warranty and Liab...

Page 5: ...ight 6 m 20 ft optional 8 m 26 ft General specifications Coolant R134a Maintenance requirements Maintenance free Weight Top part approx 6 6 kg approx 10 kg approx 14 3 kg approx 10 kg approx 14 3 kg B...

Page 6: ...Specifications 6 1 1 Dimension TP5 W TP5 P TP5 C Figure 1 Dimensions W x H x D see the specification table...

Page 7: ...injury CAUTION Indicates a potentially or imminently hazardous situation that could result in minor or moderate injury Important note Information that requires special emphasis Note Information that s...

Page 8: ...ies and all auxiliary items for proper disposal 2 2 General Information 2 2 1 Areas of application The equipment is used for sampling aqueous liquids with a temperature of 0 C to 50 C refer to Section...

Page 9: ...General Information 9 Figure 3 Scope of delivery TP5 P Figure 4 Scope of delivery TP5 C...

Page 10: ...General Information 10...

Page 11: ...nd fused correctly Sufficiently protect the electrical power supply against short circuits For the external power supply always connect a residual current circuit breaker trip current max 30 mA betwee...

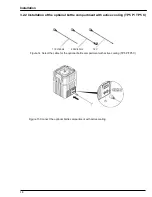
Page 12: ...ccording to the condition of the wall The manufacturer shall accept no liability if the instrument is installed incorrectly Plan how to lay cables and tubes and their path in advance Lay the tubes dat...

Page 13: ...lect suitable fastening materials e g 6 x 40 mm screws and corresponding dowels and read all the safety information about installation and mechanical assembly Figure 8 Attach the equipment TP5 W Figur...

Page 14: ...Installation 14 3 1 3 Position TP5 P und TP5 C Figure 9 Select the position TP5 P und TP5 C Figure 10 Position the equipment TP5 P und TP5 C...

Page 15: ...the external power supply always connect a residual current circuit breaker trip current max 30 mA between the mains and the system If the equipment is to be installed outdoors switch the overload pr...

Page 16: ...rs it must be connected to a suitable outlet with a protection type of at least IP44 splash protection 3 2 1 Electrical installation 3 2 1 1 Prepare the electrical installation In battery mode In main...

Page 17: ...tion 17 3 2 1 2 Wiring diagram Please note The assignment of the connections in the illustration below The cable color of the label on the cable Figure 13 Connection plan for the optional signal cable...

Page 18: ...al bottle compartment with active cooling TP5 P TP5 C 115 V 60 Hz 230 V 50 Hz 12 V Figure 14 Select the cable for the optional bottle compartment with active cooling TP5 P TP5 C Figure 15 Connect the...

Page 19: ...damage the equipment Make sure that the air outlets are always open and that no liquid is able to enter the air outlets Figure 16 Sample distributor plate and air outlets on the optional bottle compar...

Page 20: ...Installation 20 3 3 Commission of the equipment 3 3 1 Tube connection Figure 17 Connect the sample tube connection...

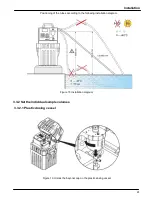
Page 21: ...1 Positioning of the tubes according to the following installation diagram Figure 18 Installation diagram 3 3 2 Set the individual sample volumes 3 3 2 1 Plastic dosing vessel Figure 19 Unlock the ba...

Page 22: ...Installation 22 Figure 20 Remove the plastic dosing vessel Figure 21 Cut the dosing tube to set the sample volume V Probe ml...

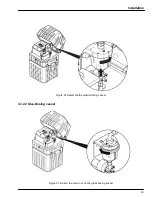
Page 23: ...Installation 23 Figure 22 Assemble the plastic dosing vessel 3 3 2 2 Glas Dosing vessel Figure 23 Loosen the union nut on the glass dosing vessel...

Page 24: ...Installation 24 Figure 24 Remove the glass dosing vessel Figure 25 Cut the dosing tube to set the sample volume...

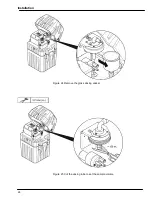
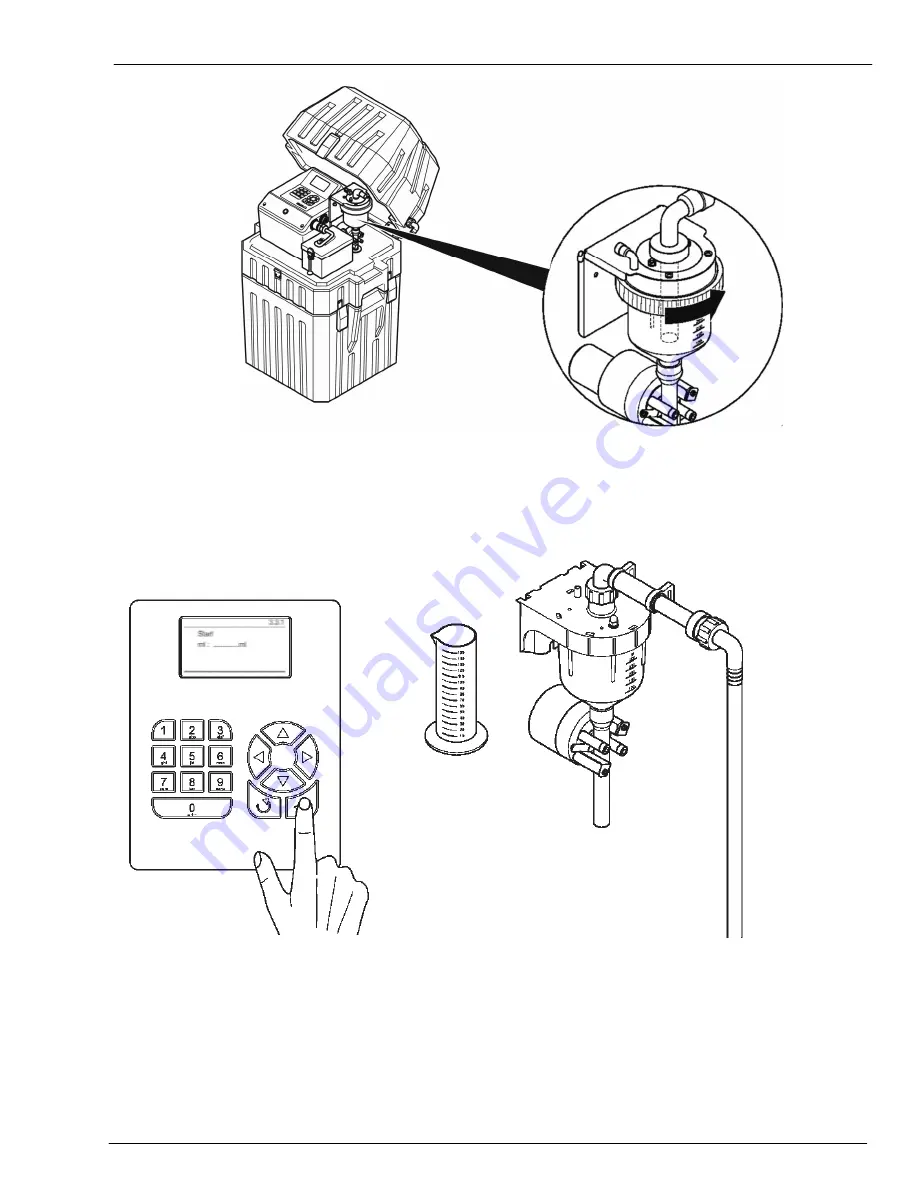
Page 25: ...Installation 25 Figure 26 Assemble the glass dosing vessel 3 3 2 3 Dosing vessel for flow proportional sampling Figure 27 Calibrate the flow proportional dosing vessel via the service menu...

Page 26: ...Installation 26 P hPa bar Figure 28 The flow proportional dosing vessel can only be used if there is NO counter pressure...

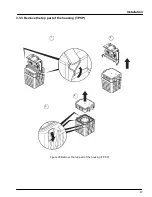
Page 27: ...Installation 27 1 3 3 3 Remove the top part of the housing TP5 P Figure 29 Remove the top part of the housing TP5 P 1 3 4 2...

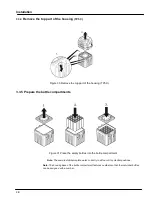
Page 28: ...3 3 5 Prepare the bottle compartments Figure 31 Place the empty bottles into the bottle compartment Note The sample distributor plate works correctly in all four of its potential positions Note The ho...

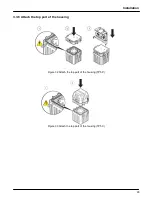
Page 29: ...Installation 29 3 3 6 Attach the top part of the housing Figure 32 Attach the top part of the housing TP5 P Figure 33 Attach the top part of the housing TP5 C...

Page 30: ...r supply this applies to TP5 W as well as to TP5 P and TP5 C in connection with the charger and Y plug BM69742 The correct plug has been attached or the direct wire has been implemented correctly The...

Page 31: ...Installation 31 Figure 35 Possible connection configurations TP5 W Figure 36 Model TP5 C with Y cable and charger...

Page 32: ...Installation 32 I O I O I O Figure 37 Potential connection variations optional bottle compartment with active cooling 3 3 8 Switch on the device Figure 38 Switch on the device...

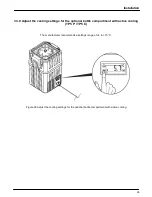
Page 33: ...oling settings for the optional bottle compartment with active cooling TP5 P TP5 C The manufacturer recommends a settings range of 4 to 15 C Figure 39 Adjust the cooling settings for the optional bott...

Page 34: ...Installation 34...

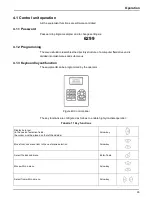
Page 35: ...next menu Select the desired menu Move within a menu Select from within a menu All the equipment functions are software controlled Password to program sampler and to change settings is 6299 The menu s...

Page 36: ...rsor until it is in the required position 3 Press Enter The selection is now confirmed and the program can be started Tabelle 1 Tastenfunktion Fortsetzung Enter key Arrow key Enter key Return to the n...

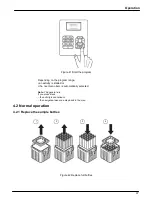
Page 37: ...activity is started or the next menu item is automatically selected Note The general rule If you press Back the activity is cancelled or the navigation takes one step back in the men 4 2 Normal operat...

Page 38: ...Operation 38...

Page 39: ...operator does not need to carry out any maintenance work 5 2 Cleaning 5 2 1 Clean the housing and distribution unit TP5 P TP5 C WARNING Manual rotation of the distribution unit can damage the drive Ne...

Page 40: ...tion vat TP5 P und TP5 C 4 Clean the distribution vat 5 Attach the distribution vat again and in doing so make sure that the guide pin is positioned in the bore hole Figure 44 Assemble the distributio...

Page 41: ...le compartment Figure 45 Clean the sample distributor plate on the bottle compartment 8 Position the top part back on the bottle compartment as shown in the illustrations Figure 32 Page 29 and Figure...

Page 42: ...Maintenance and cleaning 42 Figure 47 Remove the dosing vessel Figure 48 Clean the dosing vessel...

Page 43: ...ure 49 Insert the dosing vessel 5 3 Troubleshooting If the equipment does not work as required check the fuse and replace if necessary 5 3 1 Change the fuse Open the fuse holder as shown in Figure 50...

Page 44: ...of the fuse in the portable sampler Figure 51 Position of the fuse in the optional bottle compartment with active cooling If the error is not rectified please contact the customer service of the manu...

Page 45: ...5 4 Instrument decommissioning and storage 1 Remove all liquids and if necessary solid matter from the infeed and outfeed lines and bottle compartments and clean as required 2 Close all active program...

Page 46: ...Maintenance and cleaning 46...

Page 47: ...L 0030030 Cap for 1 L glass bottle 0060533 Replacement bottle glass 20 L 0030045 Replacement bottle PE 1 L 0060486 Cap for 1 L PE bottle 0060488 Replacement bottle PE 25 L with cap 0060046 Replacement...

Page 48: ...Replacement parts and accessories 48 Figure 52 Plastic dosing vessel Plastic dosing vessel 900715 Valve system 900627...

Page 49: ...Replacement parts and accessories 49 Figure 53 Glass dosing vessel 350 ml Valve system 900627 Glas dosing vessel 900743...

Page 50: ...C 0900033 Signal cabel 10 m 0069644 RS232 serial data cabel 0900021 PC Software Read Data 0200004 Tube connection with screw connection 0900300 Battery for bottle compartment with active cooling 90 A...

Page 51: ...Replacement parts and accessories 51 Figure 56 Transportation trolley TP5 P TP5 C...

Page 52: ...Replacement parts and accessories 52...

Page 53: ...he transfer of risk in particular due to incorrect design poor materials or inadequate finish will be improved or replaced at the supplier s discretion The identification of such defects must be notif...

Page 54: ...MAXX Mess u Probenahmetechnik GmbH Hechinger Str 41 D 72414 Rangendingen Tel 49 0 7471 98481 0 Fax 49 0 7471 98481 44 www maxx gmbh com info maxx gmbh com...

Reviews: