background image


Ensure that the wires are not pinched. The wires 
should be routed on the outside of the sleeve. The 
excess wire should lay in the garnish ring to keep 
them contained. 


Secure the garnish ring to the ceiling/wall with the 
four (4) screws provided in the small parts package. 


Reconnect the main vehicle power to the 

MAXXFAN Dome

This completes the installation of the 

MAXXFAN Dome exhaust fan.


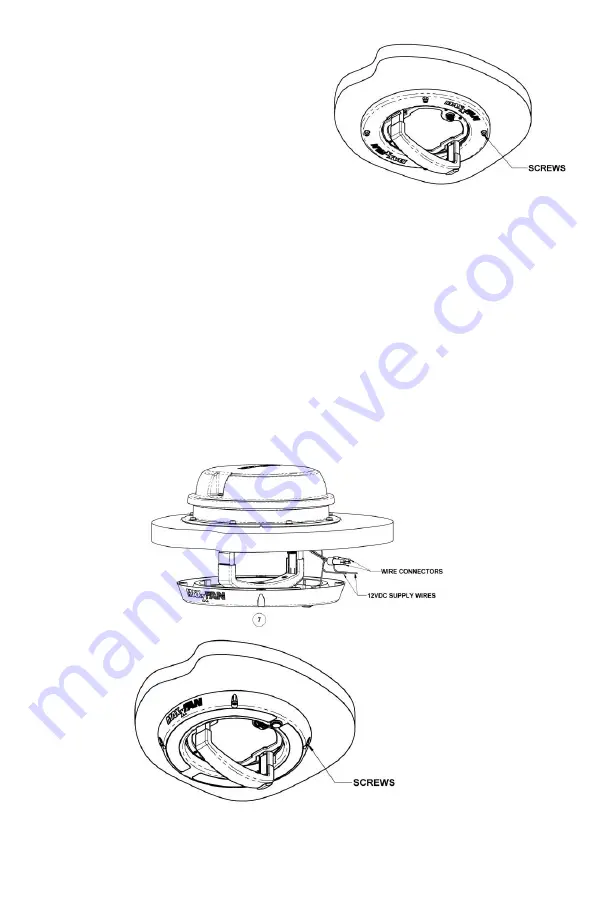
STEP 7 LED MAXXFAN Dome 

Using the supplied wire nuts, connect the Positive (+) 12VDC supply wire to the 

MAXXFAN Dome


fan wire and the LED light wire 

marked “POS 12VDC” and the Negative (-) 12VDC supply wire to 

the 

MAXXFAN Dome

 fan wire and the LED light wire 

marked “Neg. 12VDC”. 


If the sleeve is needed, insert the sleeve into the garnish ring positioning the notch in the 
sleeve to line up the wiring. 


Raise the garnish ring to the ceiling/wall ensuring that the garnish ring is centered over the fan 
opening. 


If using the sleeve, the sleeve will overlap the base that extends in the opening. This will help 
center the garnish ring in the opening. 


Ensure that the wires are not pinched. The wires should be routed on the outside of the 
sleeve. The excess wire and wire nuts should lay in the garnish ring to keep them contained. 


Secure the garnish ring to the ceiling/wall with the four (4) screws provided in the small parts 
package. 


Reconnect the main vehicle power to the 

MAXXFAN Dome

This completes the installation of the MAXXFAN Dome fan.


Summary of Contents for MAXXFAN DOME 3810

Page 1: ... accommodate the additional load Circuit must be fused and use appropriate gauge stranded wire for electrical connections WARNING TO REDUCE THE RISK OF FIRE ELECTRIC SHOCK OR INJURY TO PERSONS OBSERVE THE FOLLOWING a Use this unit in the manner intended by AIRXCEL INC If you have questions contact the manufacturer b Before servicing or cleaning unit switch power off at service panel and lock the s...

Page 2: ...This page intentionally left blank ...

Page 3: ... the MAXXFAN Dome fan into the roof opening orient the fan with the button toward the front of the coach ensure that the fan wires are hanging to the inside of the coach Center the fan in the opening Using the eight 8 screws provided attach the flange to the roof at each dimple location along the flange Note Opening the fan lid gives better access to the flange for assembling the screws Screw into...

Page 4: ...FAN Dome fan has been installed remove the excess BUTYL caulk that may have squeezed out Use silicone to apply a daub over every exposed screw head In addition apply a bead of silicone approximately 3 16 dia along the outside edge of the flange all the way around the fan STEP 4A Center the Rain Shield over the fan with the slots facing downward as shown Using six 6 screws provided attach the rain ...

Page 5: ...ICKNESS LENGTH TO ADD TO CEILING WALL THICKNESS MEASUREMENT LED NON LED 1 1 8 to 5 7 8 inch 15 16 inch 1 2 inch STEP 6 Non LED MAXXFAN Dome Using the supplied wire splices connect the Positive 12VDC supply wire to the MAXXFAN Dome fan wire marked POS 12VDC and the Negative 12VDC supply wire to the MAXXFAN Dome fan wire marked Neg 12VDC If the sleeve is needed insert the sleeve into the garnish rin...

Page 6: ...fan wire and the LED light wire marked Neg 12VDC If the sleeve is needed insert the sleeve into the garnish ring positioning the notch in the sleeve to line up the wiring Raise the garnish ring to the ceiling wall ensuring that the garnish ring is centered over the fan opening If using the sleeve the sleeve will overlap the base that extends in the opening This will help center the garnish ring in...

Page 7: ...iltration of air when exhaust fan is not in use The MAXXFAN Dome fan should not be operated with the lid closed USER INSTRUCTIONS SERVICING Cleaning of your MAXXFAN Dome may be achieved with mild soap and water only The screen can be removed for cleaning by removing the four 4 screws Before removing the screen for cleaning ensure the fan is turned to the OFF position CAUTION Do not operate the fan...

Page 8: ...PLACE CONSUMER LABEL HERE For additional product information please visit www AIRXCEL com AIRCEL INC RV Products Division MAXXAIR 3050 N St Francis St Wichita KS 67219 316 832 3400 ...

Reviews: