background image

OPERATING INSTRUCTIONS  

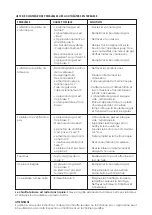
PLEASE NOTE! 

White smoke could form around the burner during the first few minutes when the outdoor heater is 

first used.

•  The gas hose and regulator must be checked before use. If excessive wear and tear or damage  

  is evident or if there are indentations in the gas hose, they must be repaired before use.

•  Keep the ventilation openings of the casing, the operating section, the burner and the air 

  openings of the outdoor heater clean and free of dirt. Remove any dirt, spider’s and insect’s   

  nests using a heavy-duty pipe-cleaner or compressed air to keep the outdoor heater clean 

  and safe for use. Don’t try to clean out openings with a toothpick or ether object that could 

  break off and block these openings.

•  Always keep a powder extinguisher (type ABC) at hand. 

•  When turning the outdoor heater off, always wait 5 minutes before switching it on again. 

•  Never use the outdoor heater in the rain. If it starts to rain, turn it off.

•  Never sprinkle any type of liquid over the outdoor heater.  

•  The burner becomes very hot when the outdoor heater is on. Never touch it and keep children  

  at a safe distance.

•  Ensure that the outdoor heater is always placed on a horizontal and level surface. The outdoor  

  heater can become damaged if it falls over.

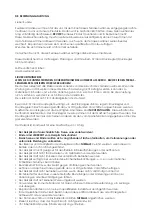
TURNING THE OUTDOOR HEATER ON 

1.  Turn on the valve on the gas supply cylinder. 

2.  Press down the variable control knob and hold for 30 seconds. While holding down the variable  

  control knob, press the igniter button several times until the pilot flame ignited. Release the 

  variable control knob 10-20 seconds after the ignition.

3.  Turn the variable control knob to minimum position and leave it there for 5 minutes or more 

  before turning the knob to desired temperature setting.

4.  lf the burner flame goes out accidentally or if is blown out by wind, turn off the heater and wait  

  at least 5 minutes or more to let the gas dissipate before re-lighting to avoid possible gas 

  explosion. Repeat steps 2 to 4.

TURNING THE OUTDOOR HEATER OFF

1. Press and turn the variable control knob to OFF position. 

2. Turn off the valve on the gas cylinder.

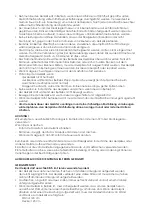
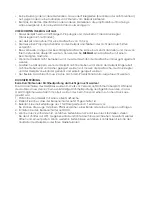
REPLACING THE GAS CYLINDER 

Always replace the gas cylinder outdoors.

Ensure that all the valves on the outdoor heater are close.

•  Close the valve of the gas cylinder.  

•  Disconnect the regulator from the gas cylinder according to the accompanying instructions. 

•  Replace the gas cylinder. 

•  Remove the cap or lid that protects the valve of the gas cylinder. 

•  Before connecting the regulator check that a washer is present and if it is in good condition. 

•  Check all connections for leaks using a soap solution. 

Summary of Contents for Lounge 20681

Page 1: ...PLOI BEDIENUNGSANLEITUNG USER S MANUAL MANUAL DE USUARIO MANUALE D USO NL Lounge Terrasverwarmer FR Chauffe terrasse lounge DE Lounge Terrassenheizer EN Lounge patio heater SP Calentador de patio loun...

Page 2: ...rbeit mit den Gasen G30 G31 Butan Propan oder einer Kombination davon bei 28 30 37 50mbar eingestellt Verwenden Sie keine anderen Arten von Gasen Patio heater on propane or butane gas For outdoor use...

Page 3: ...e gasleverancier Deze ontspanner moet samen met de gasfles gekocht worden Vervang de ontspanner nooit door een andere ontspanner dan door de gasleverancier wordt aangegeven De terrasverwarmer is gemaa...

Page 4: ...punt krijgen Spuit geen aerosols in de omgeving van de terrasverwarmer wanneer deze in gebruik is Verplaats de terrasverwarmer niet terwijl hij brandt Verplaats de terrasverwarmer pas nadat hij is uit...

Page 5: ...e terrasverwarmer voor langere tijd niet gebruikt wordt en dus opgeborgen wordt moeten de gasfles ontspanner en terrasverwarmer losgekoppeld worden en apart opgeborgen worden De flexibele gasslang moe...

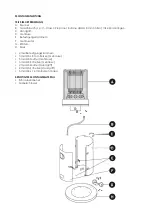
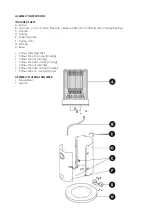
Page 6: ...m Class 3 Propane Butane HHGA 8 mm 30 Bar with 2 clamping rings C Handle D Casing E Fastening clips F Casing door G Wheels H Base 2 times fastening clips 5 times M5 x 8 mm bolt leasing 5 times M5 nut...

Page 7: ...M5 moeren 4 Koppel het ene uiteinde van de gasslang vast aan het brandergedeelte met behulp van een spanring Het andere uiteinde van de gasslang moet met behulp van de tweede span ring aan de ontspan...

Page 8: ...op een horizontale en effen ondergrond staat De terrasverwarmer kan beschadigd raken wanneer hij omvalt DE TERRASVERWARMER AANZETTEN 1 Open de klep van de gasfles 2 Druk de variabele bedieningsknop in...

Page 9: ...niet gebruik binnen te plaatsen en of af te dekken met een hoes Er moet gezorgd worden dat de koppelstukken van de gasfles en van de ontspanner be schermd en in goede staat opgeborgen worden De terras...

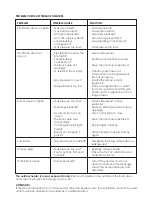
Page 10: ...on Dicht de aansluitingen goed af Laat thermokoppel vervangen Controleer aanvoerslang en aansluitingen en vervang dicht ze zonodig Gasfles bijna leeg vervang hem Zet het toestel even in een warme ruim...

Page 11: ...it tre achet en m me temps que la bouteille de gaz Ne remplacez jamais un d tendeur par un autre que celui indiqu par votre fournisseur de gaz Le chauffe terrasse est con u pour tre utilis avec une bo...

Page 12: ...e gaz et des flammes point jaune Ne vaporisez pas des a rosols dans l environs du chauffe terrasse quand t il est en fonction Ne pas transporter le chauffe terrasse lorsqu il est en fonction Ne pas d...

Page 13: ...z il faut d brayer le chauffe terrasse la bouteille de gaz et le d tendeur et les ranger s par ment Le tube souple au le tuyau flexible doit tre remplac selon la p riodicit indiqu e 2 ans TEST DE FUIT...

Page 14: ...Propane Butane HHGA 8 mm 30 Bar with 2 clamping rings C Handle D Casing E Fastening clips F Casing door G Wheels H Base 2 times fastening clips 5 times M5 x 8 mm bolt leasing 5 times M5 nut leasing 5...

Page 15: ...x 10 mm et 5 M5 crous 4 Branchez une extr mit du tuyau gaz au br leur l aide d un collier de serrage L autre extr mit du tuyau gaz doit l aide du deuxi me collier de serrage tre branch au d tendeur de...

Page 16: ...distance s re Assurez vous que le chauffe terrasse se trouve sur un sous sol plat et solide Le chauffe terrasse peut tre endommag quand il tombe ALLUMER LE CHAUFFE TERRASSE 1 Ouvrez la valve de la bou...

Page 17: ...chauffe terrasse l abri et ou de Ie prot ger par une housse durant les p riodes de non utilisation Il faut veiller ce que les connexions de la bouteille de gaz et le d tendeur sont prot g s et les ra...

Page 18: ...s les connexions Remplacer la bouteille de gaz Nettoyer les endroits sales Sceller correctement les connexions Faire remplacer le thermocouple V rifier le tuyau d alimentation et les connexions et les...

Page 19: ...ei lhrem Gaslieferanten Der Druckregler muss zusammen mit der Gasflasche gekauft werden Der Druckregler darf niemals durch einen anderen als den vom Gaslieferanten angegebenen Druckre gler ersetzt wer...

Page 20: ...gelbe Spitze haben Keine Aerosole in der N he des Heizpilzes verspr hen wenn dieser in Betrieb ist Der Heizpilz darf w hrend des Betriebs nicht bewegt werden Bewegen Sie den Heizpilz erst wenn dieser...

Page 21: ...elagert werden soll m ssen die Gasflasche der Druckregler und der Heizpilz voneinander getrennt und einzeln gelagert werden Der flexible Gasschlauch muss 2 Jahre nach dem Produktionsdatum ausgetauscht...

Page 22: ...4 m Class 3 Propane Butane HHGA 8 mm 30 Bar with 2 clamping rings C Handle D Casing E Fastening clips F Casing door G Wheels H Base 2 times fastening clips 5 times M5 x 8 mm bolt leasing 5 times M5 n...

Page 23: ...M5 x 10 mm und 5 M5 Muttern befestigen 4 Ein Ende des Gasschlauchs mit einem Spannring am Brennerteil anschlie en Das andere Ende des Gasschlauchs muss mithilfe des zweiten Spannrings am Druckregler...

Page 24: ...ren Abstand halten Sicherstellen dass der Heizpilz immer auf einer horizontalen und ebenen Fl che steht Der Heizpilz kann durch Umfallen besch digt werden HEIZER EINSCHALTEN 1 Ventil an der Gasflasche...

Page 25: ...rinnen zu lagern und oder mit einer H lle zu sch tzen Die Kupplungen der Gasflasche und des Druckreglers m ssen gesch tzt und in einem guten Zustand gelagert werden Der Heizpilz muss gegen Regen gesch...

Page 26: ...ersorgungsschlauch und Anschl sse pr fen und ggf austauschen abdichten Gasflasche fast leer ersetzen Sie sie Stellen Sie das Ger t eine Weile in einen warmen Raum damit die Gasflasche und das Ger t ni...

Page 27: ...ied by your gas supplier The outdoor heater is designed for a 10 5 kg gas cylinder The outdoor heater is intended solely for outdoor use NEVER let children in the vicinity of the outdoor heater Adults...

Page 28: ...guish any flames that may have been caused by the gas leak il you continue to smell gas then immediately call the fire brigade Do not store or use petrol or other flammable gasses or liquids near the...

Page 29: ...must perform a complete check for leaks given that it could have been subjected to improper treatment or high pressure during shipping 1 Check the outdoor heater using a full gas cylinder 2 Ensure th...

Page 30: ...er B Gas hese 1 4 m Class 3 Propane Butane HHGA 8 mm 30 Bar with 2 clamping rings C Handle D Casing E Fastening clips F Casing door G Wheels H Base 2 times fastening clips 5 times M5 x 8 mm bolt leasi...

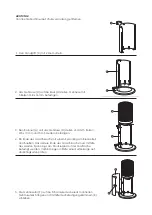
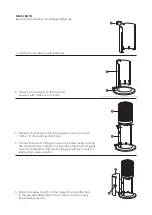
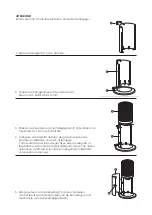
Page 31: ...nd secure it with 5 M5 x 1 D mm bolts and 5 M5 nuts 4 Connect one end of the gas hose to the burner using a clamp Use a second hose clamp to connect the other end of the gas hose to the regulator atta...

Page 32: ...rface The outdoor heater can become damaged if it falls over TURNING THE OUTDOOR HEATER ON 1 Turn on the valve on the gas supply cylinder 2 Press down the variable control knob and hold for 30 seconds...

Page 33: ...ng we recommend that you place the outdoor heater indoors and or cover it with a sleeve when not in use Ensure that the connecting pieces of the gas cylinder and the regulator are protected and stored...

Page 34: ...the connections securely Have thermocouple replaced Check supply hose and connections and replace seal them if necessary Gas bottle almost empty replace it Place the appliance in a warm room for a wh...

Page 35: ...oveedor de gas Este regulador debe comprarse junto con la botella de gas Nunca reemplace el regulador con un regulador diferente al especificado por el proveedor de gas El calefactor de patio est hech...

Page 36: ...rilla larga No roc e aerosoles cerca del calentador de patio cuando est en uso No mueva el calentador de patio mientras est encendido Mueva el calentador de patio solo despu s de haberlo apagado y enf...

Page 37: ...po m s largo y por lo tanto se va a almacenar la botella de gas el regulador y el calentador de patio deben desconectarse y almacenarse por separado La manguera flexible de gas debe ser reemplazada se...

Page 38: ...s hese 1 4 m Class 3 Propane Butane HHGA 8 mm 30 Bar with 2 clamping rings C Handle D Casing E Fastening clips F Casing door G Wheels H Base 2 times fastening clips 5 times M5 x 8 mm bolt leasing 5 ti...

Page 39: ...D mm y 5 tuercas M5 4 Conecte un extremo de la manguera de gas a la secci n del quemador usando un anillo de sujeci n El otro extremo de la manguera de gas debe conectarse al regulador de la botella...

Page 40: ...zontal y uniforme El calentador de patio se puede da ar si se cae ENCIENDA EL CALENTADOR DEL PATIO 1 Abra la v lvula de la botella de gas 2 Mantenga presionada la perilla de control variable durante 3...

Page 41: ...comienda colocar el calentador de patio en el interior cuando no est en uso y o cubrirlo con una cubierta Se debe tener cuidado para asegurar que la botella de gas y los conectores del regulador est n...

Page 42: ...lla de gas Limpiar lugares sucios Sellar bien las conexiones Reemplazar el termopar Verifique la manguera de suministro y las conexiones y reempl celas s llelas si es necesario Botella de gas casi vac...

Page 43: ...fa a fungo realizzata per una bombola di gas da 10 5 kg Il riscaldatore da esterno destinato esclusivamente all uso all aperto Tenere SEMPRE i bambini lontani dalla stufa a fungo Adulti e bambini devo...

Page 44: ...empre chiuso correttamente Per aumentare la durata dell apparecchio e prevenire la ruggine prematura si consiglia di posizionare la stufa da esterno al chiuso quando non viene utilizzata e o coprirla...

Page 45: ...sibile del gas deve essere sostituito in base alla data di produzione 2 anni CONTROLLARE PERDITE Non controllare mai la presenza di perdite mentre si fuma I collegamenti del gas della stufa da esterno...

Page 46: ...lass 3 Propane Butane HHGA 8 mm 30 Bar with 2 clamping rings C Handle D Casing E Fastening clips F Casing door G Wheels H Base 2 times fastening clips 5 times M5 x 8 mm bolt leasing 5 times M5 nut lea...

Page 47: ...mm e 5 dadi M5 4 Collegare un estremit del tubo del gas alla sezione del bruciatore utilizzando un anello di serraggio L altra estremit del tubo del gas deve essere collegata al regolatore sulla bombo...

Page 48: ...stufa da esterno pu subire danni se cade ACCENDI IL RISCALDATORE PER IL PERCORSO 1 Aprire la valvola della bombola del gas 2 Tenere premuta la manopola di controllo variabile per 30 secondi Tenere pre...

Page 49: ...a stufa da esterno al chiuso quando non viene utilizzata e o coprirla con una copertura necessario prestare attenzione per garantire che la bombola del gas e i connettori del regolatore siano protetti...

Page 50: ...oghi sporchi Sigillare bene i collegamenti Far sostituire la termocoppia Controllare il tubo di alimentazi one e le connessioni e sostituirli sigillarli se necessario Bombola del gas quasi vuota sosti...

Page 51: ...uthalen Helchteren Product name Outdoor patio heater on propane or butane Known under the brand MaxxGarden Lounge Patio heater Article number 20681 Complies with the EU Gas Combustion Appliances Direc...

Page 52: ...n Datenbank gespeichert und oder ver ffentlicht werden Diese Version darf nur f r Galico Produkte verwendet werden Fehler und nderungen vorbehalten Importer Maxxtools bvba Centrum Zuid 2084 3530 Houth...

Page 53: ...u vermeiden Informieren Sie sich bei Ihrer zust ndigen Beh rde ber die korrekte Entsorgung von Elektro oder Elektronikger ten The above symbol and the symbol on the product indicate that the product i...

Page 54: ......
Page 55: ...LFT IHNEN GERNE BEI n Fragen zu Ihrer Bestellung n Reklamationen n Teile und Handb cher Wenn Sie Fragen oder Beschwerden haben wenden Sie sich bitte an uns Wir helfen Ihnen gerne weiter The biggest on...

Page 56: ...bestelling n Klachten n Onderdelen en handleidingen Heb je vragen of klachten contacteer ons en we helpen je graag verder The biggest online selec on of home garden pet toys OUR MAXXTOOLS SERVICE TEAM...

Reviews: