17
ENG
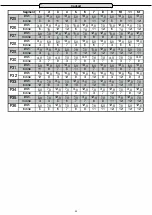
Free memory slots U01, U02 and U03
These are three free memory slots for individual training profiles
Step 1: Programme Selection
After switching on the treadmill, select the desired memory location U01, U02 or U03 by pressing the P button.
The corresponding programme appears in the display and the value “30:00” flashes.
Now press the M button.
Step 2: Specify the speed & slope
The values for speed (1.0km / h) and incline (level 0) flash in the display. Below the programme display “01”
appears for the first of ten segments in total.
Enter the desired speed by pressing the speed control buttons and the desired gradient value by pressing the
incline control buttons.
Confirm your entry by pressing the MODE button.
Now the values for speed and incline flash again and the segment “02” is displayed.
Proceed with the value entries for segments 02 to 10.
Step 3: Specification of the training time
After you have confirmed the defaults for the tenth segment by pressing the M button, the time window will flash
value “30:00” Use the +/- buttons to set the desired training time from 5:00 to 99:00 Minutes.
Step 4: Programme start
Press the START button.
The display shows a countdown, each countdown value is accompanied by an acoustic signal.
The training time starts to run after the countdown and the treadmill starts automatically.
End of training
The treadmill stops automatically after the specified training time has elapsed.
Heart rate controlled programme (HRC)
These programmes are heart rate controlled exercise programmes. Here the user gives a desired target heart
rate in advance. This will be continuously compared from the cockpit of the treadmill with the actual heart rate of
the user. If the actual heart rate is lower than the desired target heart rate, the treadmill automatically increases
the speed. If the value is higher, the treadmill reduces it. The main requirement for using these programmes is a
continuous and accurate transmission of heart rate values. For this reason, these programmes can only be used
when an uncoded heart rate chest belt is worn. This is available as an accessory. The use of these programmes
with hand pulse sensors is not possible. Please also read the chapter “Heart Rate Monitoring” in this manual.
Step 1: Programme Selection
After switching on the treadmill, select the desired programme HRC1, HRC2 or HRC3 by pressing the P-key.
“HRC” is in the upper right area of the display, and the HRC 1 = “01”, HRC 2 = “02” and HRC 3 = “03” are dis-
played in the centre of the display. Maximum speed, is the speed that is not exceeded in these programmes.
HRC 1 = max. 9.0 km / h HRC 2 = max. 11.0 km / h HRC 3 = max. 13,0km / h
The value “25” flashes in the display.
Step 2: Enter the user age
Now enter the user age by pressing the +/- buttons for speed. Confirm your entry by pressing the M button.
Step 3: Target pulse specification
The display shows the target heart rate calculated by the cockpit.
This is 60% of the maximum heart rate.
If you want to train with the calculated value, confirm this with the M key.
If you want to train with an individual target heart rate, enter it by pressing the +/- buttons for speed. Confirm
your specification by pressing the M button.
Please also read the chapter “Warning about Pulse & Heart Rate Monitors” in this manual.
Step 4: Time input
30:00 minutes flashes in the TIME display window. Enter the desired exercise time from 05:00 to 99:00 Minutes
by pressing the +/- buttons for speed.
Step 5: Profile start
Press the START button.
The display shows a countdown. The training time starts to run after the countdown has ended and the treadmill
starts automatically.
End of training
The treadmill stops automatically after the specified training time has elapsed.
Cockpit
Summary of Contents for 6.4
Page 1: ...1 ENG MAXXUS 6 4 Treadmill I N S TA L L AT I O N O P E R AT I N G M A N U A L...
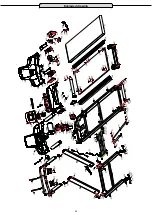
Page 26: ...26 Exploded drawing...
Page 29: ...29 ENG Notes...
Page 30: ...30 Notes...

