background image

5

ENG

5.   Service and Maintenance   


The maintenance of the device may only be carried out by qualified personnel. 

Please do not disassemble or try to maintain the device yourself. Exceptions are 

only small maintenance works or repairs under the instruction of a technician of the 

supplier.


Do not forget to turn off the power to the device at the mains after use.


Do not use the device if the electrical plug is loose in the socket.


If the chair is not to be used for a long period of time, roll up the cable and store it in 

a dry and dust-free place.


Do not expose the device to high temperatures or long periods of direct sunlight. 


If the electrical cable is damaged, remove the plug from the socket and contact the 

supplier or another qualified electrical technician for a replacement


Please clean the device with a dry cloth. Do not ever use thinner, mineral spirits, or 

alcohol for cleaning.


All mechanical components of the chair are designed so that no special mainte-

nance is required.


Avoid contact with sharp objects with the chair.


Please do not push or pull the chair over uneven ground. The chair must always be 

lifted to be transported.


Please use the device with enough time intervals between each application. Do not 

have the device in constant use.

6.   Commonly Alleged Malfunctions   


It is normal for the electronic motors to make buzzing noises during operation.


If the control unit does not operate, please check first if the electrical plug is correct

-

ly plugged into the socket and it is turned on at the mains.


The device will switch off automatically when the set program has come to an end.


If the device runs too long, the chair temperature protection system will switch off 

automatically.


If the device switches off automatically, it should be possible to switch it on again for 

use after approximately 30 minutes

Safety and Maintenance

Summary of Contents for MX 7.1

Page 1: ...ENG Massage Chair MX 7 1 I N S TA L L AT I O N O P E R AT I N G M A N U A L...

Page 2: ...ll rights reserved This publication may not be reproduced stored in a retrieval system or transmitted in whole or in part in any form or by any means electronic mechanical photocopying recording or ot...

Page 3: ...s manual are prohibited Es empfiehlt sich das Ger t nicht l nger als 20 Minuten pro Massage zu nutzen Please do not use this device if the leather is torn or damaged any of the covers are broken or da...

Page 4: ...et with wet hands Keep water or any other liquids away and avoid them getting into the device Do not damage any cables and do not exchange any circuits on this product Do not use wet or damp cloths or...

Page 5: ...Do not ever use thinner mineral spirits or alcohol for cleaning All mechanical components of the chair are designed so that no special mainte nance is required Avoid contact with sharp objects with t...

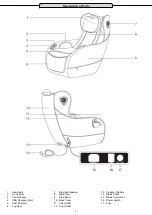
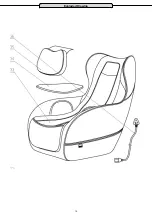
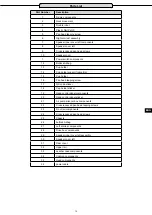
Page 6: ...anel 4 USB Charging Point 5 Seat Cushion 6 Leg Rest 7 Bluetooth speaker 8 Back Rest 9 Side Panel 10 Back Cover 11 Cup Holder 12 Cup Holder 13 Transport Rollers 14 Mains Cable 15 Mains Connection 16 Po...

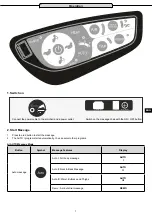
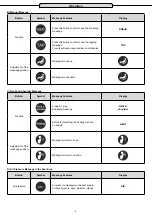
Page 7: ...on 2 Start Massage 1 Press the red button to start the massage 2 The AUTO I program starts automatically You can select other programs A AUTO Massage Mode Button Symbol Massage Features Display Auto m...

Page 8: ...oves up Massage moves down C Neck and Shoulder Massage Button Symbol Massage Features Display Function 2 way 1 way Kneading massage Neck shoulder Button for switching the heating function on and off H...

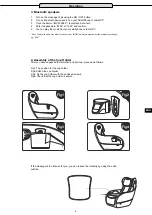
Page 9: ...sic from your smartphone or tablet PC Note The device name may differ for each model IMCM is always displayed but the number may change e g 0061 4 Assembly of the Cup Holder After you have unpacked th...

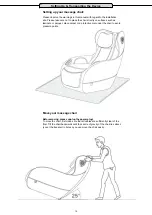
Page 10: ...place carpet or a protective mat under the chair to avoid pressure points Move your massage chair Before moving please unplug the power plug To move the chair first make sure that all cables are suffi...

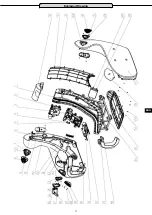
Page 11: ...11 ENG Exploded Drawing...

Page 12: ...12 Exploded Drawing...

Page 13: ...trim 15 Cup holder 16 Pan head tapping screw 17 QR code sticker 18 Cup holder sticker 19 Hand control panel components 20 Hand control panel sticker 21 Air pump silencer box components 22 Cross reces...

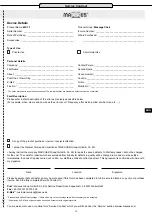
Page 14: ...e of purchase and applies solely to products which were purchased directly from the MAXXUS Group GmbH Co KG or one of the MAXXUS Group GmbH Co KG direct and authorised distribution partners The warran...

Page 15: ...t must be completed Fault Description Please enter a short description of the error as precisely as possible below For example when where and how does the error occur Frequency after which period at w...

Page 16: ...Maxxus Group GmbH Co KG Zeppelinstr 2 D 64331 Weiterstadt Germany E Mail info maxxus de www maxxus com...

Reviews: