5
ENG
Carefully unpack all of the delivered items. Two people are required as some parts of your exercise equipment
are bulky and heavy. Check that all of the fastening material (screws, nuts, etc.) and components are there
before starting assembly.
Carefully carry out the installation as damage that has arisen due to assembly errors are not covered by the
warranty or guarantee. Read the instructions carefully before starting, follow the sequence of installation steps
exactly and follow the instructions for each individual step. Installation of the device must be carried out by com-
petent adults. Perform the assembly in a location that is level, clean and free from obstructions. Carry out the
assembly with two people. Only start training after fully completing the installation.
Preparing for Assembly
Unpack the main frame (A) and place it in the designated assembly area which should be level and clean.
ATTENTION
: Do not remove the transport safety strap (P) until you are instructed to do so, premature removal
of the safety strap (P) can cause the tread to fold up suddenly.
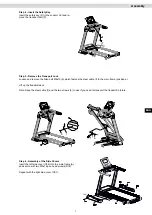
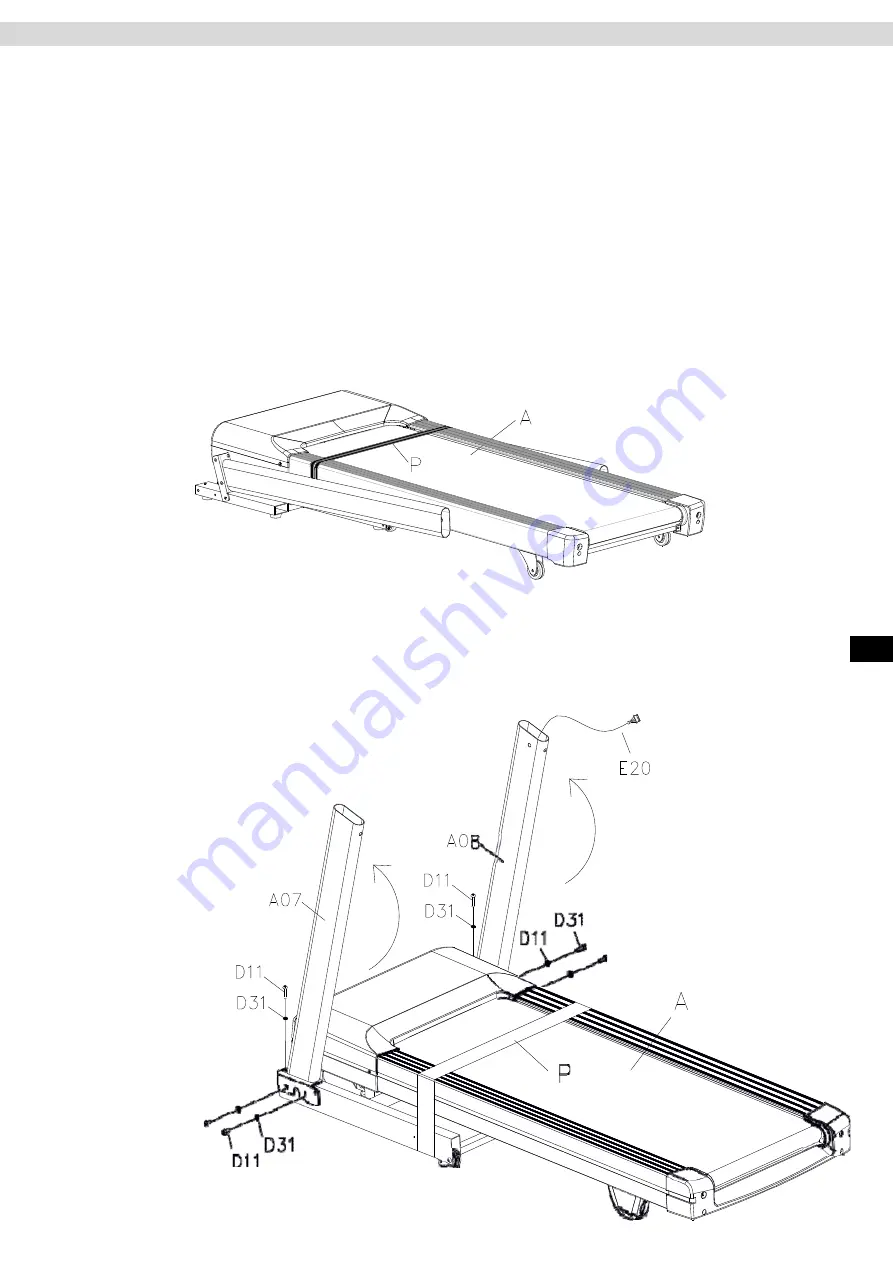
Step 1 - Assembly of the Side Frames:
Fold up the left side frame (A07).
Attach the left side frame (A07) to the main frame from the side with two Allen bolts M8x15 (D11) and two M8
locking washers (D31) and from above with an M8x15 Allen bolt (D11) and an M8 washer (D31).
Then do the same with the right side frame (A08).
Assembly
Side Tread
Summary of Contents for RunMaxx 7.4 T
Page 1: ...ENG RunMaxx 7 4 T Treadmill I N S TA L L AT I O N O P E R AT I N G M A N U A L ...
Page 23: ...23 ENG Cockpit ...
Page 36: ...36 Exploded Drawing ...
Page 37: ...37 ENG Exploded Drawing ...
Page 40: ...Notes 40 ...
Page 41: ...41 ENG Notes ...


