background image

26

26

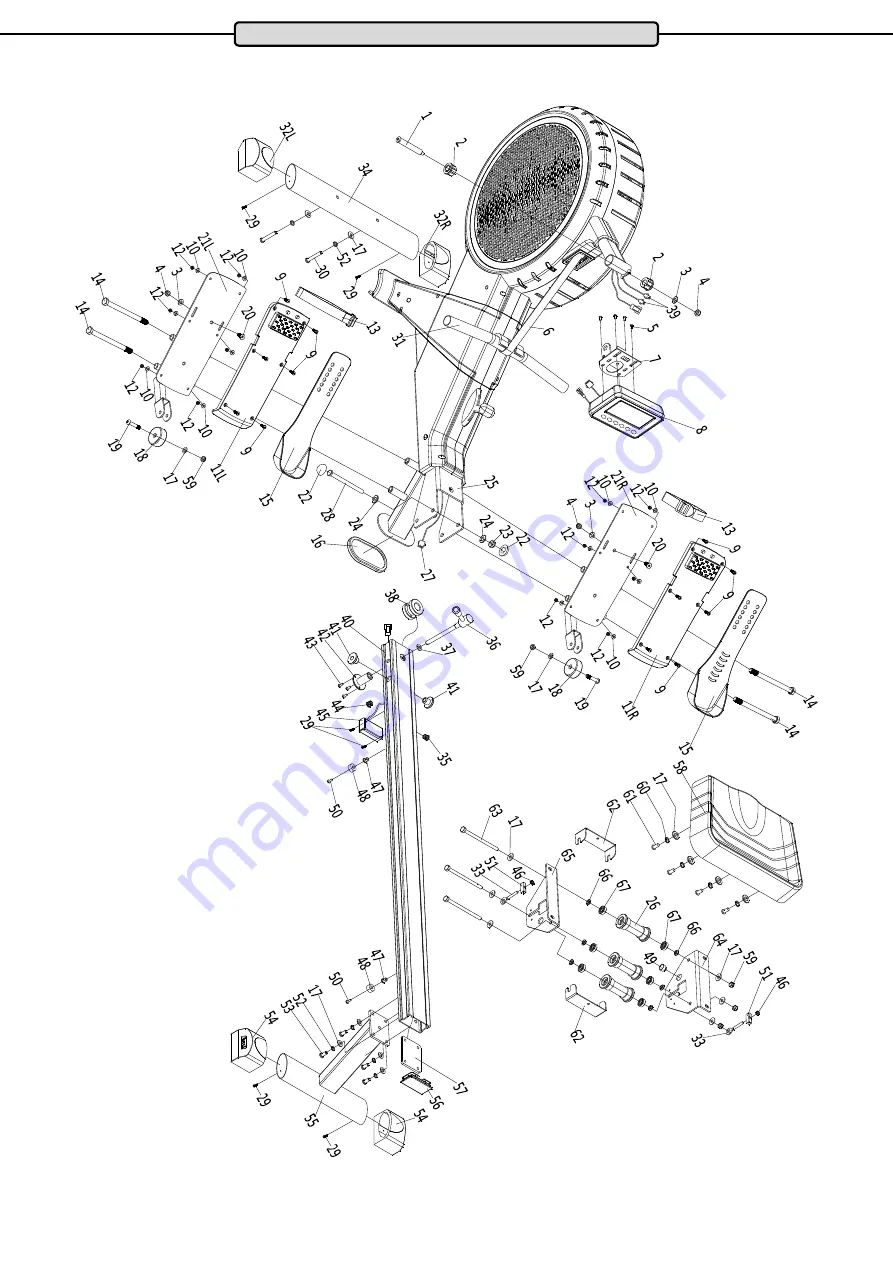
Exploded Drawing

Summary of Contents for RunMaxx 7.4

Page 1: ...ENG MAXXUS 7 4 Rowing Machine A S S E M B LY A N D O P E R AT I N G M A N U A L...

Page 2: ...es 25 Disposal 25 Exploded Drawing 26 27 Spare Parts List 28 29 Warranty 30 Service Contract 31 2019 by MAXXUS Group GmbH Co KG All rights reserved This publication may not be reproduced stored in ret...

Page 3: ...at your training device is kept on flat hard clean ground both in operation and at rest Any uneven surfaces must be removed or made good It is recommended that a floor covering carpet mat etc should b...

Page 4: ...4 Overview of the Device Cockpit Rowing Handle Resistance Control Foot Strap Seat Slide Rail Adjustable Pedal...

Page 5: ...r suitable work gloves during assembly Carry out the assembly of your training equipment in an area that is level clean and free from at obstructions Carry out the assembly with 2 people Your training...

Page 6: ...6 Step 2 Assembling the Pedals Attach the right and left pedals 21R 21L to the base frame 25 usimng two hexagon screws 14 for each Assembly...

Page 7: ...t the threaded holes of the fixing plate 57 match with the drill holes in the slide rail 40 Attach the rear stand 55 with four Allen screws 53 four spring washers 52 and four washers 17 from below at...

Page 8: ...s length of cable from the connected cables 45a 27 into the slide rail 40 Make sure that you do not crush or damage the cables Fix the slide rail 40 to the base frame 25 with a hexagon bolt 28 two was...

Page 9: ...ase frame 25 Slide the protruding cable lengths back into the frame Inserting and Changing the Batteries Step 1 Open and remove the battery compartment cover located on the back of the cockpit Step 2...

Page 10: ...up quickly and easily Folding up the slide rail Step 1 Remove the locking knob 36 with the washer 37 by turning it anti clockwise Step 2 Lift the slide rail 40 until it is vertical holding the seat wi...

Page 11: ...the unit is standing securely and is protected from uncontrolled access by third parties such as children playing Folding Mechanism To make it easier to transport this rowing machine the middle stand...

Page 12: ...of rowing movements In order to move the body forward you need your feet to be firmly held in position The cockpit is powered by two AA batteries If the display in the cockpit fades or goes out replac...

Page 13: ...inute DISTANCE Displays the distance covered in metres When a distance is set this value flashes The keys can be used to set the distance up to 99 900 meters STROKES Displays number of strokes so far...

Page 14: ...key Step 2 Enter the current time minute he minute value flashes before the colon in the TIME window adjust it by pressing the keys Confirm your entry by pressing the ENTER key Date Step 1 Enter the c...

Page 15: ...desired value is displayed TIME Specification of the training time from 1 00 to 99 00 minutes DISTANCE Specification of the training distance from 100 to 99 900 metres STROKES Specification of the row...

Page 16: ...ressing the keys Confirm your selection by pressing the ENTER key Step 2 Specifying the training distance The value now flashes in the DISTANCE field Select a value in the range of 500 to 10 000 metre...

Page 17: ...starting pulse with the pulse value determined after 60 seconds and gives a rating F1 Very good F2 Good F3 Satisfactory F4 Sufficient F5 Deficient F6 Unsatisfactory CAUTION Please note that while reco...

Page 18: ...at 25 carbohydrate and 5 protein Fat burning target zone 60 to 70 of the maximum heart rate This training zone is suitable for athletes and sports people who aim to lose weight Training in this zone t...

Page 19: ...n cockpit receiver We recommend always using a chest belt for heart rate measurement during use heart rate controlled pro grams WARNING The determination of the current heart rate by means of the ches...

Page 20: ...e Keep children pets and other people away while using the rowing machine espe cially from the seat rollers and slide rail where there is a risk of injury For your own safety wear tight fitting sports...

Page 21: ...r solar plexus Straighten your body far enough for your back to be pulled straight and pull your shoulders slightly back CAUTION Never bend your back too far backwards Step 5 Return to the Starting Po...

Page 22: ...o not just get off your training device immediately the training session is finished Like with the warm up stage you should continue for 3 5 minutes at minimum resistance to cool down After training y...

Page 23: ...ing goals such as weight reduc tion cardiac exercise training improvement of physical condition stress reduction etc to strive for training intensity to meet these goals should be be adjusted It makes...

Page 24: ...hing in the display when I turn it on Check if the battery is charged and change them if necessary Check if the control cable has been pinched or jammed during assembly and or if the connector has com...

Page 25: ...faces treated with MAXXUS Anti Static Spray do not attract dust as quick ly and will remain clean for longer MAXXUS Special Foam Cleaner Use for regular cleaning of your training device Plastic covers...

Page 26: ...26 26 Exploded Drawing...

Page 27: ...27 ENG Exploded Drawing...

Page 28: ...re 1 28 Hex bolt 1 29 Cross pan head self drilling srew 33 30 Inner hex pan head bolt 2 31 Handlebar 1 32L R Front stabilizer end cap 1pair 33 Bolt for chain adjustment 2 34 Front stablizer 1 35 Wire...

Page 29: ...et plate 1 86 Corrugated washer 1 87 Washer 1 88 Bush for spring 1 89 Round magnet 2 90 Pressing spring 1 91 Washer 4 92 Spring washer 4 93 Inner hex cylinder head bolt 4 94 Handlebar fixation plate 1...

Page 30: ...your training device starts on the date of purchase and applies solely to products which were purchased directly from the MAXXUS Group GmbH Co KG or one of the MAXXUS Group GmbH Co KG direct and auth...

Page 31: ...eted Fault Description Please enter a short description of the error as precisely as possible below For example when where and how does the error occur Frequency after which period at what Use etc A c...

Page 32: ...Maxxus Group GmbH Co KG Zeppelinstr 2 DE 64331 Weiterstadt Germany E Mail info maxxus com www maxxus com...

Reviews: