background image

17

Removing the doors

a

.

 The oven door is fully open

b

.

 The latch hinges completely lifted

c

.

 Gently close the oven door until you hear 

    the sound of engagement, once they reach

    a clamping position, with both hands holding

    the door and continue to push, pull up at the 

    same time so that the hinge bolt removed 

    from the oven

d

.

e.  

c.  

    .

C

Remove the inner glass panel

b. Remove the inner glass .

A

B

a. Press and hold the two sides of the grid with 
    both hands to pull it out 

.

Pull out the grid 

Right

Left

After


cleaning,


align


the


hinge


with


the


oven door. Latch and push


it


until


it


catches.


Take care to ensure 

that the hinge and door are properly 

aligned to avoid door damage. 

If in doubt, contact the service centre - 
information is listed on the back of  this user 

manual. 


With the oven door fully opened, push the 

latch down to it's initial position to complete 

the oven door installation. 


Locate the glass stopper and remove it. 


Remove the glass


for


cleaning.


To reinstall 

the inner glass, simply gently place it back 

onto the door and reinsert the glass 

stopper to secure the glass in place.  


Summary of Contents for MMDO9

Page 1: ...Instruction Manual MMDO9 60cm Built in Electric Oven ...

Page 2: ... become hot during use Children or persons with reduced physical sensory or mental capabilities should be kept away from the appliance Never touch the interior surfaces of the cooking compartment o the heating element of the appliance when the appliance is in use 12 Never place tin foil directly in contact with the oven floor as the buildup of heat may damage the enamel 13 Do not cover the cooking...

Page 3: ...ever prepare food containing large quantities of drinks with a high alcohol content in the appliance 21 Open the appliance door with care do not place items weighing over 15kg on the open appliance door 22 After using your oven ensure that all controls are in their stop position 23 To prevent overheating do not install this appliance behind a door Ensure the area of installation is well ventilated...

Page 4: ...ructions carefully you will be able to avoid any problems in using the appliance It is important to keep the instruction manual and store it in a safe place so that it can be consulted at any time Caution Do not use the oven until you have read this instruction manual The oven is intended for household use only The manufacturer reserves the right to introduce changes which do not affect the operat...

Page 5: ...ons 3 How to save energy 5 Description of the appliance 7 Specifications of the appliance 8 Installation 9 Operation 11 Cleaning and maintenance 15 Operation in case of emergency 19 Baking in the oven practical hints 20 Technical data 25 ...

Page 6: ...ing cavity heating elements and accessories are clean In case of fire or smoke within the cavity do not open the appliance door as this may cause the fire to spread into your home and cause severe burns Immediately switch off the appliance and unplug it from the mains or switch off the circuit breaker in the fuse box Leave the fire to burn out on its own If fire persists call the fire department i...

Page 7: ...ay be present Ensure the appliance is installed in a well ventilated area The unit s power cord must be connected to a properly grounded and protected 220 240V electrical outlet Always use ground fault protection where required by the electrical code Do not operate any appliance with a damage cord or plug or after the appliance malfunctions has been dropped or damaged in any manner Contact the aut...

Page 8: ...more economically in a pan on the cooker hob Important When using the timer set appropriately shorter cooking times according to the dish being prepared Do not install the cooker in the direct vicinity of refrigerators freezers Otherwise energy consumption increases unnecessarily responsible Here are some ways to do so Open the appliance door as infrequently as possible when the appliance is in us...

Page 9: ... pieces etc should be kept out of reach of children Old appliances should not sim ply be disposed of with normal household waste but should be delivered to a collection and recycling centre for electric and electronic equipment A symbol shown on the product the instruction manual or the packaging shows that it is suitable for recycling Materials used inside the appliance are recyclable and are lab...

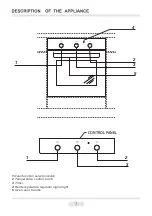
Page 10: ...1 Oven function selection knob 2 Temperature control knob 3 Timer 4 Red temperature regulator signal light 5 Oven door handle 3 2 1 3 2 1 4 5 CONTROL PANEL ...

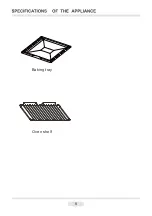
Page 11: ...Oven shelf Baking tray 8 ...

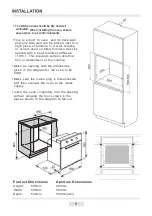
Page 12: ...ng with the dimensions given in the diagram for the oven to be fitted Make sure the mains plug is disconnected and then connect the oven to the mains supply Insert the oven completely into the opening without allowing the four screws in the places shown in the diagram to fall out Product Dimensions Height 595mm Width 595mm Depth 530mm Aperture Dimensions 600mm 560mm 560mm min 9 kitchen area should...

Page 13: ...10 ...

Page 14: ... of the oven should only be washed with warm water use appliance Heat the ovengradually from the lowest available temperature to the highest available temperature with temperature increments being 10deg C at a time Allow the oven to remain at each set temperature for approximately 10mins before further increasing the temperature and bio degradable washing solutions Use a mixture of baking soda and...

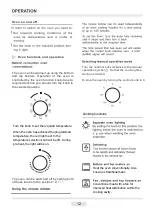
Page 15: ...control knob clockwise to the manual operation symbol So that the cooking time can be no limited To stop the oven by turning the control konb to 0 0 50 100 150 200 250 Turn the knob to set the required temperature When the oven has achieved the programmed temperature the red light next to the temperature selection knob will be off During pre heat the light will be on Cooking functions Heat the ove...

Page 16: ...13 Note Note ...

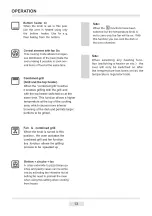
Page 17: ...bined Grill pre heating up to 150 deg C may be up to 50 quicker using this function switching insert prepared ingredients into oven adjust function to desired if different from Fan Combined Grill Set the oven function to Fan Combined Grill ...

Page 18: ...r cooker you can have a sig nificant influence on the continuing fault free operation of your appliance 15 Bio degradable or natural cleaning products are recommended e g baking soda lemon vinegar etc Otherwise specialised oven cleaners may also be used ...

Page 19: ...ed with warm water and a small amount of bio degradable washing up solution Alternatively mix baking soda with water for a quick fix Do not use cleaning products containing abrasive materials for the cleaning and maintenance of the glass front panel or the oven chamber to prevent damage to these surfaces C ...

Page 20: ...oth hands to pull it out Pull out the grid Right Left After cleaning align the hinge with the oven door Latch and push it until it catches Take care to ensure that the hinge and door are properly aligned to avoid door damage If in doubt contact the service centre information is listed on the back of this user manual With the oven door fully opened push the latch down to it s initial position to co...

Page 21: ... of time Moisture buildup on internal wires Heat the oven gradually from the lowest available temperature to the highest available temperature with temperature increments being 10deg C at a time Allow the oven to remain at each set temperature for approximately 10mins before further increasing the temperature 18 页 ...

Page 22: ...e to cool and rest after cooking Premature removal and serving will cause most cakes to collapse Let cookie dough rest in the refrigerator for at least a day before baking If using the oven for baking at higher altitudes 1km above sea level adjust baking time and temperature and ingredients Increase the oven temperature by 10 Deg C liquid by 2 tablespoons for each cup used Decrease each cup of sug...

Page 23: ...20 The following menus are for reference only ...

Page 24: ...21 Preheat the oven before baking Using the third level from the bottom is recommended ...

Page 25: ...22 ...

Page 26: ... 190 170 190 80 100 100 120 120 140 2 0 1 0 1 0 2 0 3 0 2 0 3 0 2 2 2 1 2 2 2 1 2 170 190 180 200 180 200 170 190 140 160 180 200 160 180 90 110 30 40 50 60 85 90 110 130 110 130 150 180 During baking you should turn the meat over periodically as well as basting it with its juices or with hot salty water Caution The figures given in the Tables are approximate and can be adapted based on your own e...

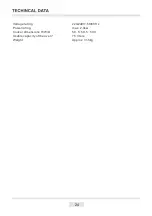
Page 27: ...24 Voltage rating Power rating Cooker dimensions H W D Usable capacity of the oven Weight 220 240V 50 60 Hz max 2 9kw 59 5 59 5 53 0 75 liters Approx 31 5kg ...

Page 28: ... ...

Reviews: