background image


20


2 Starting the machine for the first time 


After reassembly, the machine shall be checked as 

per the following:  


a)  

Be sure no foreign materials or tools, are left in the 

soil hopper, in the elevator or on the turntable. 


b) 

Put the 

main switch of the machine to OFF („Zero”) 

position  before  the  plug  of  the  connection  cable  is 

connected to the socket.  


c)  

When the machine is connected, put the switc

h to „1 

ON” position.  


d) 

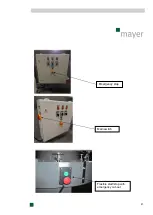
Now turn the switch for "soil" to position "2" and then 

turn  the  switch  for  the  "drill"  to  "2"  also.  Press 

pushbutton  „Start”  on  „Start-Stop”  switch  of  the 

swinging  cable  and  the  turntable  starts  to  rotate 

counterclockwise.  

If  it  rotates  clockwise,  call  an  electrician  to  change 

phases at the connecting cable.  

Plates  of  the  elevator  shall  be  forwarded  from  the 

bottom towards the top seeing from the side of the 

soil hopper.  


Pay attention to the following: 


Reversing 

switch “Soil”: 


  switch position 

“2”:  the turntable, the elevator 

and the conveyor belt move in working direction. 

  switch position "1": the turntable and the 

elevator move against working direction, the 

conveyor belt moves in working direction. 


Reversing switch 

“Drill”:  


  switch position 

“2”: drill rotates clockwise  

> it excavates the soil. 

  switch position "1": drill rotates counterclockwise 

> it compacts the soil. 


Reversing switch 

“Turntable”:  

  switch  position  "1":  the  turntable  moves  in 

working direction. 


e)  

In  case  there  were  no  problems  found  or  unusual 

noises heard during test operation, the machine may 

be  put  into  operation  as  it  is  described  in  section 

„Operation”. 

Summary of Contents for TM 1610F

Page 1: ...Issue date 1st October 2020 V1 1 Before the initial start up read and keep at the machine for future use Operating instructions Potting machine TM 1610F ...

Page 2: ...on 1 General notes 2 Installing the machine 3 Measures for the machine s stability against overturning 4 Disassembly and disposal of the machine 5 Initial start up 1 Check prior to first start 2 Starting the machine for the first time 3 Stopping the machine 6 Operation 1 Normal operation 2 Shutting down the machine 3 Measures prior to and after a longer shutdown 7 Malfunctions 1 Behaviour in case ...

Page 3: ...ne is not used in accordance with the regulations safe operation of the machine is not guaranteed The usage for intended purpose involves reading of the operating instructions and compliance with regulations especially with safety regulations stated in them Furthermore every inspection and maintenance should be performed in specified time The manufacturer accepts no liability for damages resulting...

Page 4: ...4 2 Structure Plan view of potting machine TM 1610F back right right left front ...

Page 5: ...ts beneath There is a controlled conveyor belt installed into the soil hopper which forwards the soil always towards the elevator The turntable continues to turn and a drilling motor synchronously with the inching mechanism drills a hole into the soil using an exchangeable drill One or several person s standing around the machine may plant plants into the pots Plant holding trays may be located ei...

Page 6: ... instructions of pot dispenser 4 Technical data Make Mayer Machine type Potting machine Series TM 1610F Length width height 296 130 195 cm Weight 780 kg Working height approx 85 cm Power connection 400V 50Hz 5 pole Power input 2 05 kW Pot size 5 to 21 cm diameter for round and square pots Capacity of soil hopper 1 m Production speed max 2800 pots hour Drill sizes 3 5 13 cm Noise level 73dB A ...

Page 7: ...fertiliser dosing dispenser pot dispenser with storage belt extension kit for soil hopper conveyor belts Important When placing repeat orders for accessories and spare parts make sure to have information about the machine type and number at your hand ...

Page 8: ...nery Emergency stop Principles for design ISO 13850 2015 EN ISO 13855 2010 Safety of machinery Positioning of safeguards with respect to the approach speeds of parts of the human body ISO 13855 2010 EN ISO 13857 2008 Safety of machinery Safety distances to prevent hazard zones being reached by upper and lower limbs ISO 13857 2008 EN ISO 14119 2014 Safety of machinery Interlocking devices associate...

Page 9: ...cal performance Part 2 Manual handling of machinery and component parts of machinery EN 1005 5 2007 Safety of machinery Human physical performance Part 5 Risk assessment for repetitive handling at high frequency Any design alterations that effect the technical specifications given in the Operating Instructions or the intended use i e change the machine substantially will invalidate this EU Declara...

Page 10: ...duct description the machine is only operated when in flawless working order and especially that the working order of the safety equipment is regularly checked the Operating Instructions are always available in legible condition and complete at the location where the machine is used only sufficiently qualified and authorised personnel operate service and repair the machine these personnel are regu...

Page 11: ...t when dealing with this machine These residual hazards relate to People The machine Other things and objects The environment The following safety symbols are used in these Operating Instructions This symbol indicates that there are dangers to the machine things and the environment but that no dangers to people are to be expected If these instructions are not followed it might result in malfunctio...

Page 12: ...wed to reach into the compost hopper to push in more soil for example because when doing so there would be a danger of getting caught by the scraping chain it is not allowed to get into the compost hopper while the machine is running it is not allowed to reach into the turntable or pot dispenser while the machine is running it is not allowed to reach into the drilling stand while the machine is ru...

Page 13: ...due to carelessness or wearing further additional clothing or jewellery In case of malfunctions during the workflow it is forbidden to touch the running machine in order to resolve the malfunction It must always be possible to access the emergency cut off switch The emergency cut off switch should always be located on the relevant workplace during normal operation preferably on the panel next to t...

Page 14: ...n special qualifications are required for the following activities Operational personnel being trained may at first only work with the machine under the supervision of an experienced individual It should be confirmed in writing that the training has been successfully completed Only trained personnel may ever operate any of the control and safety equipment All individuals that carry out any activit...

Page 15: ... machine the following special dangers must be expected Suspended loads can drop which would be a lethal danger never go under suspended loads If load lifting equipment other than that specified here severe damage to the machine may result 1 Transport When the machine is transported special care shall be taken to avoid damage of the machine during loading or unloading During transport fixings acco...

Page 16: ...with the front wheels If the machine is to be moved over an inclined plane it is necessary to completely empty the soil hopper to make sufficient safety precautions in order to prevent the machine from accidentally rolling away Such precautions may include enough personnel to secure the wheels using a wedge and so on 3 Storage When the machine or its parts are not reassembled right after transport...

Page 17: ...device c Be sure that enough space is assured for feeding and filling pots Same care shall be taken in case machines are connected in front of or behind it d In order to utilise the machine s maximum performance it is suggested to prepare soil mixture seedling plants pots trays on the best place and in sufficient quantity Do not under estimate the task of removing and transporting filled pots sinc...

Page 18: ...the machine s stability against overturning There is no need to carry out other activity for erecting the machine than it is described in section 4 2 4 Disassembly and disposal of the machine After completion of its full time of operation the machine must be duly separated from energy supply systems and disposed according to valid legal regulations ...

Page 19: ... to it have been removed from the machine Before the first start up check the electrical connections Activate all safety equipment and EMERGENCY SHUT OFF switches before the initial start up Also read section General Safety Instructions 1 Check prior to first start Prior to starting up the machine the following must be checked are all safety devices available was the machine damaged during transpo...

Page 20: ... an electrician to change phases at the connecting cable Plates of the elevator shall be forwarded from the bottom towards the top seeing from the side of the soil hopper Pay attention to the following Reversing switch Soil switch position 2 the turntable the elevator and the conveyor belt move in working direction switch position 1 the turntable and the elevator move against working direction the...

Page 21: ...21 Emergency stop Flexible start stop with emergency cut out Main switch ...

Page 22: ...the machine There are two ways to switch off the machine a In normal case by switch Stop mounted on the swinging cable b In emergency case by Emergency Stop switch Note See also section 6 2 Shutting down the machine ...

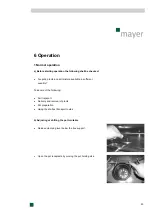
Page 23: ... soil mixture available in sufficient quantity Take care of the following Soil transport Delivery and removal of plants Pot preparation Using the shortest transport routes b Adjusting or shifting the pot turntable Release clamping lever below the box support Open the pot receptacle by moving the pot holding disk ...

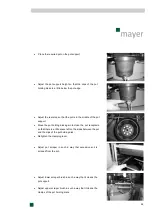
Page 24: ...the pot holding disk again to close the pot receptacle so that there is a little space left on the sides between the pot and the clips of the pot holding disk Retighten the clamping lever Adjust pot scraper in such a way that excessive soil is scraped from the pot Adjust lower scraper brush in such a way that it cleans the pot support Adjust upper scraper brush in such a way that it cleans the cla...

Page 25: ...e removed from the machine by opening the soil flap If the soil heap gets too high in front of the soil flap the potting machine must be pulled back a bit Cleaning of the elevator deflection is also carried out by opening the soil flap d Adjusting drill depth and pressure intensity of plates After fixing the size of the soil drill and the matching plate drilling depth must be set according to the ...

Page 26: ...lling depth roughly by using an empty pot Drilling depth may be adjusted by shifting the rod in the sleeve and fixing them to each other with the threaded pin Then make a drilling test with pots filled up with soil and check the drilling depth readjust if necessary When using soft plastic grided or Jiffy pots pressing force of the press plate shall be set by using clamping pieces ...

Page 27: ...ed from the soil hopper to the elevator by means of a continuous conveyor belt which runs on carrier rollers in the soil hopper The speed of the belt may be increased or decreased by rotating the star grip as marked Before setting is started the clamping lever of the spindle of the star grip shall be loosened and when the required speed is set it shall be tightened Thus the shovels of the constant...

Page 28: ... for loose filling Comment to 2 The height adjustable pot stripper enables a regulation of filling quantity Larger quantity of soil results in firm filling while soil stripped at the edge of the pot results in loose filling Comment to 3 Function of the pressing plate is to hold down the pot and the remaining soil during the drilling process When the gap is small between the outer diameter of the d...

Page 29: ... Stop is eliminated the machine can be started by pressing push button Start 3 Measures prior to and after a longer shutdown a Before a long shutdown Clean carefully the machine Grease and oil certain parts of the machine according to maintenance plan Protect the machine against dirt and moisture it should be covered Disconnect the machine from power lines electricity compressed air b After a long...

Page 30: ...he power sources can result in injuries to people as well as damage to the machine In case of unprotected manual operation there is an increased risk of injuries through bruising 1 Behaviour in case of malfunctions If any malfunctions occur while the machine is in operation proceed as follows 1 Stop the machine either using the STOP button or EMERGENCY CUT OFF depending on the situation 2 For pers...

Page 31: ... wooden piece Remove cause for malfunction Possibly by running elevator backwards turn switch to the left to position 1 or 2 Rotating assembly has too much clearance Worn shifting roll or carrier bolt Replace shifting roll or carrier bolt Chains are too loose Retighten chains Uneven filling of pots Object in elevator Remove source of interference Soiled dirty shovel Clean shovels No soil supply So...

Page 32: ...unit that is under pressure All interventions in the control programme of the machine may only be carried out by Mayer GmbH Co KG All un recycled operational materials lubricants and supplies must be disposed of in an environmentally friendly manner Also read section General Safety Instructions When carrying out maintenance on the machine the please note following special dangers Installing incorr...

Page 33: ...may be retensioned by means of tensioning bearings located on the sides of the elevator Check regularly if the chains are tensioned properly When the chain is too loose the plates may jam with edge of the housing Overtensioned chain requires an excess of driving power and causes too quick wear When the chains are retensioned both of them shall have the same tightness With the soil hopper being com...

Page 34: ...ns of tensioning nuts located at the end of the soil hopper Retensioning evenly is particularly important so that the belt does not run on one side It must be ensured the groove of the driving and deflecting roller of the conveyer belt is not filled up with soil Regularly clean the grooves Generally the conveyor belt requires no retensioning Follow maintenance schedule ...

Page 35: ... of controller drum quarterly Grease holding down bar at drill monthly Clean and grease elevator chain e g with WD 40 or Caramba monthly Grease the brake grease nipples on the back side of turntable quarterly Grease all bearings fitted with grease nipples yearly ...

Page 36: ...36 9 Part list ...

Page 37: ...37 10 Circuit diagrams for electric and pneumatic system ...

Page 38: ...r parts which we do not manufacture ourselves e g motors we can only accept liability for the same scope and length of time which the subcontractor has accorded to us Any replaced parts shall become our own property No warranty claims can be accepted if the fault occurs as a result of the customer having mistreated or neglected the products delivered by us made modifications or undertaken repairs ...

Page 39: ...c during the delivery period provided that the purchased object is not thereby significantly altered rendered less effective or reduced in value and the customer can reasonably be expected to accept the modifications You have chosen to purchase a product of true quality We wish you every success with your product We would be most grateful if you would recommend our products to others Thank you You...

Reviews: