20
ELECTRONIC CONTROL SETUP INSTRUCTIONS
The setup code is indicated by the one or two left-hand
characters. The setup code value is indicated by the two or
three right-hand characters.
NOTE:
The first line of each code indicates the factory default.
Code Explanation
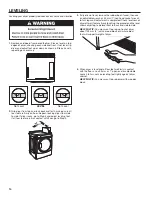
6 06
REGULAR CYCLE PRICE
6 06
Represents the number of quarters (coin 1) needed to
start the dryer; may adjust from 0–39. (See b.xx setup
for VALUE OF COIN 1.) Advance from 0–39 by pressing
the WHITES AND COLORS keypad. Factory default of
6 x coin 1.
6 00
PN MODELS ONLY:
Factory default of 6 00, or 0 coins.
• Press the DELICATES keypad once to advance
to next code.
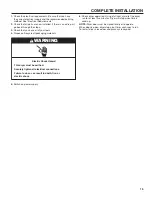
7 05
REGULAR DRY TIME
7 05
PD MODELS:
Represents the number of minutes
per coin (coin 1).
Factory default of 5 minutes per coin.
Example: 6 coins x 5 minutes = 30 minutes.
By pressing the WHITES AND COLORS keypad,
value adjusts from 1–99 minutes.
7 45
PN MODELS:
Represents the cycle length for free
cycles. Example: “7 45” = 45 minutes.
• Press the DELICATES keypad once to advance
to next code.
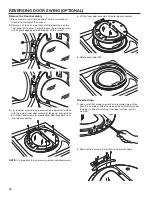
8 00
TYPE OF DRYER PRICING
8 00
Fixed Cycle with Top Off. For detailed description,
see “General User Information.”
8 FC
PN MODELS ONLY:
Factory default of FC (Fixed
Cycle). For detailed description, see “General User
Information.” Use the STOP/PAUSE keypad to change
this selection.
• Press the DELICATES keypad once to advance
to next code.
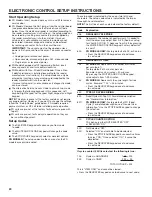
9 00
CYCLE COUNTER OPTION
This option is either NOT SELECTED “OFF”
or SELECTED “ON.”
9 00
Not Selected “OFF.”
9 0C
Selected “ON” and not able to be deselected.
• Press the STOP/PAUSE keypad 3 consecutive times
to select “ON.” Once selected “ON,” it cannot be
deselected.
• Press the DELICATES keypad once to advance
to next code.
If cycle counter (9 0C) is selected, the following is true:
1 00
Cycles in HUNDREDS
1 02 = 200
2 00
Cycles in ONES
2 25 = 25
TOTAL CYCLES = 225
This is “VIEW ONLY” and cannot be cleared.
• Press the DELICATES keypad once to advance to next code.
Start Operating Setup
■
PD Models: Insert service door key, turn, and lift to remove
service door.
■
PN Models: Remove the AA1 jumper from the control board
(see procedure below) or use the Service Access Code
below. Once the debit card reader is installed (according to
the reader manufacturer’s instructions), the setup mode can
be entered by inserting a manual setup card (supplied by
the reader manufacturer) into the card slot. If manual
setup card is not available, manual setup mode cannot
be entered. However, diagnostic mode can be entered
by removing connector AA1 on the circuit board.
IMPORTANT:
The console must not be opened unless
power is first removed from the dryer. To access connector
AA1:
g
Unplug dryer or disconnect power.
g
Open console, disconnect plug on AA1, close console.
g
Plug in dryer or reconnect power.
n
PN Models Equipped with Programming Switch: Insert
access panel key and turn counterclockwise.
n
PN Models with Gen. 2 Debit Card Reader: Once a Gen.
2 debit card reader is installed (according to the reader
manufacturer’s instructions), the setup mode can only be
entered by inserting a manual setup card (supplied by the
reader manufacturer) into the card slot.
If manual setup card is not available, only diagnostic mode
can be entered.
n
The alternative Service Access Code to enter set-up mode
is to press the following keypads in this sequence: Left
keypad, Right keypad, Left keypad, Right keypad, and Right
keypad.
NOTE:
This dryer is preset at the factory and does not require
any programming. However, if you want to change the settings,
follow the “Setup Codes” guide below. PD models require a
payment system or OPL kit to be installed prior to operation.
n
PD units are pre-set at the factory for fixed cycle price with
top off.
n
PN units are pre-set for fixed cycle operation so they can
be run without payment.
Setup Codes
■
The DELICATES keypad will advance you from code
to code.
■
The WHITE AND COLORS keypad will change the code
value.
■
The STOP/PAUSE keypad will select or deselect options.
PN MODELS:
The setup codes are the same as for the PD
models except where noted.
Summary of Contents for MDE28PD
Page 94: ...94 NOTAS ...
Page 95: ...95 NOTAS ...

