PRODUCT DESIGN
35
filter requirement charts for determination of the minimum
filter area to ensure proper unit performance. The following
figures show possible filter locations.
NOTE:
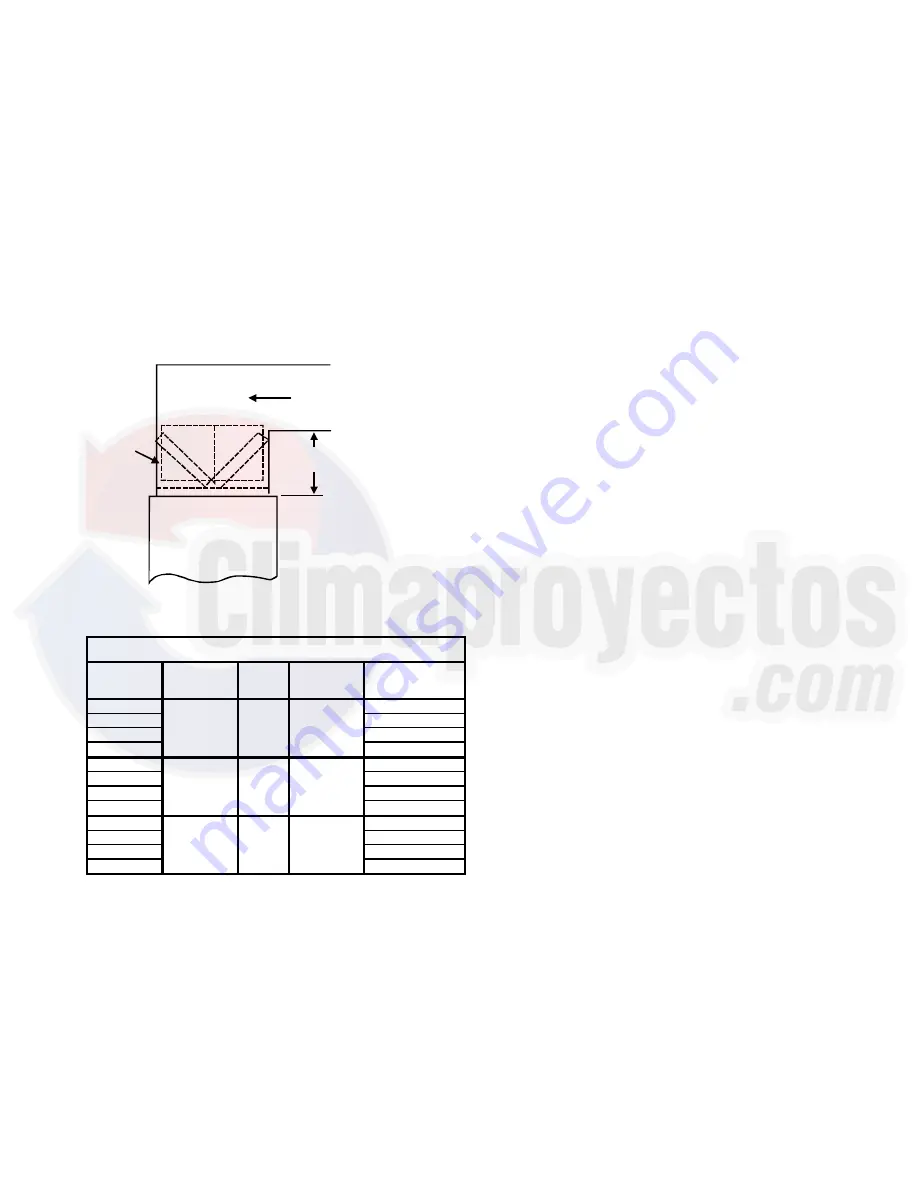
A ductwork
access door must be used in counterflow applications to
allow filter removal. If the filter rack is used, the side of the
plenum must be at least as tall as dimension "A" shown in
the following illustration. For dimension of "A" refer to the
following chart.
COUNTERFLOW FILTER INSTALLATION
This furnace has provisions for the installation of return air
filters at the counterflow top return. The furnace will
accommodate the following filter sizes depending on cabinet
size:
"A"
Min
Return Air
Optional
Access
Door
Cabinet
Width
Filter Area
(in
2
)
Qty.
Filter Size
(in)
Dimension "A:
(in)
14
15.1
17 1/2
14.2
21
13.0
24 1/2
11.3
14
20.4
17 1/2
19.7
21
18.8
24 1/2
17.7
14
25.5
17 1/2
25.0
21
24.3
24 1/2
23.4
15x20x1
20x20x1
25x20x1
COUNTERFLOW TOP RETURN
600
800
1000
2
2
2
Refer to Minimum Filter Area tables to determine filter area
requirement.
NOTE:
Filters can also be installed elsewhere
in the duct system such as a central return.
Horizontal Installations
Filter(s) must be installed external to the furnace casing for
horizontal installations. For most installations it is prefer-
able to use a central return with filters installed in the duct
behind the return air grill. In this way filter replacement is
relatively simple by merely removing the grille, rather than
going into the attic or crawl space.
ADDITIONAL FILTERING ACCESSORIES
External Filter Rack Kit (EFR01)
The external filter rack kit is intended to provide a location
external to the furnace casing, for installation of a perma-
nent filter on upflow model furnaces. The rack is designed
to mount over the indoor blower compartment area of either
side panel, and provide filter retention as well as a location
for attaching return air ductwork.
NORMAL SEQUENCE OF OPERATION
P
OWER
U
P
1.
115 VAC power applied to furnace.
2.
Integrated ignition control module performs internal
checks.
3.
Integrated ignition control module LED will light.
4.
Integrated ignition control monitors safety circuits con-
tinuously.
5.
Furnace awaits call from thermostat.
N
ORMAL
H
EATING
S
EQUENCE
1.
R and W thermostat contacts close, initiating a call for
heat.
2.
Integrated control module performs safety circuit
checks.
3.
The induced draft blower is energized causing pres-
sure switch contacts to close. Induced draft blower
remains energized for pre-purge period. Humidifier ter-
minals are energized with induced draft blower.
4.
Ignitor warm up begins after pre-purge is completed.
5.
Gas valve opens at end of ignitor warm up period, de-
livering gas to burners to establish flame.
6.
The control checks for a signal from the flame sensor
within seven (4) seconds after the gas valve is ener-
gized. Gas will only continue to flow if a flame signal is
present.
7.
Circulator blower is energized on heat speed following
a fixed thirty (30) second blower on delay. Electronic
air cleaner terminals are energized with circulator
blower.
8.
Furnace runs, integrated control module monitors safety
circuits continously.
9.
R and W thermostat contacts open, allowing the gas
valve to cycle off.
10. Induced draft blower is de-energized following a fifteen
(15) -second post purge. Humidifier terminals are de-
energized.
11. Circulator blower is de-energized following a selectable
heat off delay period (90, 120, 150 or 180 seconds).
Electronic air cleaner terminals are de-energized.
12. Furnace awaits next call from thermostat.
The adjustable delay-off timing allows the installer to cus-
tomize the comfort level.


