background image

Summary of Contents for LAT8816

Page 1: ...AUTOMATIC WASHER Welcome 1 Safety Instructions 2 Controls At A Glance 3 5 Special Features 6 Operating _ps 7 Care and Cleaning 8 Storing the Washer 8 Water Use 8 Before You Call 9 10 Warranty Back Page ...

Page 2: ...ething should go wrong we suggest consulting the Before You Call section in the back of this book It is designed to help you solve basic problems before consulting a servicer However should you need assistance it is helpful to 1 Have complete model and serial number identifica tion of your washer This is located on a data plate on the top edge of the control panel Record these numbers below for ea...

Page 3: ... have been previously cleaned in washed in soaked in or spotted with I 1 Unplug power supply cord before attempting to ser gasoline dry cleaning solvents other flammable vice your washer or explosive substances as they give off vapors 12 The agitator should not be removed If the agitator that could ignite or explode Hand wash and line is removed it must be replaced by pushing down dry any items co...

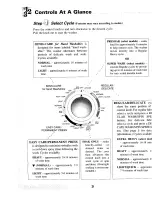
Page 4: ...IGHT REGULAR DELICATE cy NORMAL share the same portion of OFF rinse spin control knob For regular fabr select a cycle and press a 1Lt e ULAR WASH SPIN SPE soin button For delicate fabr exlra ooo aow select a cycle and press a DE OFF EASYCARE LIGHT CATE WASH SPIN SPEED I HEAVY OFF SOAK PERMANENTPRESS ONLY ton See page 5 for deta information Cycles availabl EXTRA HEAVY select mud EASY CARE PERMANENT...

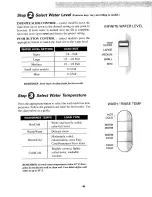
Page 5: ...ll MINI Small selectmodels 1 3 Full Mini 1 4 Full REMEMBER Items must circulate freely for best results A Step _ Select Water Temperature Press the appropriate button to select the wash and rinse tem WASH RINSE TEMP peratures Follow the garment care label for best results Use the chart below as a guide HOT WASHRINSE TEMPS LOAD TYPE COLD Hot Cold White and heavily soiled color fast items WARM WARM ...

Page 6: ...ired plus press Energy Saver button select models CANCEL OPTIONS Cancel Press button to cancel and reset any Options of the above options select models i Q 1 Step Select WashSpin Speeds Press the appropriate button to select the wash and spin WASH SPIN SPEED speeds to fit the fabric type WASh SPIN SPEED DESIGNED FOR REGULAR _ FAST Regular Fast Sturdy fabrics needing maxi mum water extraction REGUL...

Page 7: ...ot used properly If you prefer to use color safe non chlorine bleach Pour liquid chlorine bleach into pour it into the wash tub with your detergent Do not bleach dispenser pour non chlorine bleaches into the bleach dispenser Fabric Softener Dispenser This dispenser automatically releases liquid fabric soft ener at the proper time during the cycle To use follow these steps 1 Pour liquid fabric soft...

Page 8: ... soiled loads level setting This will minimize shrinkage wrinkl If you have soft water or a lightly soiled load use less and pulling of seams detergent See manufacturer s instructions For best results add the detergent to washtub bef Wipe up any detergent spills on the washer adding the load Additional 7ps If the washer stops during the spin it may be due to This washer is designed so that it will...

Page 9: ...ycle control knob to Spin and lower the hoses and internal components before storage Prepare drain hose to eliminate any water that may be in the the washer for storage as follows drain hose Select the NORMAL cycle for regular fabrics and add Disconnect the washer from the electrical supply and one cup of chlorine bleach or white vinegar to a full leave the washer lid open to let air circulate ins...

Page 10: ...tart the washer For your safety washer will Won t Agitate not agitate or spin unless the lid is closed The washer is equipped with a lid switch failure detector If the lid switch should malfunction the detector will stop operations for your safety Call for service Unevenly distributed load Redistribute the load close the lid and pull knob out Check for leveling Be sure water level is acceptable fo...

Page 11: ...id extended soaking soak for 30 minutes or less Avoid overloading Be sure washer is leveled properly as outlined in installation manual ls Noisy Weak floors can cause vibration and walking Be sure rubber feet are installed on leveling legs Turn both faucets on fully If equipped with a temperature selector knob be sure it is set directly on a Fills with temperature setting and not between settings ...

Page 12: ...vice company in your area contact the Maytag dealer from whom your appliance was purchased or call Maytag Customer Service Should you not receive satisfactory warranty service call or write Maytag Customer Assistance c o Maytag Customer Service EO Box 2370 Cleveland TN 37320 2370 US 1 800 688 9900 CANADA 1 800 688 2002 U S customers using TTY for deaf bearing impaired or speech impaired call 1 800...

Page 13: ...ing the first year To Receive Warranty Service To locate art authorized service company in your area contact the Maytag dealer from whom your appliance was purchased or call Maytag Customer Service Should you not receive satisfactory warranty service call or write Maytag Customer Assistance c o Maytag Customer Service P O Box 2370 Cleveland TN 37320 2370 US 1 800 688 9900 CANADA 1 800 688 2002 Whe...

Reviews: