background image

20

Water is leaking from the dispenser system

NOTE:

 One or two drops of water after dispensing is normal.


Glass not being held under the dispenser long enough?


Hold the glass under the dispenser 2 to 3 seconds after 

releasing the dispenser lever.


New installation?

 Flush the water system. See “Water 

Dispenser.”


Recently changed water filter?

 Flush the water system. See 

“Water Dispenser.”


Water on the floor near the base grille?

 Make sure the 

water dispenser tube connections are fully tightened. See 

“Refrigerator Door(s) and Drawer.”

Water from the dispenser is warm

NOTE: 

Water from the dispenser is only chilled to 50°F (10°C).


New installation?

 Allow 24 hours after installation for the 

water supply to cool completely.


Recently dispensed large amount of water?

 Allow 24 hours 

for water supply to cool completely.


Water not been recently dispensed?

 The first glass of water 

may not be cool. Discard the first glass of water.


Refrigerator connected to a cold water pipe?

 Make sure 

the refrigerator is connected to a cold water pipe. See “Water 

Supply Requirements.”

Accessories

The following accessories are available for your refrigerator. To 

order an accessory, contact us and ask for the part number.
In the U.S.A., visit our webpage 

www.maytag.com/accessories

or call 

1-800-901-2042

.

In Canada, visit our web page 

www.maytag.ca


or call 

1-800-807-6777.

Affresh

®

 Stainless Steel Cleaner:

In U.S.A., order Part #W10355016 

In Canada, order Part #W10355016B
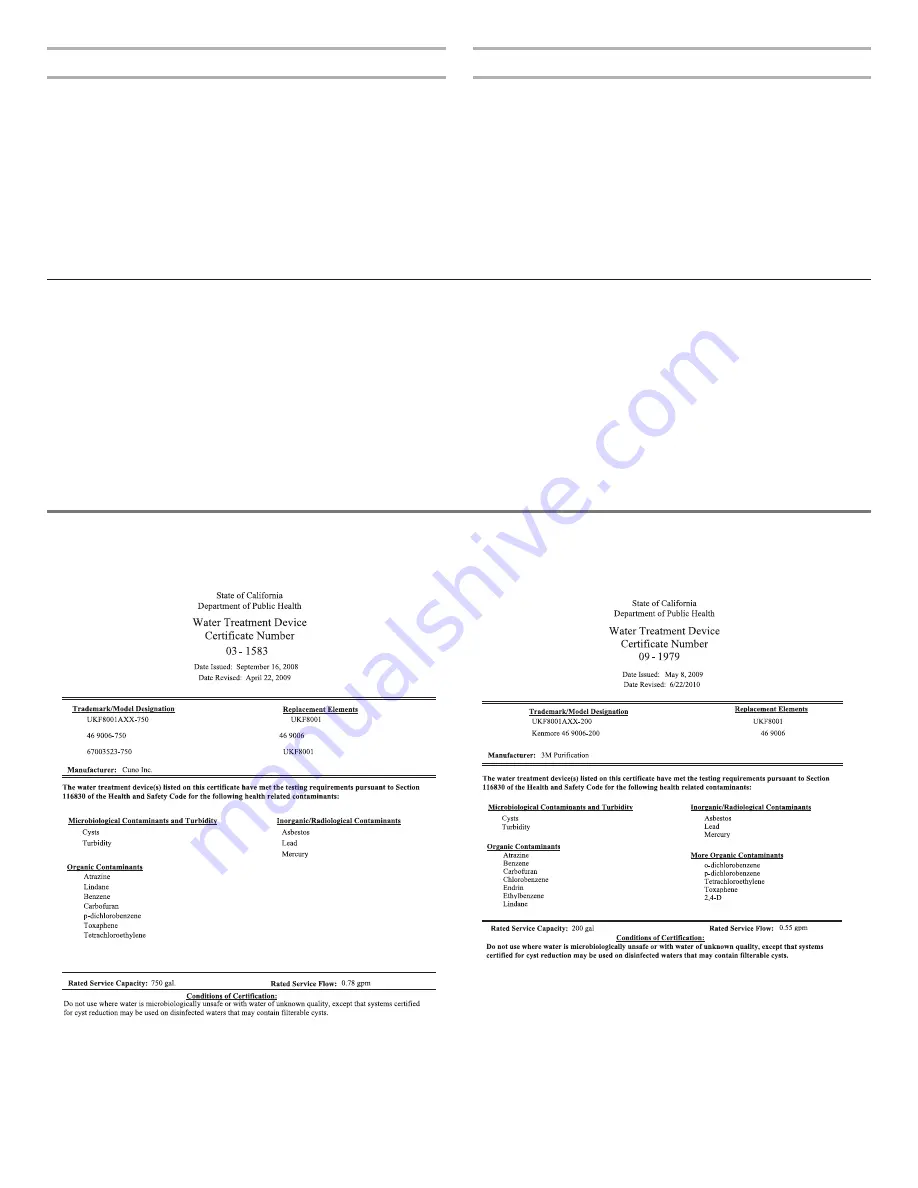
WATER FILTER CERTIFICATIONS

Affresh

®

 Stainless Steel Wipes:

In U.S.A., order Part #W10355049 

In Canada, order Part #W10355049B

Affresh

®

 Kitchen & Appliance Cleaner:

In U.S.A., order Part #W10355010 

In Canada, order Part #W10355010B

Water Filter:

Order Part #UKF8001AXX-750 or Part #UKF8001AXX-200

Produce Preserver (on some models):

Order Part #W10346771A

WATER FILTER CERTIFICATIONS

Summary of Contents for MBF2258DEH00

Page 1: ...REFRIGERATOR CARE 16 Cleaning 16 Changing the Light Bulb 17 Vacation and Moving Care 17 TROUBLESHOOTING 18 Refrigerator Operation 18 Temperature and Moisture 19 Ice and Water 19 Accessories 20 WATER FILTER CERTIFICATIONS 20 PERFORMANCE DATA SHEETS 21 WARRANTY 23 SÉCURITÉ DU RÉFRIGÉRATEUR 24 Mise au rebut du vieux réfrigérateur 26 INSTRUCTIONS D INSTALLATION 26 Déballage du réfrigérateur 26 Exigenc...

Page 2: ... explosions Do not store explosive substances such as aerosol cans with a flammable propellant in this refrigerator Do not use or place electrical devices inside the refrigerator compartments if they are not of the type expressly authorized by the manufacture Use two or more people to move and install refrigerator Disconnect power before installing ice maker on ice maker kit ready models only A qu...

Page 3: ... cleaning instructions in Refrigerator Care WARNING Suffocation Hazard Remove doors from your old refrigerator Failure to do so can result in death or brain damage Important information to know about disposal of refrigerants Dispose of refrigerator in accordance with Federal and Local regulations Refrigerants must be evacuated by a licensed EPA certified refrigerant technician in accordance with e...

Page 4: ...agent or a similarly qualified person Do not use a cord that shows cracks or abrasion damage along its length or at either the plug or connector end Recommended Grounding Method A 115 volt 60 Hz AC only 15 or 20 A fused grounded electrical supply is required It is recommended that a separate circuit serving only your refrigerator and approved accessories be provided Use an outlet that cannot be tu...

Page 5: ...d will help avoid off taste or odor in your ice or water Check for leaks If PEX tubing is used instead of copper we recommend the following Whirlpool Part Numbers W10505928RP 7 ft 2 14 m jacketed PEX 8212547RP 5 ft 1 52 m PEX or W10267701RP 25 ft 7 62 m PEX Install tubing only in areas where temperatures will remain above freezing If you turn on the refrigerator before the water line is connected ...

Page 6: ...h the plastic water line to the refrigerator cabinet with a P clamp 7 Turn on water supply to the refrigerator and check for leaks Correct any leaks Complete the Installation 1 Plug into a grounded 3 prong outlet NOTE Allow 24 hours to produce the first batch of ice Discard the first three batches of ice produced Allow 3 days to completely fill the ice contain Refrigerator Door s and Drawer TOOLS ...

Page 7: ...arts for the bottom hinge as shown in Bottom Hinge graphic French Doors 1 Unplug refrigerator or disconnect power 2 Keep the refrigerator doors closed until you are ready to lift them free from the cabinet NOTE Provide additional support for the refrigerator door while the hinges are being removed Do not depend on the door gasket magnets to hold the door in place while you are working 3 Starting w...

Page 8: ...t tighten the screws completely 5 Adjust the doors so that the bottom of the refrigerator door is aligned with the top of the freezer door Tighten all screws French Doors 1 Assemble the parts for the top hinges as shown in Top Hinge graphic Do not tighten the screws completely 2 Replace the parts for the bottom hinges as shown in Bottom Hinge graphic Tighten screws Replace the refrigerator doors N...

Page 9: ...ge Screws D Top Hinge A Hinge Pin Cover C Hinge Screws B Center Hinge A Hinge Pin Shim B Bottom Hinge C Hinge Plate D Roller Bracket E 3 8 Hex Head Hinge Screws A Flat Head Handle Screws B Refrigerator Door Handle A Door Stop Screws B Door Stop Front View Side View A 5 16 Hex Head Hinge Screws A Flat Head Handle Screws Door Handle Seal Screw Front A Hinge Pin Shim B Bottom Hinge C Hinge Plate D Ro...

Page 10: ... Screws D Top Hinge A Hinge Pin Cover C Hinge Screws B Center Hinge Door Swing Reversal optional A Flat Head Handle Screws B Refrigerator Door Handle A 5 16 Hex Head Hinge Screws Front View Side View A Door Stop Screws B Door Stop A Flat Head Handle Screws B Freezer Drawer Handle Door Handle Seal Screw Front Drawer Front Removal Drawer Front Replacement A Loosen 4 Door Bracket Screws ...

Page 11: ... A A A B Door Removal and Replacement Top Hinge Bottom Hinge A Hinge Cover Screw B Top Hinge Cover C 5 16 Hex Head Hinge Screws D Top Hinge A Hinge Pin Cover C Hinge Screws B Center Hinge A Flat Head Handle Screws B Freezer Drawer Handle A Flat Head Handle Screws B Refrigerator Drawer Handle Drawer Front Removal Drawer Front Replacement A Loosen 4 Door Bracket Screws ...

Page 12: ...o close easier 5 Check for door alignment If one door is lower than the other adjust the leveling screw on the lower side of the refrigerator Using a 1 4 hex driver turn the screw clockwise to raise that side of the refrigerator until the doors are aligned It may take several turns of the leveling screw to raise the refrigerator NOTE Having someone push against the top of the refrigerator takes so...

Page 13: ...rol to OFF to save energy when the environment is less humid Adjusting Controls If you need to adjust the temperature in either the refrigerator or freezer compartment use the settings listed in the chart below as a guide To adjust the temperature Style 1 Press the up or down arrow touch pads Style 2 Press the plus or minus sign touch pads Except when first turning on the refrigerator do not adjus...

Page 14: ...er outage During a power outage if the temperatures in the refrigerator and freezer compartments exceed normal operating temperatures the highest temperature reached will be displayed Press the Temp Alarm touch pad until the indicator light is lit to turn on this feature Press and hold Temp Alarm for 3 seconds until the indicator light goes off to turn off this feature Temp Alarm An alarm will sou...

Page 15: ...er should produce a complete batch of ice approximately every 3 hours To increase ice production lower the freezer and refrigerator temperature See Using the Controls Wait 24 hours between adjustments Remember Allow 24 hours to produce the first batch of ice Discard the first three batches of ice produced Allow 3 days to completely fill the ice storage bin The quality of your ice will be only as g...

Page 16: ...ons any odors formed in one section will transfer to the other You must thoroughly clean both sections to eliminate odors To avoid odor transfer and drying out of food wrap or cover foods tightly For stainless steel models stainless steel is corrosion resistant and not corrosion proof To help avoid corrosion of your stainless steel keep your surfaces clean by using the following cleaning instructi...

Page 17: ...Empty the ice bin If You Choose to Turn Off the Refrigerator Before You Leave 1 Remove all food from the refrigerator 2 If your refrigerator has an automatic ice maker Turn off the water supply to the ice maker at least one day ahead of time When the last load of ice drops raise the wire shutoff arm to the OFF up position or press the switch to OFF depending on your model 3 Turn off the Temperatur...

Page 18: ...if the room is warm a large food load is added doors are opened often or if the doors have been left open The refrigerator seems noisy Refrigerator noise has been reduced over the years Due to this reduction you may hear intermittent noises from your new refrigerator that you did not notice from your old model Below are listed some normal sounds with explanations Buzzing heard when the water valve...

Page 19: ...urn the water shutoff valve fully open Kink in the water source line A kink in the line can reduce water flow Straighten the water source line Water filter installed on the refrigerator Remove filter and operate ice maker If ice quality improves then the filter may be clogged or incorrectly installed Replace filter or reinstall it correctly Reverse osmosis water filtration system connected to your...

Page 20: ...pletely Water not been recently dispensed The first glass of water may not be cool Discard the first glass of water Refrigerator connected to a cold water pipe Make sure the refrigerator is connected to a cold water pipe See Water Supply Requirements Accessories The following accessories are available for your refrigerator To order an accessory contact us and ask for the part number In the U S A v...

Page 21: ... 91 80 97 90 Tetrachloroethylene 0 005 mg L 0 015 mg L 0 015 mg L 10 0 0005 mg L 0 0005 mg L 96 6 96 6 Test Parameters pH 7 5 0 5 unless otherwise noted Flow 0 78 gpm 2 9 Lpm Pressure 60 psig 413 7 kPa Temp 68 F 5 F 20 C 3 C It is essential that operational maintenance and filter replacement requirements be carried out for the product to perform as advertised The disposable water filter should be ...

Page 22: ... mg L 2 2 mg L 2 1 mg L 10 0 0048 mg L 0 11 mg L 99 80 99 90 Chlorobenzene 0 1 mg L 2 0 mg L 2 0 mg L 10 0 0038 mg L 0 0008 mg L 99 80 99 90 Endrin 0 002 mg L 0 007 mg L 0 006 mg L 10 0 0004 mg L 0 0002 mg L 94 30 96 80 Test Parameters pH 7 5 0 5 unless otherwise noted Flow 0 55 gpm 2 08 Lpm Pressure 60 psig 413 7 kPa Temp 68 F 5 F 20 C 3 C It is essential that operational maintenance and filter r...

Page 23: ...nstallation instructions 2 In home Instruction on how to use your product 3 Service to correct improper product maintenance or installation installation not in accordance with electrical or plumbing codes or correction of household electrical or plumbing i e house wiring fuses or water inlet hoses 4 Consumable parts i e light bulbs batteries air or water filters preservation solutions etc 5 Damage...

Page 24: ...aytag décline toute responsabilité au titre de la qualité de la durabilité ou en cas de dépannage ou de réparation nécessaire sur ce gros appareil ménager autre que les responsabilités énoncées dans la présente garantie Si vous souhaitez une garantie plus étendue ou plus complète que la garantie limitée fournie avec ce gros appareil ménager adressez vous à Maytag ou à votre détaillant pour obtenir...

Reviews: