background image

22

Options

Style 1

To access available features, press the OPTIONS button to toggle 

through the following choices in a continuous loop:


Fast Ice - The Fast Ice feature assists with temporary periods 

of heavy ice use by increasing ice production over a 24-hour 

period. Fast Ice will remain on for 24 hours unless manually 

turned off.

NOTES:


Fast Ice works only if the ice maker is turned on. See “Ice 

Maker and Storage Bin.”


If increased ice production is desired at all times, change 

the freezer set point to a lower setting. Setting the freezer 

to a colder temperature may make some foods, such as 

ice cream, harder.


PowerCold

®

 - The PowerCold

®

 feature assists with periods of 

high refrigerator use, full grocery loads, or temporarily warm 

room temperatures. PowerCold

®

 will remain on for 24 hours 

unless manually turned off.

NOTE:

 If you adjust the refrigerator temperature set point, 

PowerCold

®

 will turn off.


Fast Ice and PowerCold

®

 - Indicates that both features are 

on.


Turn all OFF (default)

 - All options are off.

Style 2


Fast Ice

 - The Fast Ice feature assists with temporary periods 

of heavy ice use by increasing ice production over a 24-hour 

period. Fast Ice will remain on for 24 hours unless manually 

turned off.


Press the FAST ICE button to activate the Fast Ice feature.

NOTES:


Fast Ice works only if the ice maker is turned on. See “Ice 

Maker and Storage Bin.”


If increased ice production is desired at all times, change 

the freezer set point to a lower setting. Setting the freezer 

to a colder temperature may make some foods, such as 

ice cream, harder.

Additional Features

Water Filter Status

Press WATER FILTER to display the percentage of use remaining 

in the water filter (from 99% to 1%).

ALSO

The water filter status lights will let you know when to replace the 

water filter. See “Water Filtration System.”


ORDER (Yellow) - Order a replacement water filter.


REPLACE (Red) - Replace the water filter.

NOTE:

 REPLACE will remain illuminated if a filter is not installed 

or installed incorrectly.

Door Ajar Alarm

The Door Ajar alarm lets you know when the refrigerator door or 

freezer drawer has been open for 5 minutes or longer and the 

cooling is turned on.
The words “Door Ajar” will appear on the control panel display 

and the Alarm feature will sound an alert tone. The alert tone will 

repeat every 2 minutes. Close the doors and drawer to turn off the 

tone. The feature is reset and will reactivate when either door or 

drawer is again left open for 5 minutes.

NOTE:

 To mute the alert tone while keeping the doors open, such 

as while cleaning the inside of the refrigerator, press any button 

on the control panel. The alert tone will be temporarily turned off, 

but the “Door Ajar” icon will still be displayed on the dispenser 

control panel.

Power Outage Indicator (on some models)

The Power Outage indicator lets you know if the power supply to 

the refrigerator has been off and the freezer temperature has risen 

to 18°F (-8°C) or higher.
The words “Power Outage” will appear on the control panel 

display and an alert tone will sound three times. “Power Outage” 

will continue to blink until you acknowledge the power outage.


Press any control button to confirm. The Power Outage icon 

will disappear, and the control panel will return to the Home 

screen.

Disabling Sounds (on some models)

When the control panel is muted, all tones, except alert tones are 

disabled.


To turn Off/On control and dispenser sounds, press and hold 

LIGHT and WATER FILTER at the same time for 3 seconds.

Showroom Mode

This mode is used only when the refrigerator is on display in 

a retail store. If you unintentionally turn on Showroom mode, 

the word “Showroom” will appear on the display. All lights and 

controls will function, but the refrigerator will not cool.

To exit Showroom Mode:
Style 1

 - Press TEMP and OPTIONS at the same time for 3 

seconds

Style 2

 - Press TEMP and FAST ICE at the same time for 3 

seconds.

Us

e

Summary of Contents for MFT2772HEZ

Page 1: ...W11218737B French Door Bottom Mount Refrigerator Use Care Guide www maytag com U S 1 800 688 9900 www maytag ca Canada 1 800 807 6777 ...

Page 2: ...or Leveling Door Closing and Alignment 14 FILTERS AND ACCESSORIES 16 Water Filtration System 16 Install the Water Filter 16 The Water Filter Status Light 16 Replace the Water Filter 17 Install Air Filter on some models 17 Installing the Air Filter 17 Installing the Filter Status Indicator 17 Replacing the Air Filter 18 Install Produce Preserver on some models 18 Installing the Produce Preserver 18...

Page 3: ... old refrigerator Use nonflammable cleaner Do not store or use petrol flammable liquids or gas in the vicinity of this or other electrical appliances The fumes can cause fires or explosions Do not store explosive substances such as aerosol cans with a flammable propellant in this refrigerator Do not use or place electrical devices inside the refrigerator compartments if they are not of the type ex...

Page 4: ...ay not easily climb inside PARTS AND FEATURES WARNING Suffocation Hazard Remove doors from your old refrigerator Failure to do so can result in death or brain damage B A C D E F G H I J Important information to know about disposal of refrigerants Dispose of refrigerator in accordance with Federal and Local regulations Refrigerants must be evacuated by a licensed EPA certified refrigerant technicia...

Page 5: ... some models The refrigerator and freezer compartments have dedicated evaporators to provide fresh and frozen foods with separate climates Frozen food stays cold and dry while fresh food remains at the ideal temperature and humidity Slide Out Shelf This full width slide out shelf tucked between the crispers and the lowest shelf is perfect for leftover family sized casserole dishes pizza boxes and ...

Page 6: ...e between the refrigerator and wall to allow the door to swing open NOTE This refrigerator is intended for use in a location where the temperature ranges from a minimum of 55 F 13 C to a maximum of 110 F 43 C The preferred room temperature range for optimum performance which reduces electricity usage and provides superior cooling is between 60 F 15 C and 90 F 32 C It is recommended that you do not...

Page 7: ...or or utility bins from doors Gather the required tools and read all instructions before removing doors TOOLS NEEDED 3 16 hex key wrench and a 2 Phillips screwdriver WARNING Electrical Shock Hazard Disconnect power before removing doors Failure to do so can result in death or electrical shock A B A C A C B A D Door Removal and Replacement Style 1 Water Dispenser Tubing Connection Style 1 Water Dis...

Page 8: ...ugh the left hand door hinge so they must be disconnected before removing the door 1 Using a Phillips screwdriver remove the cover from the top hinge 2 Disconnect the water dispenser tubing located on top of the door hinge Style 1 Press the outer ring against the face of the fitting and gently pull the dispenser tubing free NOTE The water dispenser tubing remains attached to the left hand refriger...

Page 9: ...ace Right Hand Refrigerator Door 1 Set the right hand door onto the bottom hinge pin 2 Insert the top hinge pin into the open hole in the top of the refrigerator door 3 Using the two 3 16 internal hex head screws fasten the hinge to the cabinet Do not tighten the screws completely Replace Left Hand Refrigerator Door IMPORTANT Do not intertwine the water tubing and wiring bundles when reconnecting ...

Page 10: ...lots 4 Slide the drawer glides back into the freezer Replace Drawer Front 1 Pull out the freezer drawer glides to their full extension 2 Holding the drawer front by its sides align the two plastic studs located at the bottom inside the drawer front with the drawer glide bracket slots NOTE It helps if one person holds the drawer glides steady while another person aligns the drawer front and inserts...

Page 11: ...o small to keep up with the requirements of the refrigerator NOTE Faucet mounted reverse osmosis systems are not recommended If your refrigerator has a water filter it may further reduce the water pressure when used in conjunction with a reverse osmosis system Remove the water filter See Water Filtration System If you have questions about your water pressure call a licensed qualified plumber Conne...

Page 12: ... meet the water line inlet which is located on the back of the refrigerator cabinet as shown Leave a coil of copper tubing to allow the refrigerator to be pulled out of the cabinet or away from the wall for service Connect to Refrigerator Follow the connection instructions specific to your model Style 1 1 Remove plastic cap from water valve inlet port Attach the copper tube to the valve inlet usin...

Page 13: ...le 1 Remove the handles from the packaging inside the refrigerator and place them on a soft surface 2 Open a refrigerator compartment door On the closed door place a handle onto the shoulder screws so that the setscrews are facing the adjacent door 3 Firmly push the handle toward the door until the handle base is flush against the door 4 While holding the handle insert the short end of the hex key...

Page 14: ...ight to left motion loosen the setscrew a quarter turn at a time 3 Repeat steps 1 and 2 for the other setscrew Slowly pull the handle away from the door or drawer 4 If necessary use a Phillips screwdriver to remove the shoulder screws from the door Refrigerator Leveling Door Closing and Alignment The base grille covers the adjustable brake feet and roller assemblies located at the bottom of the re...

Page 15: ...ex key wrench packed with the Door Handle Installation Instructions into the bottom hinge pin until it is fully engaged in the alignment screw To raise the refrigerator door turn the hex key to the right To lower the door turn the hex key to the left Continue to turn the alignment screw until the doors are aligned 6 Make sure the refrigerator is steady If the refrigerator seems unsteady or rolls f...

Page 16: ...water system you may experience dripping and or decreased flow from the water dispenser The Water Filter Status Light Press WATER FILTER to display the percentage of filter life remaining from 99 to 0 Press WATER FILTER again to return to the Normal screen The water filter status lights will help you know when to change your water filter ORDER yellow it is almost time to change the water filter RE...

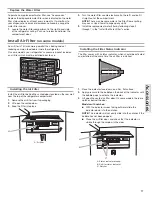
Page 17: ...cessory packet includes an air filter which must be installed prior to use Installing the Air Filter Install the air filter behind the vented door located on the rear wall near the top of the refrigerator compartment 1 Remove the air filter from its packaging 2 Lift open the vented door 3 Snap the filter into place Installing the Filter Status Indicator The filter comes with a status indicator whi...

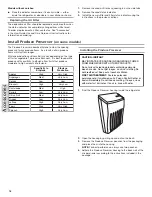
Page 18: ...ylene Ethylene Production Apples High Very High Asparagus Med Very Low Berries Low Low Broccoli High Very Low Cantaloupe Med High Carrots Low Very Low Citrus Fruit Med Very Low Grapes Low Very Low Lettuce High Very Low Pears High Very High Spinach High Very Low Installing the Produce Preserver 1 Find the Produce Preserver housing inside the refrigerator 2 Open the housing by pulling up and out on ...

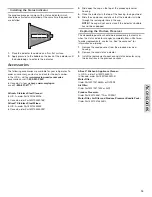
Page 19: ...e Accessories for information on ordering 1 Remove the used pouches from the produce preserver housing 2 Remove the used status indicator 3 Install the replacement pouches and status indicator using the instructions in the previous sections Accessories The following accessories are available for your refrigerator To order an accessory contact us and ask for the part number In the U S A visit our w...

Page 20: ... when the control buttons and dispenser pads have not been used for 2 minutes or more Press any control to reactivate the display screen Style 1 Style 2 Viewing and Adjusting Temperature Set Points For your convenience your refrigerator and freezer temperature controls are set to the recommended set points at the factory When you first install your refrigerator make sure the temperature controls a...

Page 21: ...et point of the selected compartment as shown 3 Press the adjust UP ARROW to raise the temperature set point or press the adjust DOWN ARROW to lower the temperature set point 4 When you have finished adjusting the refrigerator set point press TEMP to change the display to show the freezer set point When the zone has been changed freezer appears on the display screen 5 Press the adjust UP ARROW to ...

Page 22: ...nt water filter REPLACE Red Replace the water filter NOTE REPLACE will remain illuminated if a filter is not installed or installed incorrectly Door Ajar Alarm The Door Ajar alarm lets you know when the refrigerator door or freezer drawer has been open for 5 minutes or longer and the cooling is turned on The words Door Ajar will appear on the control panel display and the Alarm feature will sound ...

Page 23: ...torage Bin The dispenser may continue to make noise and ice may continue to dispense for several seconds after releasing the dispenser button or paddle IMPORTANT If the ice cubes are hollow or have an irregular shape it could be because of low water pressure See Water Supply Requirements To Clean the Ice Dispenser Chute Humidity causes ice to naturally clump together Ice particles can build up unt...

Page 24: ... and Ice Storage Bin on some models IMPORTANT To avoid low ice production and poor quality ice flush the water system before turning on the ice maker See Water Dispenser Allow 24 hours to produce the first batch of ice Discard the first three batches of ice produced Allow 2 to 3 days for the storage bin to fill completely following installation The quality of your ice will be only as good as the q...

Page 25: ...eep the ice cubes from dropping out of the ice maker and into the freezer compartment After replacing the ice storage bin turn on the ice maker REFRIGERATOR FEATURES Refrigerator Shelves The shelves in your refrigerator are adjustable to meet your individual storage needs Storing similar food items together in your refrigerator and adjusting the shelves to fit different heights of items will make ...

Page 26: ...tainer in crisper or store in a loosely closed paper bag on a refrigerator shelf Vegetables with skins Place in plastic bags or plastic container and store in crisper HIGH Move control to the far right hand side to keep moist air in the crisper for best storage of fresh leafy vegetables Leafy vegetables Wash in cold water drain and trim or tear off bruised and discolored areas Place in plastic bag...

Page 27: ...t in original wrapping as long as it is airtight and moisture proof Re wrap if necessary See the following chart for storage times When storing meat longer than the times given freeze the meat Fresh fish or shellfish use same day as purchased Chicken ground beef variety meats liver 1 2 days Cold cuts steaks roasts 3 5 days Cured meats 7 10 days Leftovers Cover leftovers with plastic wrap aluminum ...

Page 28: ...en cleaners For heavy soil ONLY a stainless steel cleaner designed for appliances To order the cleaner see Accessories Stainless steel cleaner is for stainless steel parts only Do not allow the Stainless Steel Cleaner and Polish to come into contact with any plastic parts such as the trim pieces dispenser covers or door gaskets NOTES If unintentional contact does occur clean plastic part with a sp...

Page 29: ...tomatic ice maker Turn off the water supply to the ice maker at least one day ahead of time When the last load of ice drops raise the wire shutoff arm to the OFF up position or press the switch to OFF depending on your model 3 Turn off the Temperature control s See Using the Controls 4 Clean refrigerator wipe it and dry well 5 Tape rubber or wood blocks to the tops of both doors to prop them open ...

Page 30: ...g outlet Do not use an extension cord Make sure there is power to the outlet Plug in a lamp to see if the outlet is working Reset a tripped circuit breaker Replace any blown fuses NOTE If problems continue contact an electrician Check controls Make sure the controls are turned on See Using the Controls New installation Allow 24 hours following installation for the refrigerator to cool completely N...

Page 31: ... OFF On some models the dispenser light will operate only when a dispenser paddle is pressed If you want the dispenser light to stay on continuously see Water and Ice Dispensers Doors have been open longer than 10 minutes Close the doors and drawer to reset and open to resume lighted task MicroEdge Glo shelves on some models are not lit Shelf hooks are not fully engaged in shelf supports Check tha...

Page 32: ...o dispense water and or fill the ice maker If the refrigerator is connected to a water line this is normal If the refrigerator is not connected to a water line turn off the ice maker Repetitive Clicking Dual evaporator valve regulating the cooling operation You may hear rapid repetitive clicking sounds as the unit switches from cooling one compartment to cooling the other This sound is normal Crea...

Page 33: ...mpletely after use Poor door seal Ensure door seals are making full contact with the refrigerator cabinet to allow for an adequate seal Temperature controls are not set correctly See Using the Controls for recommended temperature settings Ice and Water PROBLEM POSSIBLE CAUSES SOLUTIONS The ice maker is not producing ice or is not producing enough ice The refrigerator is not connected to a water su...

Page 34: ...nd water Discard the ice and wash the ice storage bin Flush the water system with 3 gal 12 L of water Allow 24 hours for the ice maker to make new ice and discard the first 3 batches of ice produced Using a water supply connection type other than recommended It is recommended to use copper tubing or Whirlpool supply line Part Number 8212547RP See Connect to Water Line The ice has been stored too l...

Page 35: ...properly reconnected at the top of the refrigerator door See Refrigerator Doors and Drawer Ice is clogged in the ice storage bin or ice is blocking the ice delivery chute Remove the ice clogging the storage bin and delivery chute using a plastic utensil if necessary Clean the ice delivery chute and the bottom of the ice storage bin using a warm damp cloth then dry both thoroughly To avoid clogging...

Page 36: ...POSSIBLE CAUSES SOLUTIONS The doors will not close completely The door is blocked open Move food packages away from door A bin or shelf is in the way Push bin or shelf back into the correct position Recently installed Remove all packaging materials The doors are difficult to open The door gaskets are dirty or sticky Clean gaskets and contact surfaces with mild soap and warm water Rinse and dry wit...

Page 37: ...drinking water supplies at trace levels While occurring at only trace levels these compounds can affect the public acceptance perception of drinking water quality PERFORMANCE DATA SHEET It is important that operational maintenance and filter replacement requirements be carried out for the product to perform as advertised Property damage can occur if all instructions are not followed The disposable...

Page 38: ...Instruction on how to use your product 3 Service to correct improper product maintenance or installation installation not in accordance with electrical or plumbing codes or correction of household electrical or plumbing i e house wiring fuses or water inlet hoses 4 Consumable parts i e light bulbs batteries air or water filters preservation solutions etc 5 Defects or damage caused by the use of no...

Page 39: ...80 Notes ...

Page 40: ...fer to the warranty page for additional instructions on how to obtain service for your product WE CAN HELP WITH YOUR QUESTIONS You will need the model and serial number located on the inside wall of the refrigerator compartment For future reference record the model and serial number here Maytag Brand Home Appliances Customer eXperience Center 200 6750 Century Ave Mississauga Ontario L5N 0B7 Consul...

Reviews: