background image

7

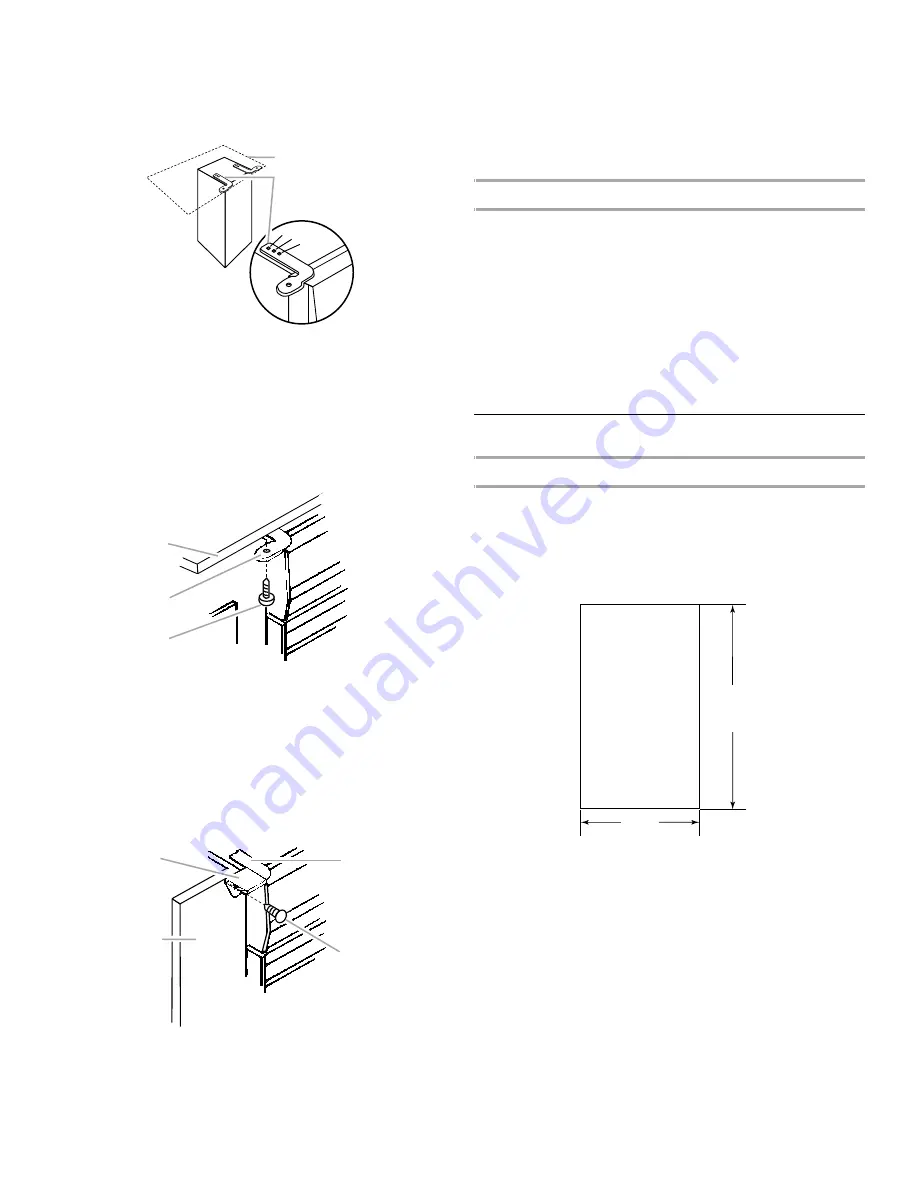
If the compactor drawer front is to be flush with the 
kitchen cabinet face, place retaining bracket mounting 
screws through “3.”

If the compactor is to be midway between “1” and “3,” 
place the retaining bracket mounting screws through “2.”

9. Slowly lift the front slightly and roll compactor into the kitchen 

cabinet opening.

10. Using 2 - #8 - 18 x 

¹₂

" mounting screws (provided in 

conversion kit), fasten the retaining brackets (provided in 
conversion kit) to the countertop with the mounting screws.

Countertop mounting

NOTE: If retaining brackets cannot be attached to the 
underside of countertop, attach mounting clips (provided in 
conversion kit) to retaining brackets. Fasten compactor to 
kitchen cabinet face with mounting screws through the 
mounting clips.

Cabinet-face mounting

11. Grasp the sides of the compactor drawer and place the 

bottom of the drawer into the tracks. 

12. Lift at the handle so the drawer will go over the drawer stops. 

13. Close the drawer. 

14. Check that the drawer opens freely. If the toe plate rubs 

against the floor, see “Adjusting the Toe Plate” for further 
instructions.

Adjusting the Toe Plate

If the toe plate rubs the floor covering, the toe plate clearance 
may be changed as follows:

1. Mark on each side of the toe plate the amount of toe plate 

that rubs the floor covering.

2. Remove the drawer from the unit. See Step 3 in the 

“Unpacking” section.

3. Use a ruler and a pencil or chalk to draw a line between the 

marks on each side of toe plate.

4. Use scissors or utility knife to cut toe plate along line.

5. Replace drawer. If toe plate still rubs floor covering, repeat 

steps 1-4.

Changing the Custom Panel

Custom Panel with Handle 

Dimensions

Use these dimensions drawings to create a custom panel for use 
without a trim kit. The panel should be 

¹⁄₂

" to 

⁵⁄₈

" (1.3 cm to 

1.6 cm) thick.

NOTE: A thicker panel may need rounded front corners and a 
cutout for access to the handle.

A. Countertop
B. Retaining bracket (provided in conversion kit)

A. Countertop
B. Retaining bracket (provided in conversion kit)

C. Mounting screw (provided in conversion kit)

A. Mounting clip (provided in conversion kit)
B. Kitchen cabinet

C. Retaining bracket (provided in conversion kit)
D. Mounting screw (provided in conversion kit)

B

A

1

2

3

A

B

C

A

D

C

B

23

¹³⁄₁₆

"

(60.5 mm)

15"

(38.1 mm)

Summary of Contents for MTUC7000AWS

Page 1: ...es operation performance parts accessories or service call 1 800 688 9900 or visit our website at www maytag com In Canada for assistance installation or service call 1 800 807 6777 or visit our websi...

Page 2: ...7 COMPACTOR USE 9 How the Compactor Works 9 Loading 10 QuietSeries Sound Package 10 Starting the Compactor 10 Using PowerPack On Locked Cycle 10 Using the Air Filter or Freshener 11 Removing a Filled...

Page 3: ...ot allow to be used as a toy or to run unattended at any time Lock Key Switch when not in use and store key out of reach of children Do not touch moving parts Do not operate with a damaged cord set pl...

Page 4: ...r of the compactor 6 Place the 2 corner posts from the carton on the floor near the compactor 7 Open the compactor drawer and remove any shipping materials or other items from the drawer NOTE Do not r...

Page 5: ...the cord is the grounding wire Do not connect the green or green and yellow wire to a live terminal A Grounded electrical outlet must be a minimum of 3 7 6 cm away from surrounding cabinets or nearby...

Page 6: ...cessories for ordering conversion kit 1 Measure the height of your kitchen cabinet opening The top of the compactor should be at least 3 mm from the top of the kitchen cabinet opening The rear wheels...

Page 7: ...e floor see Adjusting the Toe Plate for further instructions Adjusting the Toe Plate If the toe plate rubs the floor covering the toe plate clearance may be changed as follows 1 Mark on each side of t...

Page 8: ...Dimensions Use these dimension drawings to create a custom panel for use without a trim kit The panel should be 1 3 cm min thick Installation 1 Remove the mounting screws attaching the foot pedal to t...

Page 9: ...OTE The compactor drawer should be more than full before the compactor can begin to compress the load You may hear a noise when glass breaks Strong glass bottles may not break at all The trash in a fu...

Page 10: ...Knob to START and then release it 2 The compactor stops after completing the cycle NOTE When the compacting cycle is done turn the Key Knob to OFF Remove the Key Knob and store it out of children s r...

Page 11: ...trash before emptying it in the future IMPORTANT Do not push items down into compactor with hands or feet 1 Pull the drawer completely open 2 Remove top of bag from bag retainer buttons Pull up all fo...

Page 12: ...r filter cover and push in until the side tabs snap into place Cleaning Before cleaning the compactor turn the Key Knob or Key Switch to the OFF LOCK position and remove it NOTE Any services other tha...

Page 13: ...Wash the inside of the cabinet with a clean sponge or soft cloth and a mild detergent in warm water Rinse and dry thoroughly with a soft cloth 6 To replace the drawer grasp it by the sides and insert...

Page 14: ...ART Press ON before pressing START on some models See Starting the Compactor The drawer won t open Is the ram all the way up Drawer will open only when ram is fully raised To raise the ram on models w...

Page 15: ...or MI 49022 2692 Please include a daytime phone number in your correspondence In Canada Call the Whirlpool Canada LP Customer eXperience Centre toll free 1 800 807 6777 or visit our website at www may...

Page 16: ...to obtain service under this limited warranty 1 Commercial non residential or multiple family use or use inconsistent with published user operator or installation instructions 2 In home Instruction o...

Reviews: