background image

5

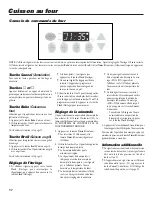
Oven Cooking

NOTE: 

The display will flash when the appliance is first connected to power or if power is interrupted. The display will stop flashing

once time-of-day clock has been set. The Bake, Broil and Timer indicators light when function is pressed.

Cancel Pad

Press to cancel all operations except the
clock and timer.

 and 

 Pads

Press and tap, or press and hold, to enter
the desired time, temperature, or to select
HI or LO broil.

Bake Pad

Use for baking or roasting.

1.

Press 

Bake

 pad.

2.

Press 

 or 

 pad to set the oven

temperature.

See page 6 for additional information.

Broil Pad

Use for top browning and broiling.

1.

Press 

Broil

 pad.

2.

Press 

 or 

 pad for Hi  or Lo broil.

See page 6 for additional information.

Setting the Clock

1.

If the display is flashing, press the

Clock

 pad to stop the flashing, then

press the 

Clock

 pad again.

If the colon is not flashing, press the

Clock

 pad.

The clock time cannot be set if the
control is programmed for a bake,
broil or timing operation.

2.

Set the correct time of day using the 

and 

 pads. If the 

▲ 

or 

 pad is not

pressed within 30 seconds, the pro-
gram will cancel. Press the 

Clock

 pad

and begin again.

Setting the Timer

The timer can be set from one minute (:01)
up to 11 hours and 50 minutes (11:50).
Time will be displayed in minutes and
not in seconds. 

THE TIMER DOES NOT

CONTROL THE OVEN.

1.

Press the 

Timer

 pad.

:00 will light and the Timer indica-
tor light will flash in the display.

2.

Press the 

 or 

 pad until the desired

time is displayed.

The timer will begin as soon as the
time is set.

The flashing colon indicates that a
timing operation is in progress. (The
colon will not flash if the time of
day or oven temperature is
displayed.)

The timer countdown will be
displayed unless another function
is programmed after setting the
timer.

A single beep signals the end of the
operation. “END” will appear in
the display. If the time of day or
oven temperature is displayed
“END” will not appear.

A short beep will sound every 30
seconds for ten minutes to remind
you that the operation has com-
pleted. “END” remains in the
display until 

Cancel

 pad is

pressed.

- If desired, press the 

Clock

 pad

and the time of day will reap-
pear in the display during a
timing operation.

3.

Press the 

Cancel

 pad and the time of

day will reappear in the display.

To cancel the timer operation: 

Press and

hold the 

Timer

 pad for several seconds.

Additional Information

A beep will sound each time a func-
tion pad is pressed. There is no beep
for the 

 or 

 pad.

If a fault code (example: F2) is dis-
played and beeps sound, press the

Cancel

 pad. If the fault code contin-

ues, see page 10.

Oven Control

Summary of Contents for PERFORMA PER4510

Page 1: ...led check as proof of purchase Model Number Serial Number Date of Purchase _______________________________ In our continuing effort to improve the quality and performance of our cooking products it may be necessary to make changes to the appliance without revising this guide Form No A 03 00 Part No 8113P264 60 74005284 Litho U S A If you have questions call 1 800 688 9900 U S A 1 800 688 2002 Cana...

Page 2: ...of tipping of the appliance from abnormal usage or by excessive loading of the oven door the appliance must be se cured by a properly installed anti tip device NEVER heat unopened containers on the surfaceunitorintheoven Pressurebuild upinthecontainermaycausecontainerto burst resulting in burns injury or damage to the appliance NEVER use aluminum foil to cover an oven rack or oven bottom Misuse co...

Page 3: ...toy and not to play with controls or other parts of the unit Ventilating Hoods Clean range hood and filters frequently topreventgreaseorotherflammablema terials from accumulating to avoid fires Turn the fan on when flambéing foods suchasCherriesJubilee underthehood Important Safety Notice and Warning IMPORTANT Never keep pet birds in the kitchen or in rooms where the fumes from the kitchen could r...

Page 4: ...ow a pan to boil dry Thiscoulddamagethepanandthe appliance NEVER touch cooktop until it has cooled Expect some parts of the cooktop especiallyaroundthesur face units to become warm or hot during cooking Use potholders to protect hands After Cooking Clean up messy spills as soon as possible Other Tips If cabinet storage is provided di rectlyabovecookingsurface limit it to items that are infrequentl...

Page 5: ...in water To remove When cool raise element Carefully pull out and away from recep tacle To replace Insert terminals on the ele ment into receptacle Guide the element intoplace Gentlypressdownontheouter edge of the element until it sits level on the drip bowl Drip Bowls The drip bowls located under each sur face element are designed to catch boilovers and must always be used Ab sence of these bowls...

Page 6: ... hours and 50 minutes 11 50 Time will be displayed in minutes and not in seconds THE TIMER DOES NOT CONTROL THE OVEN 1 Press the Timer pad 00 will light and the Timer indica tor light will flash in the display 2 Pressthe or paduntilthedesired time is displayed The timer will begin as soon as the time is set The flashing colon indicates that a timingoperationisinprogress The colon will not flash if...

Page 7: ...l appear in the display when the oven turns on Thetemperatureinthedisplaywill increase in 1 increments until the preset temperature is reached A single beep will sound when the oven is preheated Allow10to15minutesfortheoven to preheat To recall the preset temperature duringpreheat presstheBakepad The temperature will be displayed for three seconds To change the oven temperature duringcooking press...

Page 8: ...s RACK 1 Used for roasting large cuts of meat and poultry frozen pies dessert souffles or angel food cake Multiple Rack Cooking Two rack Use rack positions 2 and 4 or 1 and 4 OVEN VENT OPENING Half Rack To install in oven 1 Always in stall half rack when oven is cool 2 Grasptopcenter of the half rack Align the side arm support between the top fourth and fifth oven rack guides Insert the two tabs o...

Page 9: ...se a steam burn Storage drawer For stubborn soil use mildly abrasive cleaning agents such as baking soda paste or Bon Ami Do not use Oven door abrasive caustic or harsh cleaning agents such as steel wool pads or oven cleaners These products will scratch or permanently damage the surface NOTE Use dry towel or cloth to wipe up spills especially acid or sugary spills Surface may discolor or dull if s...

Page 10: ...enly until door clears hinge arms To replace 1 Grasp door at each side 2 Align slots in the door with the hinge arms on the range 3 Slide the door down onto the hinge armsuntilthedooriscompletelyseated on the hinges Push down on the top corners of the door to completely seat door on hinges Door should not ap pear crooked NOTE The oven door on a new range may feel spongy when it is closed This is n...

Page 11: ...he smoke and or odor There are excessive food soils on the oven bottom F plus a number appears in the display This is called a fault code If a fault code appears in the display and beeps sound presstheCancelpad Ifthefaultcodeand beeps continue disconnect power to the appliance Wait a few minutes then re connect power If fault code and beeps still continue disconnect power to the appliance and call...

Page 12: ...he following a Improper installation delivery or maintenance b Anyrepair modification alteration oradjustmentnotauthorizedbythemanufac turer or an authorized servicer c Misuse abuse accidents or unreasonable use d Incorrect electric current voltage or supply e Improper setting of any control 2 Warranties are void if the original serial numbers have been removed altered or cannot be readily determi...

Page 13: ...e encaissé comme preuve de l achat Numéro de modèle Numéro de série Date d achat _______________________________ Dans le cadre de nos pratiques d amélioration constante de la qualité et de la performance de nos produits de cuisson des modifications de l appareil qui ne sont pas mentionnées dans ce guide ont pu être introduites Formulaire N A 03 00 Article N 8113P263 60 74005283 Imprimé aux É U Pou...

Page 14: ... éviter des dommages matériels ou corporels n exécuter aucune opération de réglage réparation remplacementdepiècedel appareil quin estpasspécifiquementrecommandéedans ce guide Confier toute autre intervention à un technicien qualifié NE JAMAIS remiser ou utiliser de l essence ou un autre produit combustible ou inflammable dans le four ou à proximité de la cuisinière car les vapeurs émises peuvent ...

Page 15: ...l ouverturede l évent porte du four surfaces voisines de la porte et du hublot Sécurité pour les enfants NE JAMAIS laisser des enfants seuls ou sans supervision lorsque l appareil est en service ou chaud MISE EN GARDE NE JAMAIS remiser sur le dosseret d une cuisinière ou dans une armoire au dessus des articles auxquels les enfants peuvents intéresser Unenfanttentantdegrimper sur l appareil sur la ...

Page 16: ... nejamaisfairefonctionnerunélémentde la table de cuisson sans y placer un ustensile NE JAMAIS utiliser la table de cuisson comme lieu de remisage d aliments ou d ustensiles Durant la cuisson Veilleràbienconnaîtrelacorrespondance entre les boutons de commande et les éléments Veiller à commander l alimentation de l élément correct Commencer la cuisson avec une puis sancedechauffagesupérieureaubesoin...

Page 17: ...s de contact de l élémentdansleblocdeconnexion Guiderpour lamiseenplace Abaisserl élémentpourleplacer d aplombenappuisurlacuvettederécupération Cuvettes de récupération La cuvette de récupération doit toujours être en placelorsdel utilisationdechaqueélémentdela table de cuisson sa fonction est de récupérer toute matière renversée lors d un débordement ensonabsence lecâblageetd autrescomposants sou...

Page 18: ...églage de la minuterie On peut sélectionner une période de décompte de une minute 01 à 11 heures 50 minutes 11 50 Le tempsestaffichéenminutes etnonpasensecondes LA MINUTERIE NE CONTRÔLE PAS LE FONCTIONNEMENT DU FOUR 1 Appuyer sur la touche Timer Minuterie Les caractères 00 s illuminent et le témoin Timer Minuterie clignote sur l afficheur 2 Utiliserlestouches ou pourfaireapparaître le temps de déc...

Page 19: ...mpérature affichée augmentera par intervalles de 1 jusqu à ce que la température de maintien sélectionnée soit atteinte Un unique signal sonore signalera alors la fin de la période de préchauffage Prévoir une période de 10 à 15 minutes pour le préchauffage du four Pour faire réapparaître la température de maintien sélectionnée durant la période de préchauffage appuyer sur la touche Bake Cuisson au...

Page 20: ... 4 Vérifierquel installationestcorrecte placer la main sur la surface supérieure de la demi grille et appuyer fermement Dépose de la demi grille Lorsque le four est froid saisirlademi grille au centre en haut et tirer vers le haut pour faire sortirlesongletsdes fentes de la paroi arrière du four Onglets Patte de support Avant REMARQUES Ne pas utiliser un ustensile qui dépasserait du bord de la gri...

Page 21: ...formation de vapeur pourrait provoquer des brûlures Tiroir de remisage Pour des souillures tenaces utiliser un produit de nettoyage peu abrasif comme Bon Ami ou une pâte de bicarbonate de sodium Ne pas Porte du four utiliser un produit de nettoyage abrasif caustique ou agressif comme un produit de nettoyage de four ou un tampon de laine d acier ces produits feraient subir des dommages permanents à...

Page 22: ...tedechaquecôté Nepasutiliserla poignée de porte pour la soulever 3 Soulever uni formément pour dégager la porte des charnières Réinstallation 1 Saisir la porte de chaque côté 2 Alignerlesfentesaveclesbrasdecharnièresur la cuisinière 3 Faire descendre la porte pour la positionner correctement sur les charnières Pousser sur lesanglessupérieursdelaportepourl enfoncer complètement sur les charnières I...

Page 23: ...ilateurpourévacuerlafumée ou l odeur Présenced uneaccumulationderésidusalimentaires sur le fond du four Exécuter une opération d autonettoyage Affichage de F suivi d un chiffre Ils agitd uncoded anomalie Siuncoded anomalie apparaît sur l afficheur avec émission d un signal sonore appuyersurlatoucheCancel Annulation Sicecinemetpasfinàl affichageducoded anomalie etàl émissiondusignalsonore débranche...

Page 24: ...client b Numéro de modèle et numéro de série de l appareil c Nom et adresse du revendeur ou de l agence de service d Description claire du problème observé e Preuve d achat facture de vente Les guides d utilisation les manuels de service et les renseignements des pièces sont disponibles auprès de Maytag Appliances Sales Company service client Maytag h t t p w w w m a y t a g c o m 23 Garantie comp...

Page 25: ...de compra Número de Modelo Número de Serie Fecha de Compra _______________________________ En nuestro continuo afán de mejorar la calidad y rendimiento de nuestros electrodomésticos puede que sea necesario modificar el electrodoméstico sin actualizar esta guía Form No A 03 00 Part No 8113P263 60 74005283 Litho U S A Si tiene alguna pregunta llame al 1 800 688 9900 EE UU 1 800 688 2002 Canadá 1 800...

Page 26: ...place ninguna pieza del electrodoméstico amenosqueseaespecíficamenterecomendadoen esta guía Todas las otras reparaciones deben ser hechas por un técnico calificado NUNCA almacene ni use gasolina u otros materialescombustiblesoinflamablesenelhorno cercadeloselementossuperioresoenlavecindad deesteelectrodomésticopueslosvaporespueden crear un peligro de incendio o una explosión Para evitar incendios ...

Page 27: ...erta el respiradero del horno y las superficies cerca de la abertura del respiradero la puerta del horno las áreas alrededor de la puerta y la ventana del horno Seguridad para los Niños NUNCA deje a los niños solos o sin supervisión cuando el electrodoméstico esté en uso o esté caliente ATENCION NUNCAguardeartículosdeinterés para los niños en los armarios que están situados sobre la estufa o en el...

Page 28: ...sdeencenderlo Para evitar daño a la estufa nunca enciendaunelementosuperiorsintener un utensilio sobre él NUNCA use la cubierta de la estufa como una área para guardar alimentos o utensilios Mientras Cocina Asegúrese de que usted sabe cual pe rillacontrolacadaelemento Asegúrese de que usted encendió el elemento correcto Comience a cocinar en un ajuste de calor alto luego reduzca a un ajuste más ba...

Page 29: ...sté frío levante el elemento Cuidadosamentetiredeélhaciaafueraysacándolo del receptáculo Para volver a colocar Inserte los bornes del elemento en el receptáculo Guíe el elemento hasta que quede en su lugar Oprima hacia abajo en el borde exterior del elemento hasta dejarlo nivelado sobre el platillo protector Platillos Protectores Losplatillosprotectoresdebajodecadaelemento recogenlosderramesydeben...

Page 30: ...or de tiempo puede ser programado desdeunminuto 01 hasta11horasy50minutos 11 50 El tiempo será desplegado en minutos y no en segundos EL INDICADOR DE TIEMPO NO CONTROLA EL HORNO 1 Oprima la tecla Timer 00 se iluminará y la luz indicadora del Indicador de Tiempo destellará en el indicador visual 2 Oprimalatecla o hastaquesedespliegue el tiempo deseado El indicador de tiempo comenzará tan pronto com...

Page 31: ...ke y luego oprima la tecla o hasta que se despliegue la temperatura deseada 3 Coloque el alimento en el horno Verifique la cocción del alimento cuando haya transcurrido el tiempo mínimo de cocción 4 Alterminardehornear oprimalatecla Cancel para apagar el horno y sacar el alimento del horno El horno cuenta con cierre automático Si el horno es dejado encendido durante 12 horas seapagaráautomáticamen...

Page 32: ...l vapor caliente antes de extraer los alimentos del horno Tenga cuidado cuando retire artículos queesténenlamediaparrillaparaevitar quemaduras Saque con cuidado los alimentos de la parrilla inferior para mover la media parrilla Posiciones de la Parrillas PARRILLA 5 posición más alta Se usa para tostar pan o asar a la parrilla alimentos delgados no grasosos PARRILLA 4 Se usa para la mayoría de los ...

Page 33: ... puede dañar la superficie y puede causar una quemadura por vapor Gaveta de Para las manchas persistentes use agentes de limpieza abrasivos suaves tales como una pasta de bicarbonato de soda o Bon Ami almacenamiento No use agentes de limpieza abrasivos cáusticos o ásperos tales como esponjas de acero o limpiadores de horno Estos productos Puerta del horno Estos productos rayarán o dañarán permanen...

Page 34: ... se salga de los brazos de articulación Para volver a colocar 1 Sujete la puerta de cada lado 2 Alinee las ranuras de la puerta con los brazos de articulación de la estufa 3 Deslice la puerta hacia los brazos de articulaciónhastaqueestécompleta mente asentada en las bisagras Empuje hacia abajo las esquinas superiores de la puerta para asentarla completamente en las bisagras Lapuertanodebequedartor...

Page 35: ...s rápidamente Encendiendounventiladorayudaráaextraerel humo y o el olor Hay suciedad excesiva de alimentos en la parte inferiordelhorno Useunciclodeautolimpieza En el indicador aparece la letra F más un número Esto es un código de falla Si aparece un código de falla en el indicador visual y se escucha una señal sonora oprima la tecla Cancel Si el código de falla y la señal sonora continúan desench...

Page 36: ...n modificación alteración o ajuste no autorizado por el fabricante o por un centro de servicio autorizado c Mal uso abuso accidentes o uso irrazonable d Corriente eléctrica voltaje o suministro incorrecto e Programación incorrecta de cualquiera de los controles 2 Las garantías quedan nulas si los números de serie originales han sido retirados alterados o no son fácilmente legibles 3 Focos 4 Produc...

Reviews: