background image

3

IMPORTANT SAFETY INSTRUCTIONS

READ AND SAVE THESE INSTRUCTIONS

WARNING: 

TO REDUCE THE RISK OF FIRE, ELECTRIC 

SHOCK, OR INJURY TO PERSONS, OBSERVE THE 
FOLLOWING: 

■  

Use this unit only in the manner intended by the 
manufacturer. If you have questions, contact the 
manufacturer.

■  

Before servicing or cleaning the unit, switch power off at 
service panel and lock the service disconnecting means to 
prevent power from being switched on accidentally. When 
the service disconnecting means cannot be locked, 
securely fasten a prominent warning device, such as a tag, 
to the service panel.

■  

Installation work and electrical wiring must be done by 
qualified person(s) in accordance with all applicable codes 
and standards, including fire-rated construction.

■  

Do not operate any fan with a damaged cord or plug. 
Discard fan or return to an authorized service facility for 
examination and/or repair.

■  

Sufficient air is needed for proper combustion and 
exhausting of gases through the flue (chimney) of fuel 
burning equipment to prevent backdrafting. Follow the 
heating equipment manufacturer's guideline and safety 
standards such as those published by the National Fire 
Protection Association (NFPA), the American Society for 
Heating, Refrigeration and Air Conditioning Engineers 
(ASHRAE), and the local code authorities.

■  

When cutting or drilling into wall or ceiling; do not damage 
electrical wiring and other utilities.

■  

Ducted fans must always be vented outdoors.


CAUTION: 

For general ventilating use only. Do not use 

to exhaust hazardous or explosive materials and vapors.


CAUTION:

 To reduce risk of fire and to properly exhaust 

air, be sure to duct air outside - do not vent exhaust air into 
spaces within walls or ceilings, attics or into crawl spaces, 
or garages.

WARNING:

 TO REDUCE THE RISK OF FIRE, USE ONLY 

METAL DUCTWORK.

WARNING: 

TO REDUCE THE RISK OF A RANGE TOP 

GREASE FIRE:

■  

Never leave surface units unattended at high settings. 
Boilovers cause smoking and greasy spillovers that may 
ignite. Heat oils slowly on low or medium settings.

■  

Always turn hood ON when cooking at high heat or when 
flambeing food (i.e. Crepes Suzette, Cherries Jubilee, 
Peppercorn Beef Flambé).

■  

Clean ventilating fans frequently. Grease should not be 
allowed to accumulate on fan or filter.

■  

Use proper pan size. Always use cookware appropriate for 
the size of the surface element.

WARNING: 

TO REDUCE THE RISK OF INJURY TO 

PERSONS IN THE EVENT OF A RANGE TOP GREASE 
FIRE, OBSERVE THE FOLLOWING:

a


■  

SMOTHER FLAMES with a close fitting lid, cookie sheet, or 
metal tray, then turn off the burner. BE CAREFUL TO 
PREVENT BURNS. If the flames do not go out 
immediately, EVACUATE AND CALL THE FIRE 
DEPARTMENT.

■  

NEVER PICK UP A FLAMING PAN - you may be burned.

■  

DO NOT USE WATER, including wet dishcloths or towels - 
a violent steam explosion will result.

■  

Use an extinguisher ONLY if:

– You know you have a class ABC extinguisher, and you 

already know how to operate it.

– The fire is small and contained in the area where it 

started. 

– The fire department is being called.

– You can fight the fire with your back to an exit.

a

Based on "Kitchen Fire Safety Tips" published by NFPA.

■  

WARNING: 

To reduce the risk of fire or electrical shock, 

do not use this fan with any solid-state speed control 
device.

Summary of Contents for UXT2030AY

Page 1: ... Instructionsd installationetGuided utilisationetd entretien Au Canada pour assistance installation ou service composer le 1 800 807 6777 ou visiter notre site Web à www whirlpool ca Table of Contents Table des matières 2 IMPORTANT READ AND SAVE THESE INSTRUCTIONS FOR RESIDENTIAL USE ONLY IMPORTANT LIRE ET CONSERVER CES INSTRUCTIONS POUR UTILISATION RÉSIDENTIELLE UNIQUEMENT Models Modèles UXT2030A...

Page 2: ...er l installation 29 UTILISATION DE LA HOTTE 29 Commandes de la hotte de cuisinière 30 ENTRETIEN DE LA HOTTE 31 Nettoyage 31 SCHÉMA DE CÂBLAGE 33 ASSISTANCE OU SERVICE 35 Au Canada 35 Accessoires 35 GARANTIE 36 RANGE HOOD SAFETY You can be killed or seriously injured if you don t immediately You can be killed or seriously injured if you don t follow All safety messages will tell you what the poten...

Page 3: ...zardous or explosive materials and vapors CAUTION To reduce risk of fire and to properly exhaust air be sure to duct air outside do not vent exhaust air into spaces within walls or ceilings attics or into crawl spaces or garages WARNING TO REDUCE THE RISK OF FIRE USE ONLY METAL DUCTWORK WARNING TO REDUCE THE RISK OF A RANGE TOP GREASE FIRE Never leave surface units unattended at high settings Boil...

Page 4: ...ulb Models UXT4030AY UXT4036AY recirculation installation only Parts needed 1 75W max 120V incandescent light bulb Models UXT4230AY UXT4236AY vented or non vented recirculation installation Parts supplied Remove parts from package Check that all parts are included 2 3 5 x 9 5 mm screws 3 x 10 8 3 x 25 4 cm rectangular vent connector Parts needed 1 75W max 120V incandescent light bulb Wall or roof ...

Page 5: ...CFR Part 328 formerly the Federal Standard for Mobile Home Construction and Safety title 24 HUD Part 280 or when such standard is not applicable the standard for Manufactured Home Installation 1982 Manufactured Home Sites Communities and Setups ANSI A225 1 NFPA 501A or latest edition or with local codes Product Dimensions Installation Clearances VentingRequirements Vent system must terminate to th...

Page 6: ...nt length of 35 ft 10 7 m or 7 17 8 cm or larger round vent with a maximum length of 50 ft 15 2 m for vent system NOTE Flexible vent is not recommended Flexible vent creates both back pressure and air turbulence that greatly reduce performance Calculating Vent System Length To calculate the length of the system you need add the equivalent feet meters for each vent piece used in the system 7 17 8 c...

Page 7: ...aluminum wiring to the added section of copper wire using special connectors and or tools designed and UL listed for joining copper to aluminum Follow the electrical connector manufacturer s recommended procedure Aluminum copper connection must conform with local codes and industry accepted wiring practices Wire sizes and connections must conform with the rating of the appliance as specified on th...

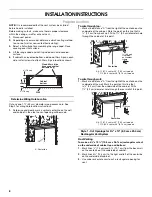
Page 8: ...ine on the underside of the cabinet Mark the point on this line that is 2 2 cm from back wall Drill a 1 3 2 cm diameter hole through the cabinet at this point To wire through wall 1 Mark a line distance A from the right of the centerline on the underside of the wall Mark the point on this line that is 2 2 cm from the underside of the cabinet Drill a 1 3 2 cm diameter hole through the rear wall at ...

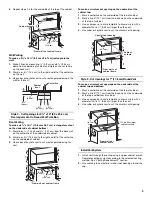
Page 9: ...side of the top of cabinet 3 Use a compass or a circle template to draw a circle with a diameter that is 0 64 cm larger than the vent 4 Use saber or keyhole saw to cut the circular vent opening Style 3 Cut Openings for 7 17 8 cm Round Vent To make a circular vent openings on the underside of the cabinet top and bottom 1 Mark a centerline on the underside of the top of cabinet 2 Mark a line 5 12 7 ...

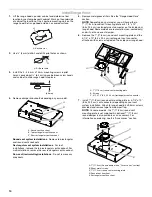
Page 10: ...ng plate or 3 1 4 x 10 8 3 x 25 4 cm rectangular vent connector on the inside your range hood Some models are recirculation non vented only and will not have a vent damper 6 Remove the 7 17 8 cm round vent mounting plate and the 3 1 4 x 10 8 3 x 25 4 cm rectangular vent connector attached with screws or taped on the inside your range hood 7 Install 7 17 8 cm round vent mounting plate or 3 1 4 x 10...

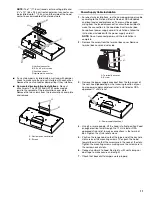
Page 11: ...d with the power supply cord kit NOTE Do not reconnect power until the installation is complete 2 Remove the screw from the terminal box cover Remove terminal box cover and set aside 3 Remove the power supply knockout from the top or rear of the vent hood depending on the incoming location of your home power supply cable and install a UL listed or CSA approved strain relief 4 Using 2 or more peopl...

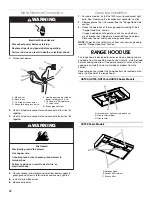
Page 12: ...gned to remove smoke cooking vapors and odors from the cooktop area For best results start the hood before cooking and allow it to operate several minutes after the cooking is complete to clear all smoke and odors from the kitchen Depending on your model the hood controls are located on the top or front panel of the range hood UXT20 UXT30 UXT40 and UXT42 Series Models UXT52 Series Models A White w...

Page 13: ... and grease filters frequently according to the following instructions Replace grease filter before operating hood Exterior Surfaces IMPORTANT Do not use soap filled scouring pads abrasive cleaners Cooktop Polishing Creme steel wool gritty washcloths or paper towels To avoid damage to the stainless steel do not use cleaners that contain chlorine Cleaning Method Rub in direction of grain to avoid s...

Page 14: ...ove screw from the grease filter retainer 2 Turn the grease filter retainer to release filter 3 Reinstall the filter by placing the back edge in the channel at rear of hood Push filter into place turn the filter retainer to secure filter to range hood 4 Replace screw in the grease filter retainer 5 Repeat steps 1 5 for the other filter Replacing the Incandescent Light Bulb UXT20 UXT30 UXT40 and UX...

Page 15: ...Light Switch On Off Motor Switch Low Off High BK W W W N BK W R Speed 2 Common Speed 1 BK L GND Ground Screw BR W R R BK BR BK 0 35 10 A 21 10 Watts 46 9 10 Ohms 37 2 10 Ohms C10 SE113B Motor Characteristics Power Supply 120 VAC Frequency 60 Hz Amperage Wattage Rating Motor Resistance White Red White Black Light Switch On Off Motor Switch Low Off High BK BK W R BK BR BK GND Ground Screw L N BK R W...

Page 16: ...ed 1 not used R BK BK R BK W BK W Y Rectifier Diode SE119A Switch Operation L 1 Lamps 120 V 1 5 Ohms L 2 Speed 1 120 V 1 5 Ohms L 3 Speed 2 120 V 2 0 Ohms 2 5 Ohms 120 V Speed 3 L 4 1 7 10 A 145 10 Watts 15 5 10 Ohms 10 7 10 Ohms Motor Characteristics Power Supply 120 VAC Frequency 60 Hz Amperage Wattage Rating Motor Resistance White Grey White Red White Black 6 10 Ohms N L GND Ground Screw W Comm...

Page 17: ...s or concerns at Whirlpool Brand Home Appliances Customer eXperience Center 553 Benson Road Benton Harbor MI 49022 2692 Please include a daytime phone number in your correspondence InCanada Call the Whirlpool Canada LP Customer eXperience Centre toll free 1 800 807 6777 Our consultants provide assistance with Features and specifications on our full line of appliances Use and maintenance procedures...

Page 18: ...ice by an authorized Whirlpool servicer is not available 10 The removal and reinstallation of your major appliance if it is installed in an inaccessible location or is not installed in accordance with published installation instructions 11 Major appliances with original model serial numbers that have been removed altered or cannot be easily determined This warranty is void if the factory applied s...

Page 19: ...as de non respect des instructions Votre sécurité et celle des autres est très importante Nous donnons de nombreux messages de sécurité importants dans ce manuel et sur votre appareil ménager Assurez vous de toujours lire tous les messages de sécurité et de vous y conformer AVERTISSEMENT DANGER Voici le symbole d alerte de sécurité Ce symbole d alerte de sécurité vous signale les dangers potentiel...

Page 20: ...die et évacuer adéquatement les gaz veiller à acheminer l air aspiré par un conduit jusqu à l extérieur ne pas décharger l air aspiré dans un espace vide du bâtiment comme une cavité murale un plafond un grenier un vide sanitaire ou un garage AVERTISSEMENT POUR RÉDUIRE LE RISQUE D INCENDIE UTILISER UNIQUEMENT DES CONDUITS MÉTALLIQUES AVERTISSEMENT POUR MINIMISER LE RISQUE D UN FEU DE GRAISSE SUR L...

Page 21: ...x 120 V Modèles UXT3030AY UXT3036AY installation avec décharge à l extérieur Pièces fournies Retirer les pièces de l emballage Vérifier que toutes les pièces sont présentes 2 vis de 3 5 x 9 5 mm Module connecteur de conduit rectangulaire de 3 x 10 8 3 x 25 4 cm Pièces nécessaires Système d évacuation rectangulaire métallique de 3 x 10 8 3 x 25 4 cm Bouche de décharge murale ou à travers le toit co...

Page 22: ...aleurs minimales des dégagements de séparation Avant d effectuer des découpages consulter les instructions d installation fournies par le fabricant de la table de cuisson cuisinière On doit disposer d une prise de courant électrique reliée à la terre Voir la section Spécifications électriques Assurer l étanchéité au niveau de chaque ouverture découpée dans le plafond ou le mur pour l installation ...

Page 23: ... Air d appoint Le code du bâtiment local peut exiger l emploi d un système d appoint d air lors de l emploi d un ventilateur d extraction dont la capacité d aspiration est supérieure à un débit pieds cubes par minute spécifié Le débit spécifié en pieds cubes par minute varie d une juridiction à l autre Consulter un professionnel des installations de chauffage ventilation climatisation au sujet des...

Page 24: ...s UL pour fixer le cuivre à l aluminium Appliquer la procédure recommandée par le fabricant des connecteurs La connexion aluminium cuivre doit être conforme aux codes locaux et aux pratiques de câblage acceptées par l industrie Le calibre des conducteurs et les connexions doivent être compatibles avec la demande de courant de l appareil spécifiée sur la plaque signalétique La plaque signalétique d...

Page 25: ...roite de l axe central sur la face inférieure du placard Sur cette ligne marquer le point situé à 2 2 cm du mur arrière Percer en ce point un trou de 1 3 2 cm de diamètre à travers le placard Passage du câble à travers le mur 1 Tracer une ligne de distance A à partir de la droite de l axe central sur la face inférieure du mur Marquer un point sur cette ligne qui se trouve à 2 2 cm de la face infér...

Page 26: ...ulaire sur la face inférieure du sommet du placard 1 Tracer un axe central sur la face inférieure du sommet du placard 2 Tracer une ligne de 5 12 7 cm en partant du mur arrière sur la face inférieure du sommet du placard 3 Utiliser un compas ou un gabarit circulaire pour tracer un cercle avec un diamètre de 0 64 cm supérieur à celui du conduit d évacuation 4 Utiliser une scie sauteuse ou une scie ...

Page 27: ...le en demi cercle Installations pour système d évacuation rectangulaire Pour les installations avec passage par le toit retirer l opercule amovible rectangulaire supérieur du conduit d évacuation Pour les installations murales retirer l opercule amovible rectangulaire arrière Installation sans décharge à l extérieur recyclage Ne pas retirer les opercules 5 Enlever les filtres à graisse métalliques...

Page 28: ...ation 1 Pour les installations à raccordement direct acheminer le câble d alimentation du domicile selon les prescriptions du Code national de l électricité ou des normes CSA et des codes et règlements locaux La longueur du câblage depuis le tableau de distribution avec fusibles ou disjoncteurs doit être suffisante pour réaliser facilement le raccordement dans le boîtier de connexion de la hotte P...

Page 29: ...e Si la hotte ne fonctionne pas déterminer si un disjoncteur s est ouvert ou si un fusible du domicile est grillé Déconnecter la source de courant électrique et inspecter les connections du câblage REMARQUE Pour pouvoir tirer le plus grand parti de la nouvelle hotte de cuisinière lire la section Utilisation de la hotte UTILISATION DE LA HOTTE La hotte de cuisinière est conçue pour extraire fumée v...

Page 30: ...itesse de ventilateur souhaitée Pour ÉTEINDRE le ventilateur tourner le commutateur de vitesse du ventilateur vers la gauche pour mettre le ventilateur en position d ARRÊT Modèles de série UXT52 Pour faire fonctionner la lampe Le bouton d éclairage Marche arrêt contrôle les deux lampes Appuyer une fois sur le bouton pour allumer la lampe puis une nouvelle fois pour l éteindre Utilisation du ventil...

Page 31: ... charbon Pour commander des pièces voir la section Accessoires Remplacement du filtre à charbon 1 Ôter la vis de la patte de retenue du filtre à graisse 2 Faire pivoter la patte de retenue du filtre à graisse pour libérer le filtre 3 Réinstaller le filtre en plaçant le bord arrière dans la rainure à l arrière de la hotte Enfoncer le filtre faire pivoter la patte de retenue du filtre pour fixer le ...

Page 32: ... série UXT52 Interrompre l alimentation de la hotte attendre le refroidissement de la lampe à halogène Pour éviter d endommager ou de réduire la longévité de l ampoule neuve ne pas toucher l ampoule avec les doigts nus Remplacer l ampoule en la manipulant avec un mouchoir de papier ou des gants de coton Si les nouvelles lampes ne fonctionnent pas vérifier que chaque lampe est correctement insérée ...

Page 33: ...u moteur Alimentation électrique 120 VCA Fréquence 60 Hz Intensité Puissance nominale Résistance du moteur Blanc Rouge Blanc Noir 0 35 10 A 21 10 Watts 46 9 10 Ohms 37 2 10 Ohms C10 SE113B Caractéristiques du moteur Alimentation électrique 120 VCA Fréquence 60 Hz Intensité Puissance nominale Résistance du moteur Blanc Rouge Blanc Noir Commutateur d éclairage marche arrêt Contacteur du moteur Faibl...

Page 34: ...du moteur Blanc Rouge Blanc Noir Vis de mise à la terre Terre SE119A Fonctionnement du commutateur L 1 Lampes 120 V 1 5 Ohms L 2 Vitesse 1 120 V 1 5 Ohms L 3 Vitesse 2 120 V 2 0 Ohms 2 5 Ohms 120 V Vitesse 3 L 4 Blanc Noir 6 10 Ohms Neu L Terre BL Commun N Ligne Boutons poussoirs mécaniques 4 boutons 3 vitesses MAR Ligne JA Lampe GRIS Vitesse 1 R Vitesse 2 N Vitesse 3 BL BL N R GRIS JA JA JA JA GR...

Page 35: ...e service désignés par Whirlpool Canada LP sont formés pour remplir la garantie des produits et fournir un service après la garantie partout au Canada Pour plus d assistance Si vous avez besoin de plus d assistance vous pouvez soumettre par écrit toute question ou préoccupation à Whirlpool Canada LP à l adresse suivante Whirlpool Canada LP Centre pour l eXpérience de la clientèle 200 6750 Century ...

Page 36: ...pose et la réinstallation de votre gros appareil si celui ci est installé dans un endroit inaccessible ou n est pas installé conformément aux instructions d installation fournies 11 Les gros appareils ménagers dont les numéros de série et de modèle originaux ont été enlevés modifiés ou qui ne peuvent pas être facilement identifiés La présente garantie est nulle si le numéro de série d usine a été ...

Reviews: