background image

4

Water Pressure

A cold water supply with water pressure of between 30 and 
120 psi (207 and 827 kPa) is required to operate the water 
dispenser and ice maker. If you have questions about your water 
pressure, call a licensed, qualified plumber.

Reverse Osmosis Water Supply

IMPORTANT: The pressure of the water supply coming out of a 
reverse osmosis system going to the water inlet valve of the 
refrigerator needs to be between 30 and 120 psi (207 and 
827 kPa).

If a reverse osmosis water filtration system is connected to your 
cold water supply, the water pressure to the reverse osmosis 
system needs to be a minimum of 40 to 60 psi (276 to 414 kPa).

If the water pressure to the reverse osmosis system is less than 
40 to 60 psi (276 to 414 kPa):

Check to see whether the sediment filter in the reverse 
osmosis system is blocked. Replace the filter if necessary.

Allow the storage tank on the reverse osmosis system to refill 
after heavy usage.

If your refrigerator has a water filter, it may further reduce the 
water pressure when used in conjunction with a reverse 
osmosis system. Remove the water filter. See “Water 
Filtration System.”

If you have questions about your water pressure, call a licensed, 
qualified plumber.

Connect Water Supply

Read all directions before you begin.

IMPORTANT: If you turn the refrigerator on before the water line 
is connected, turn the ice maker OFF.

Connect to Water Line

1. Unplug refrigerator or disconnect power.

2. Turn OFF main water supply. Turn ON nearest faucet long 

enough to clear line of water.

3. Locate a 

¹⁄₂

" (1.27 cm) to 1

¹⁄₄

" (3.18 cm) vertical cold water 

pipe near the refrigerator.

IMPORTANT:

Make sure it is a cold water pipe.

Horizontal pipe will work, but drill on the top side of the 
pipe, not the bottom. This will help keep water away from 
the drill and normal sediment from collecting in the valve.

4. Determine the length of copper tubing you need. Measure 

from the connection on the lower rear corner of refrigerator to 
the water pipe. Add 7 ft (2.1 m) to allow for cleaning. Use 

¹⁄₄

(6.35 mm) O.D. (outside diameter) copper tubing. Be sure 
both ends of copper tubing are cut square. 

5. Using a cordless drill, drill a 

¹⁄₄

" (6.35 mm) hole in the cold 

water pipe you have selected.


6. Fasten the shutoff valve to the cold water pipe with the pipe 

clamp. Be sure the outlet end is solidly in the 

¹⁄₄

" (6.35 mm) 

drilled hole in the water pipe and that the washer is under the 
pipe clamp. Tighten the packing nut. Tighten the pipe clamp 
screws slowly and evenly so the washer makes a watertight 
seal. Do not overtighten, or you may crush the copper tubing. 

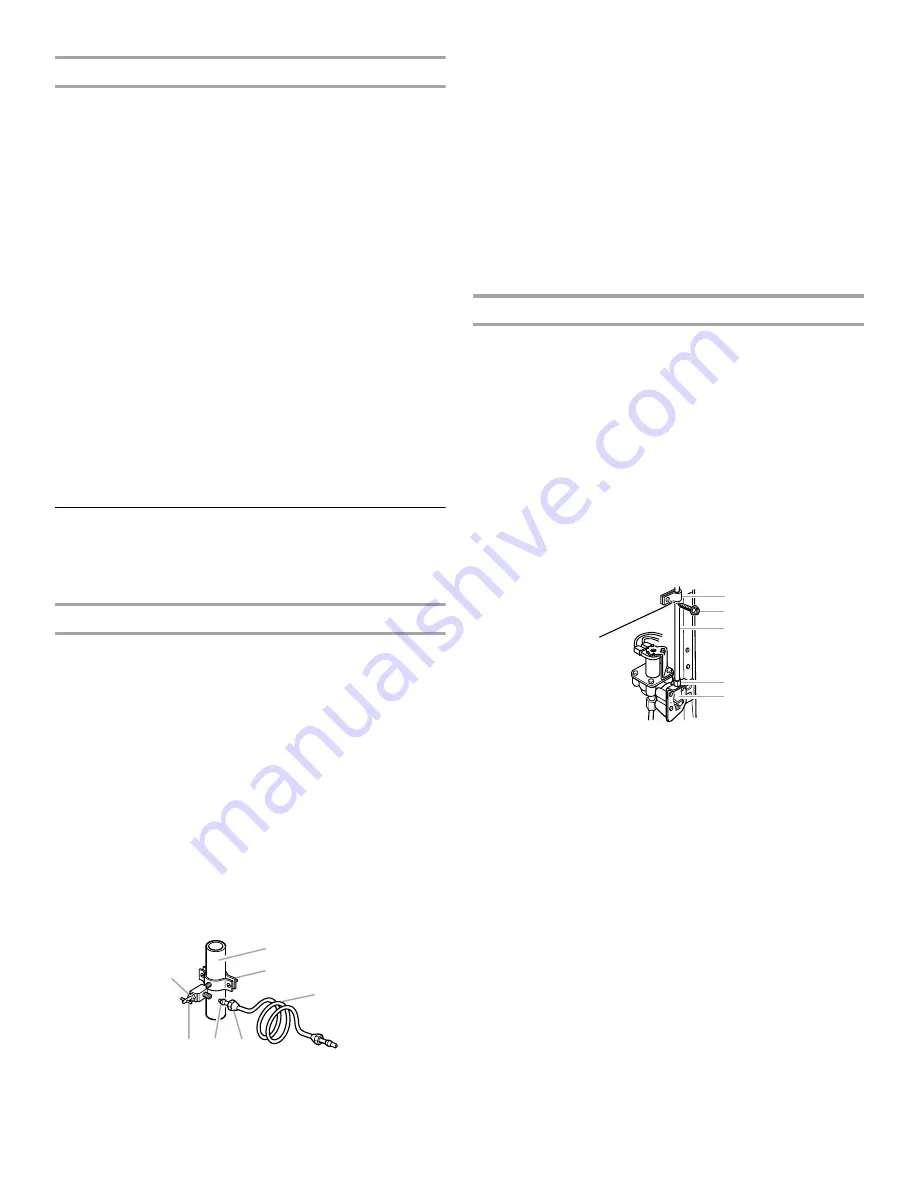
7. Slip the compression sleeve and compression nut on the 

copper tubing as shown. Insert the end of the tubing into the 
outlet end squarely as far as it will go. Screw the compression 
nut onto outlet end with adjustable wrench. Do not 
overtighten. 

8. Place the free end of the tubing in a container or sink, and 

turn ON the main water supply. Flush the tubing until water is 
clear. Turn OFF the shutoff valve on the water pipe. Coil the 
copper tubing.

Connect to Refrigerator

Style 1 

1. Unplug refrigerator or disconnect power.

2. Remove and discard the plastic part that is attached to the 

inlet of the water valve.

3. Attach the copper tube to the valve inlet using a compression 

nut and sleeve as shown. Tighten the compression nut. Do 
not overtighten.

4. Use the tube clamp on the back of the refrigerator to secure 

the tubing to the refrigerator as shown. This will help avoid 
damage to the tubing when the refrigerator is pushed back 
against the wall.

5. Turn shutoff valve ON. 

6. Check for leaks. Tighten any connections (including 

connections at the valve) or nuts that leak. 

7. The ice maker is equipped with a built-in water strainer. If 

your water conditions require a second water strainer, install 
it in the 

¹⁄₄

" (6.35 mm) water line at either tube connection. 

Obtain a water strainer from your nearest appliance dealer.

Style 2

1. Unplug refrigerator or disconnect power.

2. Remove and discard the black nylon plug from the gray water 

tube on the rear of the refrigerator. 

3. If the gray water tube supplied with the refrigerator is not long 

enough, a 

¹⁄₄

" x 

¹⁄₄

" (6.35 mm x 6.35 mm) coupling is needed 

in order to connect the water tubing to an existing household 
water line. Thread the provided nut onto the coupling on the 
end of the copper tubing. 

A. Cold water pipe
B. Pipe clamp

C. Copper tubing
D. Compression nut

E. Compression sleeve
F. Shutoff valve

G. Packing nut

A

B

C

D

E

F

G

A. Tube clamp
B. Tube clamp screw

C. Copper tubing

D. Compression nut

E. Valve inlet

A

C

B

D
E

Summary of Contents for W10321478A

Page 1: ...TER FILTER CERTIFICATIONS 12 PERFORMANCE DATA SHEETS 13 WARRANTY 17 SÉCURITÉ DU RÉFRIGÉRATEUR 18 INSTRUCTIONS D INSTALLATION 19 UTILISATION DU RÉFRIGÉRATEUR 22 ENTRETIEN DU RÉFRIGÉRATEUR 25 DÉPANNAGE 26 ACCESSOIRES 29 FEUILLES DE DONNÉES SUR LA PERFORMANCE 30 GARANTIE 34 REFRIGERATOR USER INSTRUCTIONS W10321478A You can be killed or seriously injured if you don t immediately You can be killed or s...

Page 2: ...igerator Use nonflammable cleaner Keep flammable materials and vapors such as gasoline away from refrigerator Use two or more people to move and install refrigerator Disconnect power before installing ice maker on ice maker kit ready models only Use a sturdy glass when dispensing ice on some models Do not hit the refrigerator glass doors on some models WARNING Suffocation Hazard Remove doors from ...

Page 3: ...ype of installation cleaning or removing a light bulb turn the control Thermostat Refrigerator or Freezer Control depending on the model to OFF and then disconnect the refrigerator from the electrical source When you are finished reconnect the refrigerator to the electrical source and reset the control Thermostat Refrigerator or Freezer Control depending on the model to the desired setting See Usi...

Page 4: ... the cold water pipe you have selected 6 Fasten the shutoff valve to the cold water pipe with the pipe clamp Be sure the outlet end is solidly in the 6 35 mm drilled hole in the water pipe and that the washer is under the pipe clamp Tighten the packing nut Tighten the pipe clamp screws slowly and evenly so the washer makes a watertight seal Do not overtighten or you may crush the copper tubing 7 S...

Page 5: ... the mid setting make the temperature colder Wait 24 hours before you put food into the refrigerator If you add food before the refrigerator has cooled completely your food may spoil NOTE Adjusting the Refrigerator and Freezer Controls to a higher colder than recommended setting will not cool the compartments any faster Adjusting Controls Give the refrigerator time to cool down completely before a...

Page 6: ...nsing IMPORTANT After connecting the refrigerator to a water source or replacing the water filter flush the water system Use a sturdy container to depress and hold the water dispenser lever for 5 seconds then release it for 5 seconds Repeat until water begins to flow Once water begins to flow continue depressing and releasing the dispenser lever 5 seconds on 5 seconds off until a total of 3 gal 12...

Page 7: ...ire shutoff arm to the OFF arm up position and listen for the click Ice can still be dispensed but no more can be made NOTE Your ice maker has an automatic shutoff As ice is made the ice cubes will fill the ice storage bin and the ice cubes will raise the wire shutoff arm to the OFF arm up position Do not force the wire shutoff arm up or down REMEMBER Allow 24 hours to produce the first batch of i...

Page 8: ...e abrasive or harsh cleaners such as window sprays scouring cleansers flammable fluids cleaning waxes concentrated detergents bleaches or cleansers containing petroleum products on plastic parts interior and door liners or gaskets Do not use paper towels scouring pads or other harsh cleaning tools 1 Unplug refrigerator or disconnect power 2 Hand wash rinse and dry removable parts and interior surf...

Page 9: ...NOTE Adjusting the temperature controls to coldest setting will not cool either compartment more quickly The motor seems to run too much Your new refrigerator may run longer than your old one due to its high efficiency compressor and fans The refrigerator may run even longer if the room is warm a large food load is added doors are opened often or if the doors have been left open The refrigerator i...

Page 10: ...h ice Refrigerator connected to a water supply and the supply shutoff valve turned on Connect refrigerator to water supply and turn water shutoff valve fully open Kink in the water source line A kink in the line can reduce water flow Straighten the water source line Ice maker turned on Make sure wire shutoff arm or switch depending on model is in the ON position New installation Wait 24 hours afte...

Page 11: ...kPa The water pressure to the home determines the flow from the dispenser See Water Supply Requirements Kink in the home water source line Straighten the water source line New installation Flush and fill the water system Water filter installed on the refrigerator The filter may be clogged or incorrectly installed Is a reverse osmosis water filtration system connected to your cold water supply See ...

Page 12: ...12 WATER FILTER CERTIFICATIONS ...

Page 13: ...for cold water use only Do not use with water that is microbiologically unsafe or of unknown quality without adequate disinfection before or after the system Refer to the Warranty section for the Manufacturer s name address and telephone number Refer to the Warranty section for the Manufacturer s limited warranty Application Guidelines Water Supply Parameters System tested and certified by NSF Int...

Page 14: ...er use only Do not use with water that is microbiologically unsafe or of unknown quality without adequate disinfection before or after the system Refer to the Warranty section for the Manufacturer s name address and telephone number Refer to the Warranty section for the Manufacturer s limited warranty Application Guidelines Water Supply Parameters System tested and certified by NSF International a...

Page 15: ...ly While testing was performed under standard laboratory conditions actual performance may vary The product is for cold water use only Do not use with water that is microbiologically unsafe or of unknown quality without adequate disinfection before or after the system Refer to the Warranty section for the Manufacturer s name address and telephone number Refer to the Warranty section for the Manufa...

Page 16: ...ly While testing was performed under standard laboratory conditions actual performance may vary The product is for cold water use only Do not use with water that is microbiologically unsafe or of unknown quality without adequate disinfection before or after the system Refer to the Warranty section for the Manufacturer s name address and telephone number Refer to the Warranty section for the Manufa...

Page 17: ... The removal and reinstallation of your major appliance if it is installed in an inaccessible location or is not installed in accordance with Maytag s published installation instructions 11 Replacement parts or repair labor on major appliances with original model serial numbers that have been removed altered or cannot be easily determined 12 Discoloration rust or oxidation of stainless steel surfa...

Page 18: ...SEMENT DANGER Voici le symbole d alerte de sécurité Ce symbole d alerte de sécurité vous signale les dangers potentiels de décès et de blessures graves à vous et à d autres Tous les messages de sécurité suivront le symbole d alerte de sécurité et le mot DANGER ou AVERTISSEMENT Ces mots signifient AVERTISSEMENT réfrigérateur prendre quelques précautions fondamentales y compris les suivantes Pour ré...

Page 19: ...étrer facilement AVERTISSEMENT Risque de suffoquer Enlever les portes de votre vieux réfrigérateur Le non respect de cette instruction peut causer un décès ou des lésions cérébrales AVERTISSEMENT Risque du poids excessif Utiliser deux ou plus de personnes pour déplacer et installer le réfrigérateur Le non respect de cette instruction peut causer une blessure au dos ou d autre blessure Déplacement ...

Page 20: ...t l achat s assurer que le robinet d arrêt à étrier est conforme à vos codes locaux de plomberie Ne pas employer de robinet d arrêt à étrier de 4 76 mm ou de type à percer ce qui réduit le débit d eau et cause une obstruction plus facilement IMPORTANT Toutes les installations doivent être conformes aux exigences des codes locaux de plomberie Utiliser un tube en cuivre et vérifier s il a des fuites...

Page 21: ...de sortie avec une clé à molette réglable Ne pas serrer excessivement 8 Placer le bout libre du tube dans un contenant ou évier et OUVRIR le robinet principal d arrivée d eau et laisser l eau s écouler par le tube jusqu à ce que l eau soit limpide FERMER le robinet principal d arrivée d eau Enrouler le tube en cuivre en spirale Raccordement au réfrigérateur Style 1 1 Débrancher le réfrigérateur ou...

Page 22: ...roite sont pour une température plus froide Attendre 24 heures avant de mettre des aliments au réfrigérateur Si l on ajoute des aliments avant que le réfrigérateur ait refroidi complètement les aliments peuvent s abîmer REMARQUE Tourner les commandes du réfrigérateur et du congélateur à un réglage plus élevé plus froid que le réglage recommandé ne refroidira pas les compartiments plus rapidement A...

Page 23: ...ment et le rendre ainsi plus froid Distributeurs d eau et de glaçons sur certains modèles Selon votre modèle vous pouvez choisir une ou plusieurs des options suivantes la possibilité de choisir de la glace concassée ou en cubes une lampe spéciale qui s allume à l occasion de l utilisation du distributeur ou une option de verrouillage pour éviter une distribution non intentionnelle IMPORTANT Après ...

Page 24: ...stique de verrouillage ne coupe pas l alimentation électrique à l appareil à la machine à glaçons ou à la lumière du distributeur Elle désactive simplement le levier du distributeur Les distributeurs de glaçons et d eau ne fonctionneront pas Appuyer sur le bouton ON marche pour verrouiller le distributeur Appuyer sur le bouton OFF arrêt pour déverrouiller le distributeur Machine à glaçons et bac d...

Page 25: ...distributeur sans utiliser de filtre à eau L eau ne sera pas filtrée 1 Enlever le filtre à eau 2 Faire glisser le couvercle de l extrémité du filtre et le replacer dans la grille de la base IMPORTANT Ne pas jeter le couvercle Il fait partie de votre réfrigérateur Conserver le couvercle pour l utiliser avec le filtre de rechange ENTRETIEN DU RÉFRIGÉRATEUR Nettoyage Les sections de réfrigération et ...

Page 26: ...ule s il y a lieu REMARQUE Pour nettoyer le protecteur d ampoule le laver à l eau tiède et avec un détergent liquide Bien rincer et sécher le protecteur d ampoule 3 Enlever l ampoule d éclairage et la remplacer par une de même taille forme et puissance 4 Replacer le protecteur d ampoule s il y a lieu 5 Brancher le réfrigérateur ou reconnecter la source de courant électrique DÉPANNAGE Essayer d abo...

Page 27: ...ement jusqu à ce qu ils touchent le plancher Voir les instructions Dépose de la porte soit dans les instructions d utilisation soit sur la feuille d instructions fournie séparément avec le réfrigérateur Les ampoules ne fonctionnent pas Une ampoule est elle desserrée dans la douille ou grillée Voir Remplacement des ampoules d éclairage La lumière du distributeur est elle réglée à OFF arrêt Sur cert...

Page 28: ...nant la pression de l eau Appeler un plombier agréé et qualifié Goût odeur ou couleur grise des glaçons Les raccords de plomberie sont ils neufs Des raccords de plomberie neufs peuvent causer une décoloration et un mauvais goût des glaçons Les glaçons ont ils été gardés trop longtemps Jeter les glaçons Laver le compartiment à glaçons Accorder 24 heures pour la fabrication de nouveaux glaçons Y a t...

Page 29: ...tater une ou deux gouttes d eau après la distribution d eau Le verre n a pas été maintenu sous le distributeur assez longtemps Maintenir le verre sous le distributeur pendant 2 à 3 secondes après avoir relâché le levier la plaque du distributeur S agit il d une nouvelle installation Vidanger le système de distribution d eau Voir Préparation du système d eau ou Distributeurs d eau et de glaçons Le ...

Page 30: ...res standard le rendement réel peut varier Le produit doit être utilisé pour l eau froide seulement Ne pas utiliser pour le filtrage d une eau microbiologiquement polluée ou de qualité inconnue en l absence d un dispositif de désinfection adéquat avant ou après le système Consulter la section Garantie pour obtenir le nom l adresse et le numéro de téléphone du fabricant Consulter la section Garanti...

Page 31: ... rendement réel peut varier Le produit doit être utilisé pour l eau froide seulement Ne pas utiliser pour le filtrage d une eau microbiologiquement polluée ou de qualité inconnue en l absence d un dispositif de désinfection adéquat avant ou après le système Consulter la section Garantie pour obtenir le nom l adresse et le numéro de téléphone du fabricant Consulter la section Garantie pour la garan...

Page 32: ...sents dans votre approvisionnement d eau Même si le test a été effectué dans des conditions de laboratoires standard le rendement réel peut varier Le produit doit être utilisé pour l eau froide seulement Ne pas utiliser pour le filtrage d une eau microbiologiquement polluée ou de qualité inconnue en l absence d un dispositif de désinfection adéquat avant ou après le système Consulter la section Ga...

Page 33: ...ésents dans votre approvisionnement d eau Même si le test a été effectué dans des conditions de laboratoires standard le rendement réel peut varier Le produit doit être utilisé pour l eau froide seulement Ne pas utiliser pour le filtrage d une eau microbiologiquement polluée ou de qualité inconnue en l absence d un dispositif de désinfection adéquat avant ou après le système Consulter la section G...

Page 34: ...uivant la date d achat 6 Toute perte d aliments ou de médicaments due à une défaillance du réfrigérateur ou du congélateur 7 Le ramassage et la livraison Ce gros appareil ménager est conçu pour être réparé à domicile 8 Les réparations aux pièces ou systèmes résultant d une modification non autorisée faite à l appareil 9 Les frais de déplacement et de transport pour le service du produit si votre g...

Page 35: ...rigération Pour assistance ou service aux É U composez le 1 800 688 9900 Au Canada composez le 1 800 807 6777 Si vous avez besoin de plus d assistance vous pouvez écrire à Maytag en soumettant toute question ou problème à l adresse suivante Aux États Unis Maytag Brand Home Appliances Customer eXperience Center 553 Benson Road Benton Harbor MI 49022 2692 Au Canada Maytag Brand Home Appliances Centr...

Page 36: ...ademark Trademark of Maytag Corporation or its related companies Marque déposée Marque de commerce de Maytag Corporation ou de ses compagnies affiliées Used under license by Maytag Limited in Canada Emploi sous licence par Maytag Limited au Canada 5 10 Printed in Mexico Imprimé au Mexique ...

Reviews: