background image

Summary of Contents for WED5700AC0

Page 1: ... nOmero de modelo y de serie dentro de la cavidad superior de la puerta Table of Contents DRYER SAFETY 2 iNSTALLATiON REQUIREMENTS 3 Tools and Parts 3 LOCATION REQUIREMENTS 3 ELECTRICAL REQUIREMENTS 4 iNSTALL LEVELING LEGS 6 ELECTRICAL CONNECTION 7 VENTING 13 Venting Requirements 13 Plan Vent System 14 Venting Kits 14 install Vent System 15 Connect Vent 15 LEVEL DRYER 16 COMPLETE iNSTALLATiON CHEC...

Page 2: ...l hazard is tell you how to reduce the chance of injury and tell you what can happen if the instructions are not followed WARNING ofFi o Clothes dryer installation must be performed by a qualified installer install the clothes dryer according to the manufacturer s instructions and local codes Do not install a clothes dryer with flexible plastic venting materials or flexible metal foil type duct if...

Page 3: ...stallations require metal exhaust system hardware available for purchase from the dealer from whom you purchased your dryer For further information please reference the Assistance or Service section of the Dryer User instructions If using a power supply cord Use a UL listed power supply cord kit marked for use with clothes dryers The kit should contain A UL listed 30 amp power supply cord rated 12...

Page 4: ...nt ventilation openings are acceptable Companion appliance spacing should also be considered Minimum Required Spacing o o ll_14 max _ _ 310 crn 2 4 _ __ 24i_ 155cm 1 _ I4 27 _ _ 1 _11 _2_ H5 2 _ 25rnm 686mm 25mm _Smm 1743mm 140rnrn A B 311_ 76 rnrn D 76mm C A Recessed area B Side view closet or confined area C Closet door with vents Additional spacing recommended Mobile home Additional installatio...

Page 5: ...must have 4 10 gauge solid copper wires and match a 4 wire receptacle of NEMA Type 14 30 R The ground wire ground conductor may be either green or bare The neutral conductor must be identified by a white cover if connecting by direct wire Power supply cable must match power supply 4 wire or 3 wire and be Flexible armored cable or nonmetallic sheathed copper cable with ground wire covered with flex...

Page 6: ...nto leg holes by hand Use a wrench to finish turning legs until diamond marking is no longer visible Now stand the dryer on its feet Slide the dryer until it is close to its final location Leave enough room for electrical connection and to connect the exhaust vent To avoid damaging floor use a large flat piece of cardboard from dryer carton place under entire back edge of dryer Firmly grasp dryer ...

Page 7: ...ilure to do so can result in death fire or electrical shock Electrical Connection Options 1 Choose electrical connection type Power supply cord 4 wire receptacle NEMA Type 14 30R Go to 4 wire Power Supply Cord Connection section Then go to Venting Requirements Power supply cord 3 wire receptacle NEMA Type 10 30R Go to 3 wire Power Supply Cord Connection section Then go to Venting Requirements 4 wi...

Page 8: ...ntal position Do not further tighten strain relief screws at this point If your outlet looks like this Power supply cord 4 wire receptacle NEMA Type 14 30R Go to 4 Wire Power Supply Cord Connection on this page Power supply cord 3 wire receptacle NEMA Type 10 30R Go to 3 Wire Power Supply Cord Connection on page 9 4owire Power Supply Cord Connection IMPORTANT A 4 wire connection is required for mo...

Page 9: ...re Power Supply Cord Connection iMPORTANT Use where local codes permit connecting cabinet ground conductor to neutral wire 3 wire receptacle NEMA type 10 30R 3 prong plug Connect neutral wire white or center C of power supply cord to center terminal block screw B Tighten screw Connect remaining wires Connect remaining wires to outer terminal block screws Tighten screws Finally reinsert tab of term...

Page 10: ...ion Direct wire cable must have 5 ft 1 52 m of extra length so dryer may be moved if needed Strip 5 127 mm of outer covering from end of cable leaving bare ground wire at 5 127 mm Cut 11 2 38 mm from remaining 3 wires Strip insulation back 1 25 mm Shape ends of wires into hooks ground wire and neutral wire Put direct wire cable through the strain relief The strain relief should have a tight fit wi...

Page 11: ...of extra length so dryer may be moved if needed Strip 31 2 89 mm of outer covering from end of cable Strip insulation back 1 25 mm If using 3 wire cable with ground wire cut bare wire even with outer covering Shape wire ends into hooks Connect ground wire green or bare F of direct wire cable to external ground conductor screw A Tighten screw Remove center terminal block screw B Place hooked ends o...

Page 12: ...of terminal block cover into slot of dryer rear panel Secure cover with hold down screw Now go to Venting Requirements Optionam 3owire Connection iMPORTANT You must verify with a qualified electrician that this grounding method is acceptable before connecting Place hooked ends of remaining wires under outer terminal block screws hooks facing right Tighten screws ground wire and neutral wire Remove...

Page 13: ...exible metal vent Acceptable only ifaccessible to clean Must be fully extended and supported in final dryer location Remove excess to avoid sagging and kinking that may result in reduced airflow and poor performance Do not install in enclosed walls ceilings or floors The total length should not exceed 73 4ft 2 4 m NOTE If using an existing vent system clean lint from entire length of the system an...

Page 14: ...arance installations are shown Refer to the manufacturer s instructions Over The Top installation also available with one offset elbow Periscope installation NOTE The following kits for close clearance alternate installations are available for purchase Venting Kits For more information call 1 800 901 2042 or visit us at www appJJanceaccessories com in Canada call 1 800 807 67 7 or visit us at www ...

Page 15: ...nce p Vent System Chart Number of Type 90 turns of vent or elbows 0 Rigid metal 64 ft 20 m 1 Rigid metal 54 ft 16 5 m 2 Rigid metal 44 ft 13 4 m 3 Rigid metal 4 Rigid metal NOTE Side and bottom exhaust installations have a 90 turn inside the dryer To determine maximum exhaust length add one 90 turn to the chart Box Iouvered Angled hoods hoods 58 ft 17 7 m 48 ft 14 6 m 38 ft 11 6 m 35 ft 10 7 m 29 ...

Page 16: ...er is level See Level Dryer _ Remove film on console and any tape remaining on dryer _ Wipe dryer drum interior thoroughly with a damp cloth to remove any dust _ Read Dryer Use in your Use and Care Guide _ Set the dryer on a full heat cycle not an air cycle for 20 minutes and start the dryer if the dryer will not start check the following Controls are set in a running or On position Start button h...

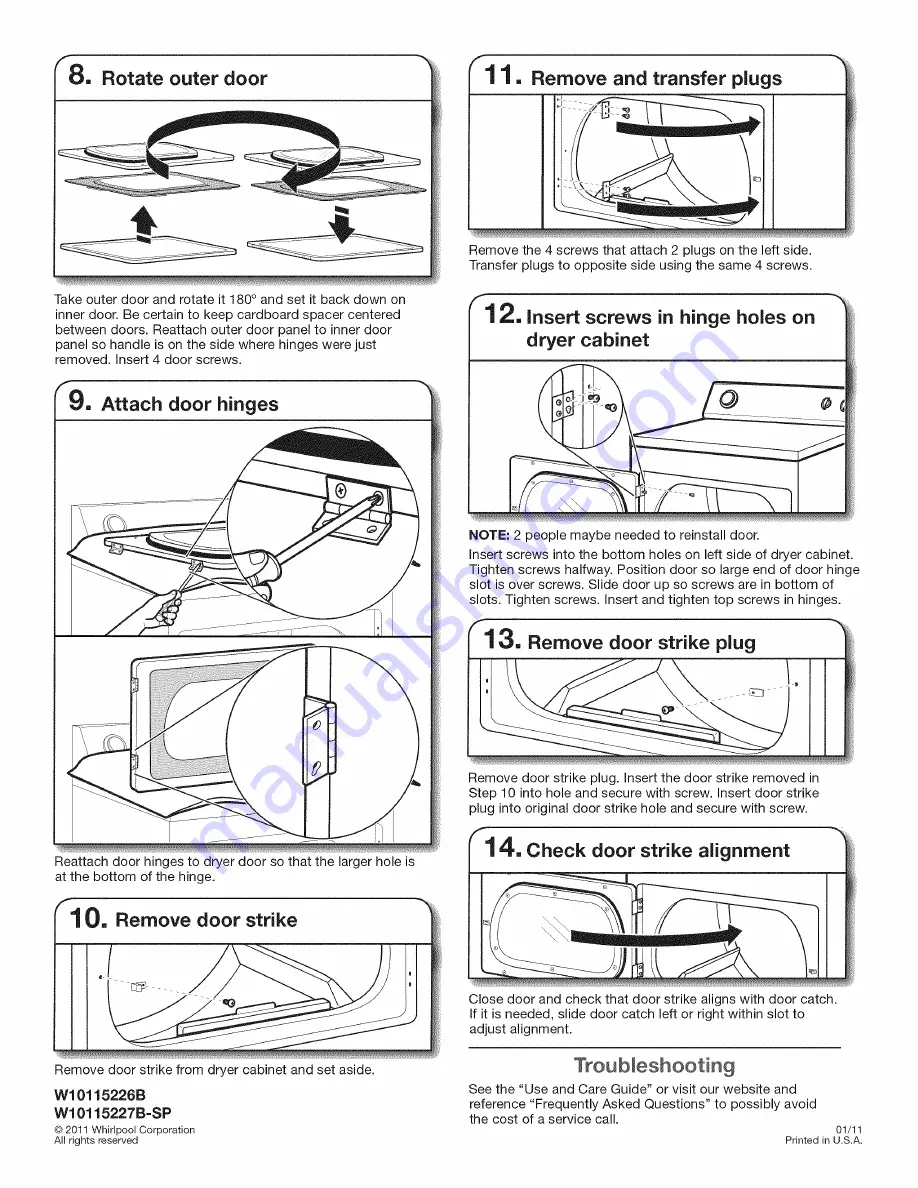
Page 17: ...ing door over towel on dryer grasp sides of outer door and lift to separate it from inner door NOTE Do not pry apart with putty knife or screwdriver Do not pull on door seal or plastic door catches Lift door off top screws Lift door until top screws in dryer cabinet are in large part of hinge slot Pull door forward off screws Set door handle side up on top of dryer Remove top screws from dryer cab...

Page 18: ...side using the same 4 screws dryer cabinet NOTE 2 people maybe needed to reinstall door Insert screws into the bottom holes on left side of dryer cabinet Tighten screws halfway Position door so large end of door hinge slot is over screws Slide door up so screws are in bottom of slots Tighten screws Insert and tighten top screws in hinges Close door and check that door strike aligns with door catch...

Page 19: ... remove top screws from dryer cabinet side of hinges Remove screws at top bottom and side of door 4 screws Keep door screws separate from hinge screws as they are different sizes Lift door until top screws in dryer cabinet are in large part of hinge slot Pull door forward off screws Set door handle side up on top of dryer Remove top screws from dryer cabinet Holding door over towel on dryer pry in...

Page 20: ...g the same 4 screws dryer cabinet NOTE 2 people maybe needed to reinstall door Insert screws into the bottom holes on left side of dryer cabinet Tighten screws halfway Position door so large end of door hinge slot is over screws Slide door up so screws are in bottom of slots Tighten screws Insert and tighten top screws in hinges Remove door strike plug Insert the door strike removed in Step 10 int...

Reviews: