background image

Summary of Contents for WED9371YL0

Page 1: ...tion 11 VENTING 14 Venting Requirements 14 Plan Vent System 15 Venting Kits 15 Install Vent System 16 CONNECT iNLET HOSE 17 CONNECT VENT 18 LEVEL DRYER 19 COMPLETE iNSTALLATiON CHECKLIST 19 DOOR REVERSAL KIT OPTIONAL 20 STACKING WASHER AND DRYER OPTIONAL 20 TROUBLESHOOTING 20 Para una version de estas instrucciones en espa_ol visite www Whirlpool com iNSTALLATiON NOTES Date of purchase Date of ins...

Page 2: ...e the chance of injury and tell you what can happen if the instructions are not followed WARNING i ofFi Clothes dryer installation must be performed by a qualified installer install the clothes dryer according to the manufacturer s instructions and local codes Do not install a clothes dryer with flexible plastic venting materials or fle ible metal foil type duct if flexible metal duct is installed...

Page 3: ... UL listed 30 amp power supply cord rated 120 240 volt minimum The cord should be type SRD or SRDT and be at least 4 ft 1 22 m long The wires that connect to the dryer must end in ring terminals or spade terminals with upturned ends A UL listed strain relief 1 4 and 5 16 nut driver recommended Adjustable wrench that opens to 1 25 mm or hex head socket wrench Parts supplied Parts package is located...

Page 4: ... mm above floor If using a pedestal you will need 18 460 mm to bottom of dryer The dryer must not be installed or stored in an area where it will be exposed to water and or weather IMPORTANT Do not operate install or store dryer where it will be exposed to water weather or at temperatures below 40 F 4 C Lower temperatures may cause dryer not to shut off at end of automatic sensor cycles resulting ...

Page 5: ... 155 cm_ Closet Installation stacked washer and dryer Cabinet installation dryer only 7 I 178 ram 1 ml 25 ram 1 ml 25 ram Custom under counter installation dryer only o o i j oo 25 ram 1 ml 25 mini 39 rain 990 ram 5 I 127 rnrr_ 25 mm 78 1930 mm 48 in 2 310cm 2 24 in Mobile home Additional installation requirements This dryer is suitable for mobile home installations The installation must conform t...

Page 6: ...4 areas where local codes prohibit grounding through the neutral conductors If using a power supply cord Use a UL listed power supply cord kit marked for use with clothes dryers The kit should contain A UL listed 30 amp power supply cord rated 120 240 volt minimum The cord should be type SRD or SRDT and be at least 4 ft 1 22 m long The wires that connect to the dryer must end in ring terminals or ...

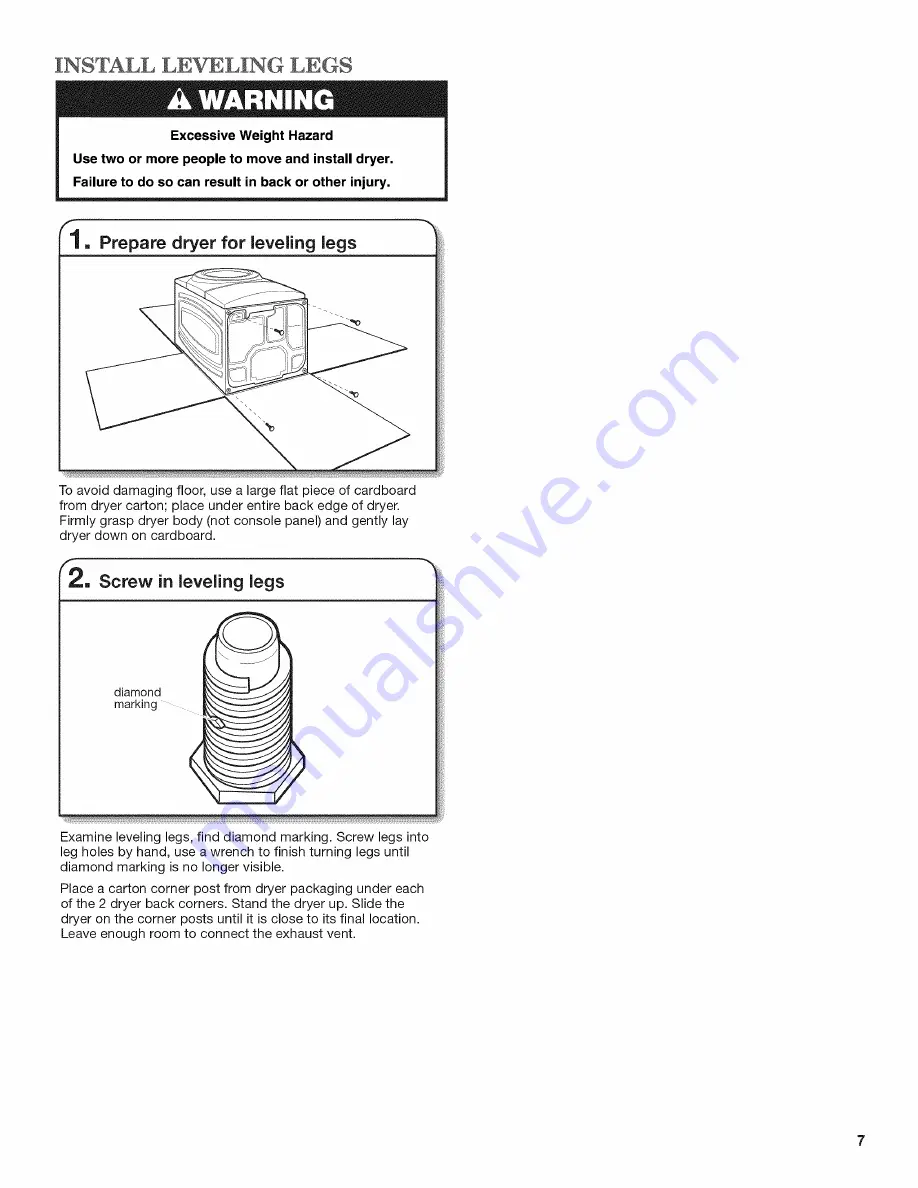
Page 7: ...k edge of dryer Firmly grasp dryer body not console panel and gently lay dryer down on cardboard Examine leveling legs find diamond marking Screw legs into leg holes by hand use a wrench to finish turning legs until diamond marking is no longer visible Place a carton corner post from dryer packaging under each of the 2 dryer back corners Stand the dryer up Slide the dryer on the corner posts until...

Page 8: ...eceptacle NEMA Type 10 30R Go to Power Supply Cord Connection 4 wire direct connection Go to Direct Wire Connection 3 wire direct connection Go to Direct Wire Connection NOTE If local codes do not permit connection of a cabinet ground conductor to neutral wire go to Optional 3 wire connection This connection may be used with either a power supply cord or a direct wire connection For direct wire in...

Page 9: ...strain relief screws at this point if your outlet looks like this Power supply cord 4 wire receptacle NEMA Type 14 30R Go to 4 Wire Power Supply Cord Connection on this page Power supply cord 3 wire receptacle NEMA Type 10 30R Go to 3 Wire Power Supply Cord Connection on page 10 4 Wire Power Supply Cord Connection IMPORTANT A 4 wire connection is required for mobile homes and where local codes do ...

Page 10: ...Connection Use where local codes permit connecting cabinet ground conductor to neutral wire 3 wire receptacle NEMA type 10 30R 3 prong plug Spade terminals with upturned ends 10 Ring terminals Remove center terminal block screw B Connect neutral wire Connect neutral wire white or center C of power supply cord under center terminal block screw B Tighten screw Connect remaining wires Connect remaini...

Page 11: ...wire cable must have 5 ft 1 52 m of extra length so dryer may be moved if needed Strip 5 127 mm of outer covering from end of cable leaving bare ground wire at 5 127 mm Cut 11 2 38 mm from remaining 3 wires Strip insulation back 1 25 mm Shape ends of wires into hooks Attach direct wire cable to strain relief Put direct wire cable through the strain relief The strain relief should have a tight fit ...

Page 12: ... must have 5 ft 1 52 m of extra length so dryer may be moved if needed Strip 31 2 89 mm of outer covering from end of cable Strip insulation back 1 25 mm If using 3 wire cable with ground wire cut bare wire even with outer covering Shape wire ends into hooks Remove center screw Remove center terminal block screw B Connect neutral wire Place hooked ends of remaining direct wire cable wires under ou...

Page 13: ..._ B Install the correct strain relief for your electrical connection method as shown on page 9 or 11 Remove center terminal block screw B Remove neutral ground wire E from green external ground conductor screw A neutral wire Connect neutral ground wire E and neutral wire white or center wire C of power supply cord or cable under center terminal block screw B Tighten screw Connect remaining wires P...

Page 14: ... 73 4ft 2 4 m The length of flexible metal vent used must be included in the overall vent system design as shown in the Vent System Chart NOTE if using an existing vent system clean lint from entire length of the system and make sure exhaust hood is not plugged with lint Replace plastic or metal foil vents with rigid metal or flexible metal vents Review Vent System Chart and if necessary modify ex...

Page 15: ...t Do not use a plastic vent Do not use a metal foil vent Faimureto follow these instructions can result in death or fire If you prefer dryer may be converted to exhaust out right side left side or through bottom You must contact your local dealer to have dryer converted Over the top installation also available with one offset elbow Periscope installation Special provisions for mobile homes Exhaust...

Page 16: ...t will help achieve best drying performance NOTE Side and bottom exhaust installation have a 90 turn inside the dryer To determine maximum exhaust length add one 90 turn to the chart Vent System Chart Number of Type Bo_JIouvered Angled 90 elbows of vent hoods hoods Rigid metal 64 ft 20 m 58 ft 17 7 m Rigid metal 54 ft 16 5 m 48 ft 14 6 m 2 Rigidmetal 44 ft 13 4m 38 ft 11 6m 3 Rigid metal 35 ft 10 ...

Page 17: ...the Y connector to the cold water faucet See figure A If Y connector cannot be attached directly to the cold water faucet the short hose must be used See figure B Attach short hose to cold water faucet Screw on coupling by hand until it is seated on faucet Then attach Y connector to male end of the short hose Screw on coupling by hand until it is seated on connector Using pliers tighten the coupli...

Page 18: ...Turn on cold water faucet Using a 4 102 mm clamp connect vent to exhaust outlet in dryer If connecting to existing vent make sure vent is clean Dryer vent must fit over dryer exhaust outlet and inside exhaust hood Check that vent is secured to exhaust hood with a 4 102 mm clamp 2 Move dryer to final location Move dryer to final location taking care not to crush or kink vent After dryer is in place...

Page 19: ...a hard water area use of a water softener is recommended to control the buildup of scale through the water system in the dryer Over time the buildup of lime scale may clog different parts of the water system which will reduce product performance Excessive scale buildup may lead to the need for certain part replacement or repair _ Select a Time Dry heated cycle and start dryer Do not select Air Onl...

Page 20: ...KING WASHER _D DRYER If you prefer to stack your washer and dryer A stack kit Part Number 8572546 is available to order For further information see Assistance or Service section in your Use and Care Guide TROUBLESHOOTING See your Use and Care Guide or visit our website and reference Frequently Asked Questions to possibly avoid the cost of a service call W10385103A W10385104A SP 2011 All rights res...

Page 21: ...tion 11 VENTING 14 Venting Requirements 14 Plan Vent System 15 Venting Kits 15 Install Vent System 16 CONNECT iNLET HOSE 17 CONNECT VENT 18 LEVEL DRYER 19 COMPLETE iNSTALLATiON CHECKLIST 19 DOOR REVERSAL KIT OPTIONAL 20 STACKING WASHER AND DRYER OPTIONAL 20 TROUBLESHOOTING 20 Para una version de estas instrucciones en espa_ol visite www Whirlpool com iNSTALLATiON NOTES Date of purchase Date of ins...

Page 22: ...e the chance of injury and tell you what can happen if the instructions are not followed WARNING i ofFi Clothes dryer installation must be performed by a qualified installer install the clothes dryer according to the manufacturer s instructions and local codes Do not install a clothes dryer with flexible plastic venting materials or fle ible metal foil type duct if flexible metal duct is installed...

Page 23: ... UL listed 30 amp power supply cord rated 120 240 volt minimum The cord should be type SRD or SRDT and be at least 4 ft 1 22 m long The wires that connect to the dryer must end in ring terminals or spade terminals with upturned ends A UL listed strain relief 1 4 and 5 16 nut driver recommended Adjustable wrench that opens to 1 25 mm or hex head socket wrench Parts supplied Parts package is located...

Page 24: ... mm above floor If using a pedestal you will need 18 460 mm to bottom of dryer The dryer must not be installed or stored in an area where it will be exposed to water and or weather IMPORTANT Do not operate install or store dryer where it will be exposed to water weather or at temperatures below 40 F 4 C Lower temperatures may cause dryer not to shut off at end of automatic sensor cycles resulting ...

Page 25: ... 155 cm_ Closet Installation stacked washer and dryer Cabinet installation dryer only 7 I 178 ram 1 ml 25 ram 1 ml 25 ram Custom under counter installation dryer only o o i j oo 25 ram 1 ml 25 mini 39 rain 990 ram 5 I 127 rnrr_ 25 mm 78 1930 mm 48 in 2 310cm 2 24 in Mobile home Additional installation requirements This dryer is suitable for mobile home installations The installation must conform t...

Page 26: ...4 areas where local codes prohibit grounding through the neutral conductors If using a power supply cord Use a UL listed power supply cord kit marked for use with clothes dryers The kit should contain A UL listed 30 amp power supply cord rated 120 240 volt minimum The cord should be type SRD or SRDT and be at least 4 ft 1 22 m long The wires that connect to the dryer must end in ring terminals or ...

Page 27: ...k edge of dryer Firmly grasp dryer body not console panel and gently lay dryer down on cardboard Examine leveling legs find diamond marking Screw legs into leg holes by hand use a wrench to finish turning legs until diamond marking is no longer visible Place a carton corner post from dryer packaging under each of the 2 dryer back corners Stand the dryer up Slide the dryer on the corner posts until...

Page 28: ...eceptacle NEMA Type 10 30R Go to Power Supply Cord Connection 4 wire direct connection Go to Direct Wire Connection 3 wire direct connection Go to Direct Wire Connection NOTE If local codes do not permit connection of a cabinet ground conductor to neutral wire go to Optional 3 wire connection This connection may be used with either a power supply cord or a direct wire connection For direct wire in...

Page 29: ...strain relief screws at this point if your outlet looks like this Power supply cord 4 wire receptacle NEMA Type 14 30R Go to 4 Wire Power Supply Cord Connection on this page Power supply cord 3 wire receptacle NEMA Type 10 30R Go to 3 Wire Power Supply Cord Connection on page 10 4 Wire Power Supply Cord Connection IMPORTANT A 4 wire connection is required for mobile homes and where local codes do ...

Page 30: ...Connection Use where local codes permit connecting cabinet ground conductor to neutral wire 3 wire receptacle NEMA type 10 30R 3 prong plug Spade terminals with upturned ends 10 Ring terminals Remove center terminal block screw B Connect neutral wire Connect neutral wire white or center C of power supply cord under center terminal block screw B Tighten screw Connect remaining wires Connect remaini...

Page 31: ...wire cable must have 5 ft 1 52 m of extra length so dryer may be moved if needed Strip 5 127 mm of outer covering from end of cable leaving bare ground wire at 5 127 mm Cut 11 2 38 mm from remaining 3 wires Strip insulation back 1 25 mm Shape ends of wires into hooks Attach direct wire cable to strain relief Put direct wire cable through the strain relief The strain relief should have a tight fit ...

Page 32: ... must have 5 ft 1 52 m of extra length so dryer may be moved if needed Strip 31 2 89 mm of outer covering from end of cable Strip insulation back 1 25 mm If using 3 wire cable with ground wire cut bare wire even with outer covering Shape wire ends into hooks Remove center screw Remove center terminal block screw B Connect neutral wire Place hooked ends of remaining direct wire cable wires under ou...

Page 33: ..._ B Install the correct strain relief for your electrical connection method as shown on page 9 or 11 Remove center terminal block screw B Remove neutral ground wire E from green external ground conductor screw A neutral wire Connect neutral ground wire E and neutral wire white or center wire C of power supply cord or cable under center terminal block screw B Tighten screw Connect remaining wires P...

Page 34: ... 73 4ft 2 4 m The length of flexible metal vent used must be included in the overall vent system design as shown in the Vent System Chart NOTE if using an existing vent system clean lint from entire length of the system and make sure exhaust hood is not plugged with lint Replace plastic or metal foil vents with rigid metal or flexible metal vents Review Vent System Chart and if necessary modify ex...

Page 35: ...t Do not use a plastic vent Do not use a metal foil vent Faimureto follow these instructions can result in death or fire If you prefer dryer may be converted to exhaust out right side left side or through bottom You must contact your local dealer to have dryer converted Over the top installation also available with one offset elbow Periscope installation Special provisions for mobile homes Exhaust...

Page 36: ...t will help achieve best drying performance NOTE Side and bottom exhaust installation have a 90 turn inside the dryer To determine maximum exhaust length add one 90 turn to the chart Vent System Chart Number of Type Bo_JIouvered Angled 90 elbows of vent hoods hoods Rigid metal 64 ft 20 m 58 ft 17 7 m Rigid metal 54 ft 16 5 m 48 ft 14 6 m 2 Rigidmetal 44 ft 13 4m 38 ft 11 6m 3 Rigid metal 35 ft 10 ...

Page 37: ...the Y connector to the cold water faucet See figure A If Y connector cannot be attached directly to the cold water faucet the short hose must be used See figure B Attach short hose to cold water faucet Screw on coupling by hand until it is seated on faucet Then attach Y connector to male end of the short hose Screw on coupling by hand until it is seated on connector Using pliers tighten the coupli...

Page 38: ...Turn on cold water faucet Using a 4 102 mm clamp connect vent to exhaust outlet in dryer If connecting to existing vent make sure vent is clean Dryer vent must fit over dryer exhaust outlet and inside exhaust hood Check that vent is secured to exhaust hood with a 4 102 mm clamp 2 Move dryer to final location Move dryer to final location taking care not to crush or kink vent After dryer is in place...

Page 39: ...a hard water area use of a water softener is recommended to control the buildup of scale through the water system in the dryer Over time the buildup of lime scale may clog different parts of the water system which will reduce product performance Excessive scale buildup may lead to the need for certain part replacement or repair _ Select a Time Dry heated cycle and start dryer Do not select Air Onl...

Page 40: ...KING WASHER _D DRYER If you prefer to stack your washer and dryer A stack kit Part Number 8572546 is available to order For further information see Assistance or Service section in your Use and Care Guide TROUBLESHOOTING See your Use and Care Guide or visit our website and reference Frequently Asked Questions to possibly avoid the cost of a service call W10385103A W10385104A SP 2011 All rights res...

Reviews: