background image

4

Installation of new washer/dryer

1.

  Unpack the washer/dryer and move close to the intended 

installation location.

1. 

  Unplug the power supply cord or disconnect wiring if dryer is 

direct wired.

2.

   Pull the dryer away from the wall enough to loosen the vent 

clamp. Loosen the clamp and gently remove the exhaust vent 

from the dryer exhaust outlet.

 3.

   Pull the dryer away from the wall so that you will have enough 

space for the installation. 

uninstalling your electric dryer

uninstalling your gas dryer

1.

  Unplug the power supply cord.

2.

  Turn off the gas supply.

3.

   Pull the dryer away from the wall enough to loosen the vent 

clamp. Loosen the clamp and gently remove the exhaust vent 

from the dryer exhaust outlet.

4.

   Disconnect the flexible gas supply line from the dryer. Put a 

piece of tape over the open ends of the gas line connection  

fittings.

5.

   Pull the dryer away from the wall so that you will have enough 

space for the installation. 

INSTALLING THE PEDESTAL

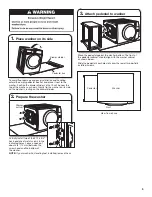
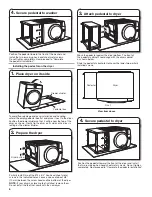
Installing the pedestal on the washer

Confirm transport bolts are in place

Locate the transport bolts on rear of washer. Transport bolts 

must remain in washer before pedestal can be installed. For 

more information on transport bolts see, “Remove Transport 

System” in washer Use and Care Guide.

Summary of Contents for XHPC155XW

Page 1: ...9 INSTRUCTIONS D INSTALLATION 10 Avant l installation du pi destal 11 Installation du pi destal 12 ACHEVER L INSTALLATION 15 INSTALLATION NOTES Date of purchase __________________________________ Dat...

Page 2: ...t pliers Bucket INSTALLATION REQUIREMENTS LOCATION REQUIREMENTS NOTE If the washer dryer and pedestal assembly are located in a garage 3 76 mm must be added under the pedestal so that the washer dryer...

Page 3: ...drawer as far as possible and remove the contents The package contains four 12 x 3 4 hex head sheet metal screws and a drawer divider IMPORTANT Set the pedestal box aside for use during installation H...

Page 4: ...y cord 2 Turn off the gas supply 3 Pull the dryer away from the wall enough to loosen the vent clamp Loosen the clamp and gently remove the exhaust vent from the dryer exhaust outlet 4 Disconnect the...

Page 5: ...ge and ease installation and handling unfold the empty pedestal box flat and place it next to the washer Position the drawer divider so that it will be near the top of the washer as shown Gently tip t...

Page 6: ...crew head and the bottom of the dryer NOTE If your dryer has leveling feet installed remove them Do not install the feet that came with the new dryer Installing the pedestal on the dryer 3 Attach pede...

Page 7: ...e washer dryer upright 1 Move close to final location Tip the washer dryer back to its upright position Remove any remaining packaging material Set the pedestal box aside for use if installing another...

Page 8: ...inside the pedestal and use a 1 4 hex head ratchet or open end wrench to adjust the feet up or down as needed to level the washer dryer NOTE Make sure all four pedestal feet are in solid contact with...

Page 9: ...uter 3 76 mm en dessous du pi destal pour que l ensemble de laveuse s cheuse soit 18 458 mm au dessus du plancher du garage Outillage et pi ces Rassembler les outlis et pi ces n cessaires avant de com...

Page 10: ...r pendant l installation Hex head screw Drawer slide 3 Retirer le tiroir du pi destal l aide d un tourne crou de 1 4 retirer les vis t te hexagonale des deux glissi res de tiroir et conserver les vis...

Page 11: ...d endommager la laveuse les boulons de transport l arri re de l appareil doivent tre en place avant l installation du pi destal Pour plus d informations concernant les boulons de transport voir limina...

Page 12: ...iliter l installation et la manipulation d plier et aplatir la bo te du pi destal et la placer proximit de la laveuse Positionner la cloison de tiroir de fa on ce qu elle se trouve proximit du dessus...

Page 13: ...lacer la s cheuse sur le c t Bo te du pi destal Cloison de tiroir Pour viter d endommager le plancher et pour faciliter l installation et la manipulation d plier et aplatir la bo te du pi destal et la...

Page 14: ...t Passer maintenant Achever l installation du pi destal 3 Fixation du pi destal la s cheuse Placer le pi destal contre le fond de la s cheuse L avant de la caisse du pi destal doit tre align avec la c...

Page 15: ...la laveuse s cheuse n est pas d aplomb relever ou abaisser les pieds du pi destal recommencer si n cessaire Pas d aplomb D aplomb Pas d aplomb 3 Ajuster les pieds du pi destal Ins rer les vis de t te...

Page 16: ...ll rights reserved Tous droits r serv s 12 2010 Printed in U S A Imprim aux U WHIRLPOOL is a trademark of Whirlpool U S A WHIRLPOOL est une marque de commerce de Whirpool U S A Hex head screw Drawer s...

Reviews: