6
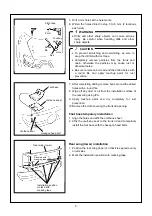
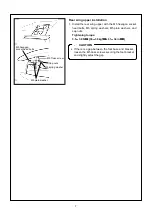
3. Secure the rear wing (lower) with masking tape.
4. Install the foot base with the hexagon head bolts.
Tightening torque
:
:
:
:
6.8
−
−
−
−
9.8N
・
・・
・
m {70
−
−
−
−
99 kgf
・
・・
・
cm, 61
−
−
−
−
86 in
・
・・
・
lbf}
5. Remove the masking tape securing the rear wing and
remove the rear wing (lower).
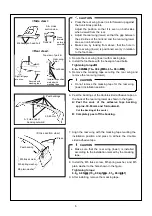
6. Peel the backings of the double-sided adhesive tape on
the back of the rear wing lower as shown in the figure.
A: Peel the ends of the adhesive tape backing
approx. 50-60 mm and fold outward.
Cut the backing at the center.
B: Completely peel off the backing.
7. Align the rear wing with the masking tape marking the
installation position and press to adhere the double-
sided adhesive tape.
8. Install the M5 truss screw, M5 spring washer, and M5
plain washer to the hole shown in the figure.
Tightening torque:
6.8
−
−
−
−
9.8 N
・
・・
・
m {70
−
−
−
−
99 kgf
・
・・
・
cm, 61
−
−
−
−
86 in
・
・・
・
lbf}
9. After installing, remove the masking tape.
•
Do not remove the masking tape for the rear wing
(lower) installation position.
CAUTION
•
Press the rear wing (lower) as far forward up against
the trunk lid as possible.
Adjust the position so that it is even on both sides
when viewed from the rear.
•
Adjust the rear wing (lower) so that the gap between
the side lines of the trunk lid and the rear wing lower
are even on both sides.
•
Make sure, by looking from above, that the hole in
the rear wing (lower) is positioned evenly in relation
to the foot base.
CAUTION
A: Fold ends of
backing outward.
B: Peel backings.
50-60 mm
•
Make sure that the rear wing (lower) is installed
according to the installation marked by the masking
tape.
CAUTION
A
A
<Side view>
Press
forward
as far as
possible
.
Trunk lid
M6 hexagon head bolt
<Rear view>
Rear wing
lower
Installation position
marked with
masking tape
Secured with
masking tape
Foot base
A-A cross
section view
Top view of part B
Right/left gaps
are even
<Cross section view>
Press
M5 truss screw
Peel backing
M5 spring washer
M5 plain washer


